Build Your Own ASP.NET 3.5 Website Using C# & VB (30 page)
Read Build Your Own ASP.NET 3.5 Website Using C# & VB Online
Authors: Cristian Darie,Zak Ruvalcaba,Wyatt Barnett
Tags: #C♯ (Computer program language), #Active server pages, #Programming Languages, #C#, #Web Page Design, #Computers, #Web site development, #internet programming, #General, #C? (Computer program language), #Internet, #Visual BASIC, #Microsoft Visual BASIC, #Application Development, #Microsoft .NET Framework

Introducing the Dorknozzle Project
While most books give you a series of simple, isolated examples to illustrate particular techniques, this book is a little different. Most of the examples provided in these pages will see us working on a single project: an intranet application for a
fictional company called Dorknozzle. We’ll build on this application as we move
through the remaining chapters of this book—the Dorknozzle intranet will give us
a chance to investigate and grasp the many different concepts that are important to
developers of any type of web application.
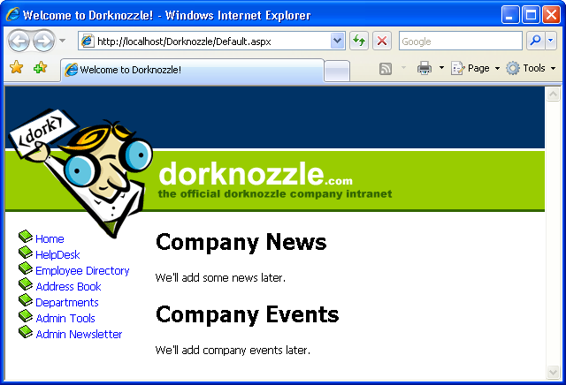
Now, real-world web development projects are built according to a detailed specification document which, among other information, includes specific details of the site’s layout. We’ll assume that the pages in the Dorknozzle intranet will be laid out
as shown in
Figure 5.1.
The menu on the left suggests that the site will have more pages than this homepage.
They’ll all have the same structure: the menu will sit on the left, and the header
will be identical to the one shown here. Only the contents of each individual page
will be different from the others. (If you paid attention in Chapter 4
, you’ll already have realized that this is a scenario in which it makes sense to use master pages.)
The intranet application we’ll develop will offer the following functionality:
homepage
You can customize this page by including news about the
Dorknozzle company.
help desk
This page allows Dorknozzle employees to report problems they experience with software, hardware, or their computers, as help desk tickets that are sent to an IT administrator.
employee directory
Employees will likely want to call each other to discuss
important, company-related affairs … such as last night’s
television viewing! The employee directory should let
Licensed to [email protected]

Building Web Applications
159
Figure 5.1. The Dorknozzle company intranet site
employees find other staff members’ details quickly and
easily.
address book
While the employee directory houses handy information
for staff use, the purpose of the address book is to provide
more detailed information about every employee within
the company.
departments
The Departments page displays information about
Dorknozzle’s various departments.
admin tools
Administrators will need the ability to perform various
administrative tasks, such as updating users’ information.
The Admin Tools section will provide the interface for
these kinds of interactions.
admin newsletter
This page will allow administrators to send email newsletters to the company employees.
You’ll learn new techniques when building each of these pages. However, before
you can begin to create all these smaller applications, we’ll need to build the
framework that will act as a template for the site as a whole. You’ve already worked
Licensed to [email protected]

160
Build Your Own ASP.NET 3.5 Web Site Using C# & VB
with Visual Web Developer in the previous chapters, but we’ll quickly review its
features before moving on.
Using Visual Web Developer
We’ll start by creating the Dorknozzle project, which will be your working folder
for the exercises to come. Start Visual Web Developer, then Select
File
>
New Web
Site…
.
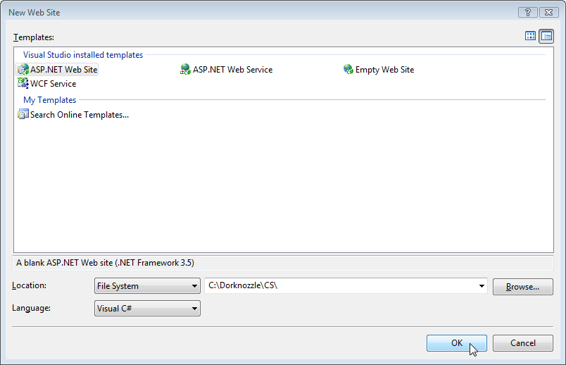
In the dialog that appears, which is shown in
Figure 5.2, select the
ASP.NET Web
Site
template, choose your preferred programming language in the
Language
box,
and identify the location at which the web site should be created—preferably
C:\Dorknozzle\VB
if you use VB or
C:\Dorknozzle\CS
if you use C#. Feel free to choose the language with which you feel most comfortable, and remember that you can
choose different languages for use in different files, so if you’re not sure which
language is your favorite just yet, don’t worry. It’s also okay to create two projects,
and work with both VB and C# at the same time: Visual Web Developer allows you
to run two instances of the application at the same time to facilitate this approach.
Figure 5.2. Creating the Dorknozzle web site project
Licensed to [email protected]


Building Web Applications
161
Choosing Your App’s Location
Remember that setting the
Location
drop-down menu to
File System
tells Visual
Web Developer to execute the project in that folder using its integrated web server.
You can create a new web project in IIS by changing the
Location
to
HTTP
. In that case, you’d need to specify an HTTP location for your application, such as
ht-
tp://localhost/Dorknozzle
, and IIS would take care of creating a physical
folder for you.
Meeting the Features
Once you click
OK
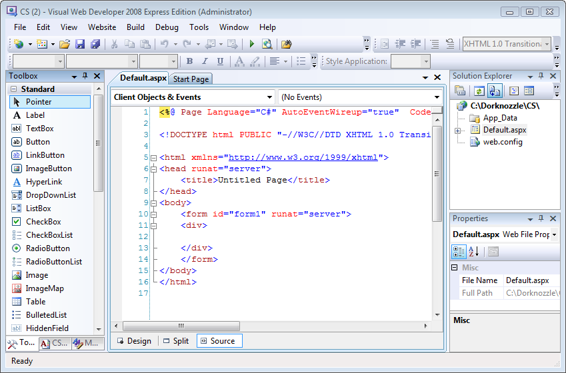
, your project will be created, along with a few default files, and
you’ll be presented with the first page of your project. It should look something like
Figure 5.3. Your new Dorknozzle web application
Don’t be daunted by the many forms and windows around your screen—each has
something to offer! Visual Web Developer is very flexible, so you can resize, relocate,
or regroup the interface elements that appear. We’ll spend the next few pages taking
a brief tour of these windows, though we’ll discover even more as we progress
through the chapters of this book.
Licensed to [email protected]

162
Build Your Own ASP.NET 3.5 Web Site Using C# & VB
The Solution Explorer
The Solution Explorer, whose default location is the upper right-hand part of the
Visual Web Developer window, provides the main view of your project, and displays
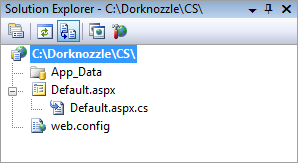
the files of which your project is composed. As
Figure 5.4 shows, the root node is
the location of your project; beneath the root node you can see that Visual Web
Developer has already created other elements for you.
Figure 5.4. The Solution Explorer
The files that are created for you will differ depending on the type of project you’re
working on, and the language you’ve chosen.
Let’
s investigate the functions of the three child nodes shown in Figure 5.4
:
■
App_Data
is a special folder that ASP.NET uses to store database files. You’ll
learn more about this folder in
Chapter 13.
■
Default.aspx
is the default web form that Visual Web Developer creates for you.
If you look closely, you’ll see that you can expand the
Default.aspx
node by
clicking the
+
sign to its left. If you expand the node, you’ll find a code-behind
file named
Default.aspx.vb
, or
Default.aspx.cs
, depending on the language you selected when you started the project. Visual Web Developer can work with web forms that use a code-behind file, as well as with those that don’t.
■
Web.config
is your web application’s configuration file. By editing
Web.config
, you can set numerous predefined configuration options for your project (for instance, you can enable debug mode). You can also define your own custom project-wide settings that can then be read from your code (such as the administrator’s email address, the project name, your favorite color, or any other simple value you’d like to store in a central place). We’ll come back to this file later in
the chapter.
Licensed to [email protected]
Building Web Applications
163
An icon sits beside each node, reflecting its type. If you right-click on each node, a
