Canning and Preserving For Dummies (9 page)
Read Canning and Preserving For Dummies Online
Authors: Amelia Jeanroy

 If you don’t know the elevation of your city, check with your city offices, your public library, or your state or county cooperative extension service listed in your local telephone directory. Or check out
http://national4-hheadquarters.gov/extension/index.html
on the Internet. Just enter your city and state in the box at the bottom of the page, click Submit, and scroll down to find the elevation of your city.
Detecting Spoiled Foods
No one can’t promise you that your home-canned foods will always be free from spoilage, but you can rest assured that your chances for spoiled food are greatly reduced when you follow the precise guidelines for each preserving method. If you suspect, for any reason, that your food is spoiled or just isn’t right, don’t taste it. Also, just because your food doesn’t look spoiled, doesn’t mean that it’s not.
The best way to detect food spoilage is by visually examining your jars. Review the following checklist. If you can answer “true” for each of the following statements, your food should be safe for eating:
The food in the jar is covered with liquid, is fully packed, and has maintained the proper headspace.
The food in the jar is free from moving air bubbles.
The jars have good, tight seals.
The food has maintained a uniform color.
The food isn’t broken or mushy.
The liquid in the jar is clear, not cloudy, and free of sediment.
After your food has passed the previous checklist, examine your jars more closely. If you discover any spoilage during any step of this process, don’t continue your search, but properly dispose of your product.
1. Hold the jar at eye level.
2. Turn and rotate the jar, looking for any seepage or oozing from under the lid that indicates a broken seal.
3. Examine the food surface for any streaks of dried food originating at the top of the jar.
4. Check the contents for any rising air bubbles or unnatural color.
The food and liquid should be clear, not cloudy.
5. Open the jar.
There shouldn’t be any spurting liquid.
6. Smell the contents of the jar.
Take note of any unnatural or unusual odors.
7. Look for any cottonlike growth, usually white, blue, black, or green, on the top of your food surface or on the underside of the lid.
 Spoiled low-acid food may exhibit little or no visual evidence of spoilage. Treat any jars that are suspect as if they contained botulism toxins. Follow the detailed instructions for responsibly disposing of spoiled, low-acid food in Chapter 9. Never use or taste any canned food that exhibits signs of spoilage or that you suspect is spoiled.
 Removing the screw bands from your cooled, sealed jars before storing them allows you to easily detect any broken seals or food oozing out from under the lid that indicates spoilage.
Part II
Water-bath Canning

In this part . . .
This part tells you all you need to know about the most popular method of canning: water-bath canning. Some of the products, like jam, jelly, marmalade, relish, and salsa may be familiar to you, while others, like chutney, conserves, and pickled vegetables, may be new. Packed with easy-to-follow instructions for canning a wide variety of fruits, jellies, and more, this part sends you well on your way to a pantry stocked with healthy and delicious items.
Chapter 4
Come On In, the Water’s Fine! Water-bath Canning
In This Chapter
Discovering water-bath canning
Recognizing high-acid foods
Stepping up to high-altitude canning
Knowing the proper processing procedures
With water-bath canning you essentially use a special kettle to boil filled jars for a certain amount of time. Common foods for water-bath canning include fruits and tomatoes, as well as jams, jellies, marmalades, chutneys, relishes, pickled vegetables, and other condiments.
You’re probably wondering whether water-bath canning is safe for canning food at home. Rest assured: The answer is a most definite “Yes!” — provided that you follow the instructions and guidelines for safe canning.
In this chapter, you discover which foods are safely processed in a water-bath canner and step-by-step instructions for completing the canning process. In no time, you’ll be turning out sparkling jars full of homemade delicacies to dazzle and satisfy your family and friends.
Water-bath Canning in a Nutshell
Water-bath canning,
sometimes referred to as the
boiling-water method,
is the simplest and easiest method for preserving high-acid food, primarily fruit, tomatoes, and pickled vegetables.
To water-bath can, you place your prepared jars in the a
water-bath canner,
a kettle especially designed for this canning method (see the section “Key equipment for water-bath canning” for more on the canner and other necessary equipment); bring the water to a boil; and then maintain that boil for a certain number of minutes, determined by the type of food and the size of the jar. Keeping the water boiling in your jar-filled kettle throughout the processing period maintains a water temperature of 212 degrees. This constant temperature is critical for destroying mold, yeast, enzymes, and bacteria that occur in high-acid foods.
Water-bath canning is one of the two recommended methods for safely home-canning food (the other method is pressure canning, covered in Chapter 9). Although each processing method uses different equipment and techniques, the goal is the same: to destroy any active bacteria and microorganisms in your food, making it safe for consumption at a later time. This is accomplished by raising the temperature of the food in the jars and creating a vacuum seal.
Water-bath canning and pressure-canning methods aren’t interchangeable because the temperature of a water bath only reaches 212 degrees while the temperature of a pressure canner reaches 240 degrees, the temperature necessary to safely process low-acid foods. For more on pressure canning, go to Chapter 9.
Foods you can safely water-bath can
You can safely water-bath can only high-acid foods — those with a pH factor (the measure of acidity) of 4.6 or lower. So just what is a high-acid food? Either of the following:
Foods that are naturally high in acid:
These foods include most fruits.
Low-acid foods that you add acid to, thus converting them into a high-acid food.
Pickled vegetables
fall into this category, making them safe for water-bath canning. You may change the acid level in low-acid foods by adding an acid, such as vinegar, lemon juice, or
citric acid,
a white powder extracted from the juice of acidic fruits such as lemons, limes, or pineapples. Some examples of altered low-acid foods are pickles made from cucumbers, relish made from zucchini or summer squash, and green beans flavored with dill. Today, tomatoes tend to fall into this category. They can be water-bath canned, but for safety’s sake you add a form of acid to them.
If your recipe doesn’t tell you which processing method (water-bath canning or pressure canning) is appropriate for your food, don’t guess. Instead, use litmus paper to test the pH level of your food (see Chapter 3). If your food has a pH of 4.6 or lower, use the water-bath canning method; if it has a pH of 4.7 or higher, use the pressure-canning method.
Key equipment for water-bath canning
Just as you wouldn’t alter the ingredients in a recipe or skip a step in the canning process, you don’t want to use the wrong equipment when you’re home-canning. This equipment allows you to handle and process your filled jars safely.
The equipment for water-bath canning is less expensive than the equipment for pressure canning (check out Chapter 9 to see what equipment pressure canning requires). Water-bath canning kettles cost anywhere from $25 to $45. In some instances, you may purchase a “starter kit” that includes the canning kettle, the jar rack, a jar lifter, a wide-mouth funnel, and jars for about $50 to $60. (If you don’t have a supplier near you, check out Chapter 22.)
Following is a list of the equipment you must have on hand, no exceptions or substitutions, for safe and successful water-bath canning:
A water-bath canner:
The water-bath canner consists of a large kettle, usually made of porcelain-coated steel or aluminum, that holds a maximum of 21 to 22 quarts of water, has a fitted lid, and uses a rack (see the next item) to hold the jars (see Figure 4-1). Do not substitute a large stock pot for a water-bath canner. It is important for the jars to be sitting off the bottom of the canner, and there are racks that fit this purpose, included in your canner kit.
 Although aluminum is a
reactive metal
(a metal
that transfers flavor to food coming in direct contact with it), it’s permitted for a water-bath canner because your sealed jar protects the food from directly touching the aluminum.
Figure 4-1:
A water-bath canning kettle with the rack hanging on the edge of the kettle.
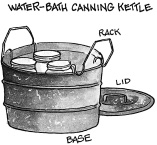
A jar rack:
The jar rack for a water-bath canner is usually made of stainless steel and rests on the bottom of your canning kettle. It keeps your jars from touching the bottom of the kettle, or each other, while holding the filled jars upright during the water-bath processing period. The rack has lifting handles for hanging it on the inside edge of your canning kettle (refer to Figure 4-1), allowing you to safely transfer your filled jars into and out of your kettle.
Canning jars:
Canning jars are the only jars recommended for home-canning. Use the jar size recommended in your recipe. For more on canning jars, refer to Chapter 2.
Two-piece caps (lids and screw bands):
These lids and screw bands, explained in detail in Chapter 2, create a vacuum seal after the water-bath processing period, preserving the contents of the jar for use at a later time. This seal protects your food from the reentry of microorganisms.
The older-style rubber rings are no longer recommended. Although they are sometimes still available secondhand, the seal is no longer dependable enough to result in a safe product. You can find these rubber rings in some specialty canning stores; however, due to their novelty, they are very expensive and sold in small quantities. Reserve this type of canning jar and kitschy design for your fun food gifts, not canning for a family’s pantry.
In addition to the must-have items listed in the preceding, you may also want the following things. These items aren’t critical to the outcome of your product, but you’ll discover a more streamlined, efficient level of work if you use them (you can find out more about these and other helpful but not necessary tools in Chapter 2):