Chinese Brush Painting (18 page)
Read Chinese Brush Painting Online
Authors: Caroline Self,Susan Self


4.
Wash the brush, dip it in clean water, and run a line of clear water on each side of the dragged line so some of the color oozes out and makes a soft edge. Do this several times, trying to make it look like a tree trunk.
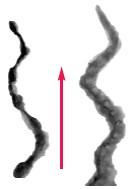
Zigzag and Wet Method

1.
Load the large brush with dark paint and hold your hand in position #1.
2.
Make a zigzag line up the page moving to the right and then to the left to make a crooked tree.
3.
Quickly add water to the brush and run a line along the right side of the zigzag.
4.
Wash the brush and add clean water to the other side of the zigzag.
5.
This should make a crooked trunk with dark and light areas. Where it is light, use the small brush and dark paint and outline circles to represent scales on the bark areas.
Graded Zigzag Method
1.
Load the large brush with dark paint, blot off the tip on a paper towel, and add water to the tip.

2.
Rotate your hand to the right into position #2, lay the brush down on the paper, and push the brush to the left and then back to the center as you move upward slightly to the right. This action makes a zigzag across the page with a line that is light on the left side and darker on the right side.
3.
Lift the brush slightly as you move your arm up the page so the trunk will get narrower, and end with a lift to make a tip.
Go back and try all of these ways to make a pine tree trunk. Remember that this is a painting, and your trunk may not look like a pine tree trunk you see out the window. Decide which way you prefer to paint your trunk, and then paint it that way.
Painting Pine Needle Wheels
The pine needle wheel is painted with a center dot to which all the needle strokes go.
1.
Load the brush with a very dark paint. Roll the hairs back and forth to make a fine point.
2.
Use position #1 and make a dot. This will be the center of the wheel.
3.
Directly above the dot, make a vertical stroke down to the dot. This is a pine needle.

4.
Touching the paper lightly and swinging your arm at an even pace, move around the dot from the left to the far right, making strokes towards the dot in the middle. This is the top wheel of needles.

5.
Below it and slightly to the left, make a dot for the next wheel center.
6.
Stroke the brush from the left side to the dot, and continue around the half-circle, ending the wheel on the far right.
Principles of Pine
Needle Wheels
A cluster usually contains 5, 7, or 9 wheels.
Try to keep your arm pressure on the paper the same so the strokes will be even.
Make a row of dots gradually moving down the page. Paint the strokes to each dot. The strokes will overlap slightly as the wheels slope to the right and downward.
Plan where the dots will go to make the next diagonal line under the top row. This should make a cluster sloping downward.
Clusters at the bottom of the tree are larger and have more wheels. The ones towards the top of the tree are smaller.
Practice making the wheels slope left and right.
Other books
Monster Gauntlet by Paul Emil
The Killing Season by Meg Collett
Never Glue Your Friends to Chairs by Katherine Applegate
Somebody's Angel (#5 in a Military Romance / BDSM Romance series) (Rescue Me) by Masters, Kallypso
Garcia's Heart by Liam Durcan
Race Against Time by Piers Anthony
Jaydium by Deborah J. Ross
Time Clock Hero by Donovan, Spikes
The Little Hotel by Christina Stead
DoingLogan by Rhian Cahill
