Extra Virgin (31 page)
Authors: Gabriele Corcos

1½ pounds eye of round, trimmed of fat and sinew, chilled for 10 minutes in the freezer
Extra virgin olive oil, for drizzling
Pizza Dough
, formed into 4 (13-inch) discs, at room temperature
Sea salt and freshly ground black pepper
Leaves from 3 sprigs fresh rosemary
4 ounces baby arugula
5 lemons, each cut into 8 wedges
Place a pizza stone in the oven and preheat to 500ºF for 1 hour before baking. (Or preheat a wood-fired pizza oven to very hot, 4 hours before baking.)
One hour before baking, using a very sharp knife, thinly slice the beef against the grain, until you have about 40 slices. (You could also have a butcher do this for you, but you’d need to come home and prepare this immediately so it doesn’t discolor.) Place the carpaccio slices in 1 layer on wax paper and refrigerate until ready to use.
Drizzle olive oil on 1 disc of dough, season with salt and pepper to taste, and sprinkle one-fourth of the rosemary on top. Gently place the pizza on the pizza stone and bake for about 5 minutes, until golden with slight signs of charring. (If using a wood-fired oven, gently place the pizza on the oven floor, and bake for 3 minutes, or until golden and crisp.)
Remove the pizza from the oven, set aside to cool, and repeat with the remaining 3 pizza discs.
Transfer the pizzas to a cutting board, and slice each into 8 to 10 slices. Lay 1 or 2 slices of carpaccio over each slice, sprinkle with arugula, and serve with a lemon wedge.
IMPORTANTE!
If you’re hand-slicing the carpaccio yourself, supreme thinness is the key. But if your slices still aren’t thin enough, lay them flat on a board, cover with plastic wrap, and pound them lightly with a meat tenderizer (or wine bottle bottom) to flatten.
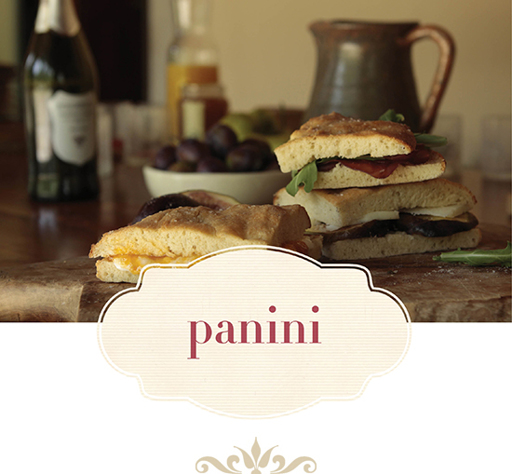
HEIRLOOM TOMATO AND MOZZARELLA SANDWICH WITH BASIL OIL
SPECK, PECORINO, AND GRILLED EGGPLANT SANDWICH
SOPPRESSATA AND MARINATED ARTICHOKE SANDWICH
PROSCIUTTO AND TALEGGIO SANDWICH WITH FIG PRESERVES

G:
In Italy,
sandwiches are the great portable food, a supremely fulfilling way to enjoy freshly baked bread and delicious ingredients in practically any setting: a picnic, a day at the beach, a ride into the countryside, or a lunch with friends in the backyard. With so many different kinds of cheeses, vegetables, and cold cuts, there’s a seemingly endless array of flavors for mixing and matching. My mother would even send us to school with a frittata between slices of bread! I loved it, because by mid-morning the frittata’s butteriness had soaked into the bread, which meant the outside was crispy, while the eggy filling was the right amount of soggy. For a kosher kid without a cured pig sandwich option, this was a highly enjoyable alternative.
Panini in Italy aren’t always grilled (as many Americans have come to assume from the popularity of the pressed kind), but what they should always be are delicious. It’s a point of pride for Italians who work in an office to head to the best local deli and order the freshly baked ciabatta spread with truffle-infused butter, layered with porcini mushrooms sautéed with mint, and topped with a few slices of speck. Or they grab a clean, simple, mortadella-and-bread combo—no extras—and wash it down with a glass of Moretti beer. (And there are probably hearty sandwich lovers who get both!) In Italy, a well-thought-out
panino
—never overstuffed but filled with the best ingredients—reflects your personality.
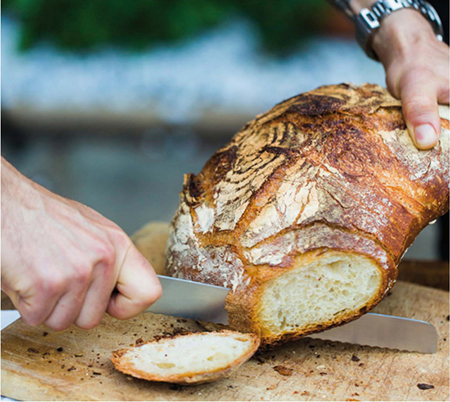
For me, a great
panino
often starts with bread I’ve made myself. Making bread gives meaning to my day. It means a beautiful loaf to have with dinner, followed by toast the next morning, then that mouthwatering
panino
for
lunch. If there’s any left over, I let it get stale to give heft to a soup or become croutons in a salad. That cycle goes straight to the essence of the joy I get from feeding my family. It’s a daily activity I wholeheartedly recommend mastering, because there are few household aromas as wonderful as a freshly baked loaf of bread reaching its full potential in your oven.
Deborah and our daughters can tell you how obsessed I became when I decided to master the process of baking bread. I tried every kind of flour, yeast, and dough hydration. Longer rising times, shorter rising times. Wetter dough, drier dough. I knew the taste I wanted: a very lightly salted loaf of rustic goodness, with a dark crust crunch that nicely offsets the pillowy consistency inside. But getting an Italian to spell out a recipe for me wasn’t so easy. I asked our local baker in Italy: “How do you make your bread?” The baker: “Some water, some flour, some yeast.” Me: “Um, proportions?” The baker: “What?” Later, me to my grandmother: “Nonna, how did you make bread when we were little?” Nonna: “Oh, some water, some flour, some yeast.” Me: [
Sigh
.]
Eventually I found inspiration from other bakers, but it was learning about the use of a heated cast iron pot as a de facto bread oven for the initial baking process that proved revelatory. I also hit upon a way to keep rising dough from temperature inconsistencies in the kitchen, like an open window, or a door that keeps opening and closing. One day I pulled my pizza stone out of the oven—I always keep it there—and noticed that it was slightly warmer than room temperature. I realized the oven light had been on the whole time, and had been gently heating up the oven. Guess where my dough rises now? In the oven, with the light on. The temperature will eventually reach anywhere between 70º and 75ºF (depending on the oven) and there won’t be any drafts to alter the rising time!
When you start making bread, also think about your schedule. When do you want it freshest? In the morning? Afternoon? Right before dinner? Once you have a good idea how long it takes to make your optimum bread, put yourself on a schedule to start the process so it’s ready when you want it. As I mentioned earlier, it helps keep me on schedule. I know when I have time to do all the other things in the day that need to get done: picking up the kids, running errands, arranging a meeting. In some ways, making bread is like having an extra baby in the house you have to take care of—it’ll bring out your nurturing side.
As for the finished product, farmers in Tuscany believe good bread needs to rest for a day, so the gluten can relax, the crust can achieve its ideal crunch, and the inside can reach a premium texture. It can be difficult to resist cutting into a warm loaf when that special aroma pervades the kitchen. But if you slide a knife through it, the dough might still be a little sticky inside and start compressing. Then you’ll be changing the shape of your bread before it’s had time to cool, get settled, and release some moisture. If you don’t want to wait until the next day, give it at least an extra 30 to 45 minutes of rest. If you wait overnight though, you can embrace the traditional saying in Tuscany about a farmer’s food calendar:
L’uovo di oggi, il pane di ieri, ed il vino dell’anno scorso
. “The egg from today, the bread from yesterday, and the wine from last year.”
Happy baking and panini-making!
BREAD STARTER
G:
The starter is a mixture of water, flour, and yeast that, when fermented, allows bread to rise. Though it’s popular to use an active dry yeast to kickstart the fermentation process, I like to rely on natural yeast that colonizes the water-flour mixture. It’s that extra poetic touch I like about breadmaking, in that you’re allowing the environment to create something. Since whole wheat flour, less refined than white, attracts more natural bacteria, I recommend using a flour mixture of 50 percent Italian 00 flour and 50 percent whole wheat flour when making a first starter. Once the starter is ready and healthy, I then feed it exclusively white flour. Remember, when starting from scratch, it takes anywhere from 1 week to 10 days to develop a starter, depending on factors such as the temperature of your kitchen. (The higher the temperature, the faster the fermentation.) Once you have your starter, as long as you keep it fed—and I’ve occasionally assigned starter-babysitting duties to Deborah if work takes me out of town—the ability to make bread will always be at your fingertips. Also, you’ll need a digital kitchen scale for weighing out your ingredients, as well as those in other baking recipes like
Chestnut Flour Cake
, so buy yourself an inexpensive one.
50 grams water, plus more for feeding the starter
50 grams whole wheat flour
All-purpose flour, for feeding the starter
In a 2-cup container, combine the water and whole wheat flour and stir well. Let it sit in a cool, shaded area of the kitchen for at least 2 days.
On the third day, discard 80 percent of the mixture and replenish with equal amounts of all-purpose flour and water. This is called “feeding.” (If beginning with more than 100 grams of flour and water, a good discarding rule is to save about 2 tablespoons of starter per 100-gram mixture.)
Feed the starter every day after that. By the fourth or fifth day, look for small air bubbles on the surface. At the end of each 24-hour cycle after that, the scent of the starter will change from its initial creamy, buttery overtones to distinctly vinegary, once the fermentation process has occurred.
By the end of the first week, with regular feeding at the same time each day, the starter will have reached an especially lively, predictable rhythm cycle of culture-forming and decay. Your adventures in bread making can begin!
Twelve hours before you plan to make bread dough—preferably the evening before creating a dough in the morning—discard 80 percent of the starter, replenish with 100 grams water and 100 grams all-purpose flour, and mix well. This will become the starter you use to make
Pane Toscano
.
IMPORTANTE!
Once a starter is alive and healthy, it can be frozen up to 3 months in a hard plastic container with a perforated lid. Once thawed at room temperature, the starter will need 2 to 3 days to get back into rising-and-feeding shape before you can bake with it.
TUSCAN BREAD
PANE TOSCANO
MAKES 1 LOAF
G:
Tuscan bread doesn’t have salt! Origin stories vary: One legend attributes it to how expensive salt became during the economically depressed Middle Ages. Another theory—which appeals to my fighting spirit as a Tuscan—involves the ancient rivalry between coastal Pisa and inland Florence, and how Pisa tried to punish Florentines by halting the transportation of salt from the shore. The Florentines decided that their food was so good, salt was superfluous.