Foundation Game Design with ActionScript 3.0, Second Edition (56 page)
Read Foundation Game Design with ActionScript 3.0, Second Edition Online
Authors: Rex van der Spuy

Figure 6-3.
The monster opens its mouth when the cat bumps into it.
Here's the program listing that makes this work. Notice that there are two different monster images that are being added to a single Sprite. Does that ring a bell? It should! (Hint: think buttons from
Chapter 3
!)
package
{
  import flash.display.Sprite;
  import flash.display.DisplayObject;
  import flash.events.KeyboardEvent;
  import flash.ui.Keyboard;
  import flash.events.Event;
  [SWF(width="550", height="400",
    backgroundColor="#FFFFFF", frameRate="60")]
  public class StateChange extends Sprite
  {

//Embed the character image
    [Embed(source="../images/character.png")]
    public var CharacterImage:Class;
    public var characterImage:DisplayObject = new CharacterImage();
    public var character:Sprite = new Sprite();

//Embed the monster images
    [Embed(source="../images/monsterNormal.png")]
    public var MonsterNormalImage:Class;
    public var monsterNormalImage:DisplayObject
      = new MonsterNormalImage();
    [Embed(source="../images/monsterScared.png")]
    public var MonsterScaredImage:Class;
    public var monsterScaredImage:DisplayObject
      = new MonsterScaredImage();
    public var monster:Sprite = new Sprite();

//Create and initialize the vx and vy variable
    public var vx:int = 0;
    public var vy:int = 0;
    public function StateChange()
    {
      createGameObjects();
      setupEventListeners();
    }
    public function createGameObjects():void
    {

//Compose the monster and add it to the stage
      monster.addChild(monsterNormalImage);
      monster.addChild(monsterScaredImage);
      monsterScaredImage.visible = false;
      stage.addChild(monster);
      monster.x = 125;
      monster.y = 150;

//Add the character to the stage
      character.addChild(characterImage);
      stage.addChild(character);
      character.x = 300;
      character.y = 150;
    }
    public function setupEventListeners():void
    {
      stage.addEventListener
        (KeyboardEvent.KEY_DOWN, keyDownHandler);
      stage.addEventListener
        (KeyboardEvent.KEY_UP, keyUpHandler);
      stage.addEventListener
        (Event.ENTER_FRAME, enterFrameHandler);
    }
    public function keyDownHandler(event:KeyboardEvent):void
    {
      if (event.keyCode == Keyboard.LEFT)
      {
        vx = -5;
      }
      else if (event.keyCode == Keyboard.RIGHT)
      {
        vx = 5;
      }
      else if (event.keyCode == Keyboard.UP)
      {
        vy = -5;
      }
      else if (event.keyCode == Keyboard.DOWN)
      {
        vy = 5;
      }
    }
    public function keyUpHandler(event:KeyboardEvent):void
    {
      if (event.keyCode == Keyboard.LEFT
        || event.keyCode == Keyboard.RIGHT)
      {
        vx = 0;
      }
      else if (event.keyCode == Keyboard.DOWN
        || event.keyCode == Keyboard.UP)
      {
        vy = 0;
      }
    }
    public function enterFrameHandler(event:Event):void
    {

//Move the player
      character.x += vx;
      character.y += vy;

//Collision detection
      if (character.hitTestObject(monster))
      {
        monsterScaredImage.visible = true;
        monsterNormalImage.visible = false;
      }
      else
      {
        monsterScaredImage.visible = false;
        monsterNormalImage.visible = true;
      }
    }
  }
}
The first thing that you'll notice is that two different monster images are embedded into the program: monsterNormal.png and monsterScared.png.
Figure 6-4
shows what these look like. They're exactly the same size'the only diffenence between them is the monster's mouth.
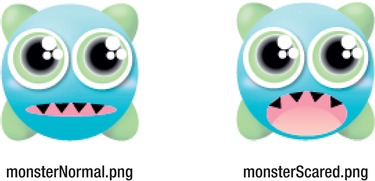
Figure 6-4.
The monster's two different states
Here's the code that embeds these images and creates the monster Sprite.
[Embed(source="../images/monsterNormal.png")]
public var MonsterNormalImage:Class;
public var monsterNormalImage:DisplayObject
  = new MonsterNormalImage();
[Embed(source="../images/monsterScared.png")]
public var MonsterScaredImage:Class;
public var monsterScaredImage:DisplayObject
  = new MonsterScaredImage();
public var monster:Sprite = new Sprite();
Notice also that, even though there are two images being created, there's only one monster Sprite. The key to this system is that
both images are added to that single Sprite
. However, only the monsterNormal image is visible when the program first starts. Here's the code that composes the monster Sprite from the two images:
monster.addChild(monsterNormalImage);
monster.addChild(monsterScaredImage);
monsterScaredImage.visible = false;
stage.addChild(monster);
The monsterScared image has its visible property set tofalseso that it's hidden. This is exactly the same technique you used to create different button states in
Chapter 3
. The monster Sprite contains the two different images that are perfectly aligned on top of each other, like stacked playing cards. But only one of these images will be visible at any one time. By selectively displaying one image or the other, you can make the monster change its appearance.
Any condition in the game that you choose can make the monster's appearance change. In this example, it happens when the two characters collide. Here's the if statement, usinghitTestObject, that makes this happen:
if (character.hitTestObject(monster))
{
  monsterScaredImage.visible = true;
  monsterNormalImage.visible = false;
}
else
{
  monsterScaredImage.visible = false;
  monsterNormalImage.visible = true;
}
The if statement hides one image or the other depending on whether or not the cat and monster are touching. It's an extremely simple but extremely useful effect.
You can use this same technique to make game objects with very complex states. Imagine that you have an object that contains 10 or 20 different images. You could selectively display these images depending on how events in your game are changing. This is the foundation for creating games with great complexity, and it's all based on this simple technique.
Many games use a
health meter
to determine when the game is over. When the game characters bump into bad things like monsters, the health meter gradually shrinks in size. When the health meter disappears, the game ends.
Implementing a health meter is very easy to do. It makes clever use of the width property. You'll find an example of a health meter in action in the HealthMeter project folder in the chapter's source files. Compile the program and you'll see the effect shown in
Figure 6-5
. When the game characters collide, the health meter decreases. When it's completely down to zero, “Game over” is displayed as a trace message.
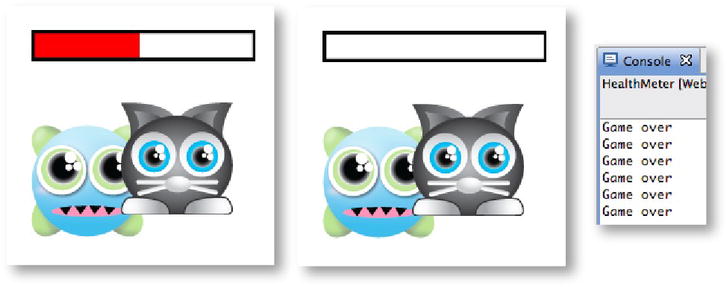
Figure 6-5.
Reduce a health meter when the objects collide.
The health meter is composed of two separate images: meterInside.png and meterOutside.png. They're both the same size and width (200 by 28 pixels).
Figure 6-6
shows what they look like.

Figure 6-6.
The two images that make up the health meter
Very importantly, the meterOutside PNG image is transparent on the inside. It's just a black frame. That means that whatever is behind it will show through.
The two images are combined together into one Sprite. This is the same concept you used to create themonsterobject with two states in the previous example. The only difference this time is that both images, the inside and outside components, are visible at the same time.
The code for most of this program is almost identical to the code for the previous two examples, so let's take a look at the differences. First, both images are embedded into the program.
[Embed(source="../images/meterInside.png")]
public var MeterInsideImage:Class;
public var meterInsideImage:DisplayObject
  = new MeterInsideImage();
[Embed(source="../images/meterOutside.png")]
public var MeterOutsideImage:Class;
public var meterOutsideImage:DisplayObject
  = new MeterOutsideImage();
public var meter:Sprite = new Sprite();
A single Sprite object, calledmeter, is going to be used to compose them together. This happens when the program initializes in thecreateGameObjectsmethod.
meter.addChild(meterInsideImage);
meter.addChild(meterOutsideImage);
stage.addChild(meter);
meter.x = 125;
meter.y = 65;
The outside image is added after the inside image so that it will sit overtop of it, neatly framing it.
TheenterFrameHandlercontains the collision code and displays the “Game over” message.
public function enterFrameHandler(event:Event):void
{
  //Move the player
  character.x += vx;
  character.y += vy;

//Collision detection

if (character.hitTestObject(monster))

{

if(meterInsideImage.width > 0)

{
meterInsideImage.width--;

}

}

if(meterInsideImage.width < 1)

{

trace("Game over");

}
}
The first if statement checks for a collision. If it finds one, it reduces the meter's width by 1 pixel every frame. But it also does one additional check. It only reduces the width of the meter if the width is greater than zero. That prevents the width from ever becoming negative, which would happen without this extra check.
if (character.hitTestObject(monster))
{
  if(meterInsideImage.width > 0)
  {
    meterInsideImage.width--;
  }
}
Preventing the meter's width from becoming negative is really not necessary in this simple example. But in a complex game program where you might have other code that's dependent on the value of the meter's width, your game could develop bugs if it wasn't expecting negative values.
This is the first time you've seen an if statement being used inside another if statement. It's called a
nested if statement
and is a very common programming structure. Nested if statements allow you to fine-tune the logic a bit to check for other conditions after the first condition has passed as true. (It's called a nested if statement because it's cozily tucked inside the first one, like an egg in a nest. If you turn this page on its side, I'm sure you can imagine a crow or magpie making a perfectly comfortable nest in the indentation created by the second if statement.)
TheenterFrameHandleralso displays a “Game over” trace message if it finds that the meter's width is less than 1 pixel.