French Classics Made Easy (51 page)
Read French Classics Made Easy Online
Authors: Richard Grausman

4.
Remove the eggs from the bowl, pour out the water, and dry the bowl. Crack the eggs into the bowl and beat with the sugar and vanilla until they triple in volume, 5 to 8 minutes. The batter should be very thick. It will fall slowly from the beaters and stand on the surface.
5.
Sift the flour one-third at a time onto the surface of the batter. Using a rubber/silicone spatula, fold the flour in gently. Fold no more than 10 to 12 times after each addition. After the last addition you may still see a small amount of flour; this will disappear when the butter is added.
6.
Fold approximately 1 cup of the batter into the creamy butter until well blended. Pour this mixture back into the remaining batter and fold gently no more than 10 to 12 times. The batter will begin to fall and you may see streaks of butter. A completely smooth batter is not necessary.
7.
Pour the batter into the prepared pan, filling it three-quarters full. Tap the filled pan firmly on a counter several times to make sure no large air bubbles have been trapped in the batter.
8.
Place the pan in the oven and bake for 25 to 35 minutes, until the cake begins to come away from the sides of the pan and is golden brown and springy to the touch.
9.
Unmold the cake onto a rack and allow it to cool, covered with the cake pan. (If not used immediately, the cake should be wrapped in plastic. It can be refrigerated for several days or frozen for up to 2 months.)
L
ES
G
ATEAUX:
Layer Cakes
Though the combinations of flavors, fillings, and icings in French cakes are infinite, there are a great number of cakes whose fillings and decorations are well defined. In fact, the name is often written on top of the cake, or the icing decoration will be so particular to that cake that when you see it in the pastry shop you know exactly what the inside will be like.
MASCOTTE PRALINEE:
Génoise layers filled with praline buttercream, coated with toasted almonds, and dusted with confectioners’ sugar.
LUTETIA:
Génoise layers filled with walnut buttercream and coated with apricot glaze. Walnut halves are embedded in the top and sides of the cake, and the cake is iced with chocolate fondant. It is decorated with a vanilla-flavored chestnut purée.
FINANCIER:
Génoise layers made from almonds and flour and baked with a layer of candied fruits in the batter. Topped with confectioners’ sugar.
REGENT:
Three génoise layers filled with buttercream or a thick chestnut purée, are coated with apricot jam, decorated with candied fruits, then frosted with rum fondant. The outlines of the fruits shows through the fondant.
CLUNY:
Génoise layers filled with pistachio and Benedictine buttercream, coated with apricot jam, and topped with Benedictine fondant and roasted hazelnuts. Decorated with chocolate.
S
IFTING
F
LOUR
The only time I ever sift flour is when I want to prevent lumping when adding it to a liquid, or to keep it light while folding it into a cake batter, such as génoise. In these instances, or anytime you need to sift flour, there is no need for a special flour sifter. Just use an everyday kitchen strainer, tapping the outer rim against the palm of your hand. Any lumps or foreign matter will be left in the strainer.
IN ADDITION
I call for all-purpose flour in the génoise recipe (and in fact for all the cakes in the book), because this is the type of flour that most people have at home and I want to encourage you to try these desserts without having to buy special ingredients. However, for those who are bakers—or who have tried the génoise already and would like to make it even better—I would recommend making it with cake flour. Cake flour is made from a softer wheat (one with less gluten in it), and the resulting cake will have a finer, more delicate texture.
Use the same amount of cake flour as the all-purpose flour called for. Be absolutely sure you do this by
weight,
with a scale, and
not
by cup measures, because the volumes of the two flours will not be the same.
VARIATION
C
HOCOLATE
G
ENOISE
[GÉNOISE AU CHOCOLAT]
For an all-purpose chocolate cake that can be used in the same way as the plain génoise, simply replace one-third of the flour in the preceding recipes with cocoa powder. Mix the flour and cocoa together before sifting into the batter. The measurements are as follows: for an 8-inch cake, ⅓ cup (50g) all-purpose flour and ¼ cup (20g) unsweetened cocoa powder; for a 9-inch cake, ½ cup (70g) all-purpose flour and ⅓ cup (30g) unsweetened cocoa powder.
D
ECORATING A
C
AKE WITH
G
ANACHE AND
R
OYAL
I
CING
Before attempting to use Ganache (
page 349
) and Royal Icing (
page 352
) together, simply coat a cake with ganache first to make sure you can frost the cake successfully.
To use royal icing and ganache together to make a design, it is important to have both at a similar consistency before starting. As soon as the cake has been coated with the ganache icing, place the royal icing in a decorating cone (see “Making and Using a Decorating Cone,”
page 353
) and use it to make the following designs:
HERRINGBONE:
Squeeze horizontal lines the size of spaghetti on the top of the cake, leaving a ½- to ¾-inch space between bands. The royal icing should sink into the ganache at this point. Immediately draw the point of a small knife, like a paring knife, down the center and perpendicular to the lines. As the knife tip passes through
the two icings, it should draw the band of white down into a V-shaped design. Working quickly, repeat this at equal distances from both sides of the first line.
HERRINGBONE DECORATION

1.
Coat the assembled cake with an even layer of ganache.
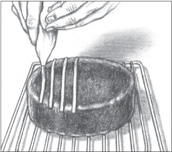
2.
Apply horizontal lines of royal icing ½ to ¾ inch apart.
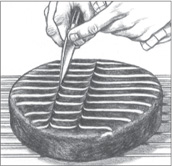
3.
Draw the point of a knife through the center of the lines. Repeat this at an equal distance from both sides of the first line.
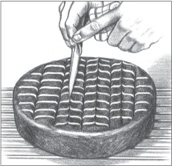
4.
Turn the cake 180 degrees and make four equally distanced cuts through the icing.
Turn the cake 180 degrees and draw a knife through the frosting to make four equally distanced cuts.
If the consistencies of the two icings are just right, and you work quickly, you will have a beautiful herringbone design. If the icings are not of the same consistency, the following can happen:
If the white bands run down the side of the cake, the chocolate icing was too thin.