iOS Programming: The Big Nerd Ranch Guide, 3/e (Big Nerd Ranch Guides) (84 page)
Read iOS Programming: The Big Nerd Ranch Guide, 3/e (Big Nerd Ranch Guides) Online
Authors: Aaron Hillegass,Joe Conway
Tags: #COM051370, #Big Nerd Ranch Guides, #iPhone / iPad Programming

Creating a
UISplitViewController
is simple since you have already learned about navigation controllers and tab bar controllers. When you initialize a split view controller, you pass it an array of view controllers just like with a tab bar controller. However, a split view controller’s array is limited to two view controllers: a master view controller and a detail view controller. The order of the view controllers in the array determines their roles in the split view; the first entry is the master view controller, and the second is the detail view controller.
Open
Nerdfeed.xcodeproj
in
Xcode
. Then, open
NerdfeedAppDelegate.m
.
In
application:didFinishLaunchingWithOptions:
, check if the device is an iPad before instantiating a
UISplitViewController
. The
UISplitViewController
class does not exist on the iPhone, and trying to create an instance of
UISplitViewController
will cause an exception to be thrown.
didFinishLaunchingWithOptions:(NSDictionary *)launchOptions
{
self.window = [[UIWindow alloc] initWithFrame:[[UIScreen mainScreen] bounds]];
ListViewController *lvc =
[[ListViewController alloc] initWithStyle:UITableViewStylePlain];
UINavigationController *masterNav =
[[UINavigationController alloc] initWithRootViewController:lvc];
WebViewController *wvc = [[WebViewController alloc] init];
[lvc setWebViewController:wvc];
// Check to make sure we're running on the iPad.
if ([[UIDevice currentDevice] userInterfaceIdiom] == UIUserInterfaceIdiomPad) {
// webViewController must be in navigation controller, you'll see why later.
UINavigationController *detailNav =
[[UINavigationController alloc] initWithRootViewController:wvc];
NSArray *vcs = [NSArray arrayWithObjects:masterNav, detailNav, nil];
UISplitViewController *svc = [[UISplitViewController alloc] init];
// Set the delegate of the split view controller to the detail VC
// We'll need this later - ignore the warning for now
[svc setDelegate:wvc];
[svc setViewControllers:vcs];
// Set the root view controller of the window to the split view controller
[[self window] setRootViewController:svc];
} else {
// On non-iPad devices, go with the old version and just add the
// single nav controller to the window
[[self window] setRootViewController:masterNav];
}
self.window.backgroundColor = [UIColor whiteColor];
[self.window makeKeyAndVisible];
return YES;
}
By placing the
UISplitViewController
code within an
if
statement in this method, we are laying the groundwork for making
Nerdfeed
a universal application. Also, now you can see why we created the instance of
WebViewController
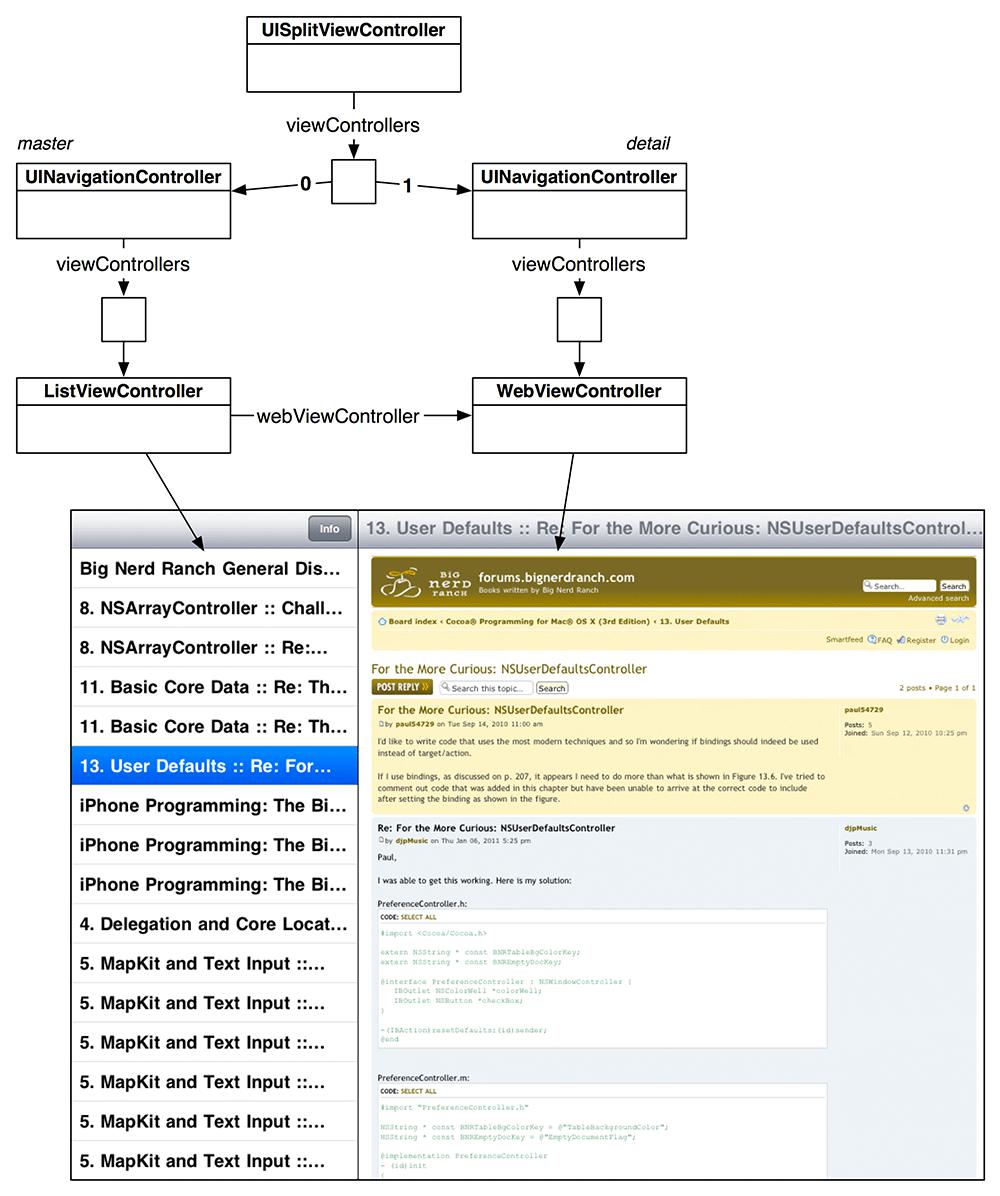
here instead of following the typical pattern of creating the detail view controller inside the implementation for the root view controller. A split view controller must have both the master and the detail view controller when it is created. The diagram for
Nerdfeed
’s split view controller is shown in
Figure 26.2
.
Figure 26.2 Split view controller diagram
However, if you build and run right now, you won’t see anything but a navigation bar on top of a blank screen. The blank screen is your web view controller. It’s blank because you haven’t selected a row. You haven’t selected a row because the list view controller is not on screen. Why is there no list view controller? In portrait mode, a
UISplitViewController
only shows the detail view controller; there isn’t enough space to show the master view controller, too. The split view controller will only display both when in landscape mode.
Unfortunately, your split view controller will not rotate to landscape mode by default. The
UISplitViewController
is a subclass of
UIViewController
, so it implements the method
shouldAutorotateToInterfaceOrientation:
. The method needs to return
YES
to allow the rotation and show the master view controller.
Overriding a method requires creating a new subclass, but before we do anything so drastic, let’s look more closely at the implementation of
shouldAutorotateToInterfaceOrientation:
in
UISplitViewController
. It looks a bit like this:
{
if ([[self viewControllers] count] == 2) {
UIViewController *master = [[self viewControllers] objectAtIndex:0];
UIViewController *detail = [[self viewControllers] objectAtIndex:1];
return [master shouldAutorotateToInterfaceOrientation:io]
&& [detail shouldAutorotateToInterfaceOrientation:io];
}
return NO;
}
This implementation asks the master and the detail view controller whether it should allow rotation. It sends the same message to both view controllers, and if both return
YES
, it rotates. So to get the
UISplitViewController
to allow rotation what we really need to do is modify the implementation of
shouldAutorotateToInterfaceOrientation:
in the two view controllers.
In
ListViewController.m
, override this method to return
YES
if
Nerdfeed
is running on the iPad:
{
if ([[UIDevice currentDevice] userInterfaceIdiom] == UIUserInterfaceIdiomPad)
return YES;
return io == UIInterfaceOrientationPortrait;
}
Do the same in
WebViewController.m
:
{
if ([[UIDevice currentDevice] userInterfaceIdiom] == UIUserInterfaceIdiomPad)
return YES;
return io == UIInterfaceOrientationPortrait;
}
Build and run the application. You should be able to rotate to landscape mode and, after the web service request finishes, see the list of posts on the lefthand side.
But we’re not done yet. If you tap a row in the list view controller, the web view controller won’t appear in the detail panel like you want. Instead, it is pushed onto the master panel and replaces the list view controller. To address this problem, when a row is tapped, we need to check if the
ListViewController
is a member of a split view controller and, if it is, take a different action.
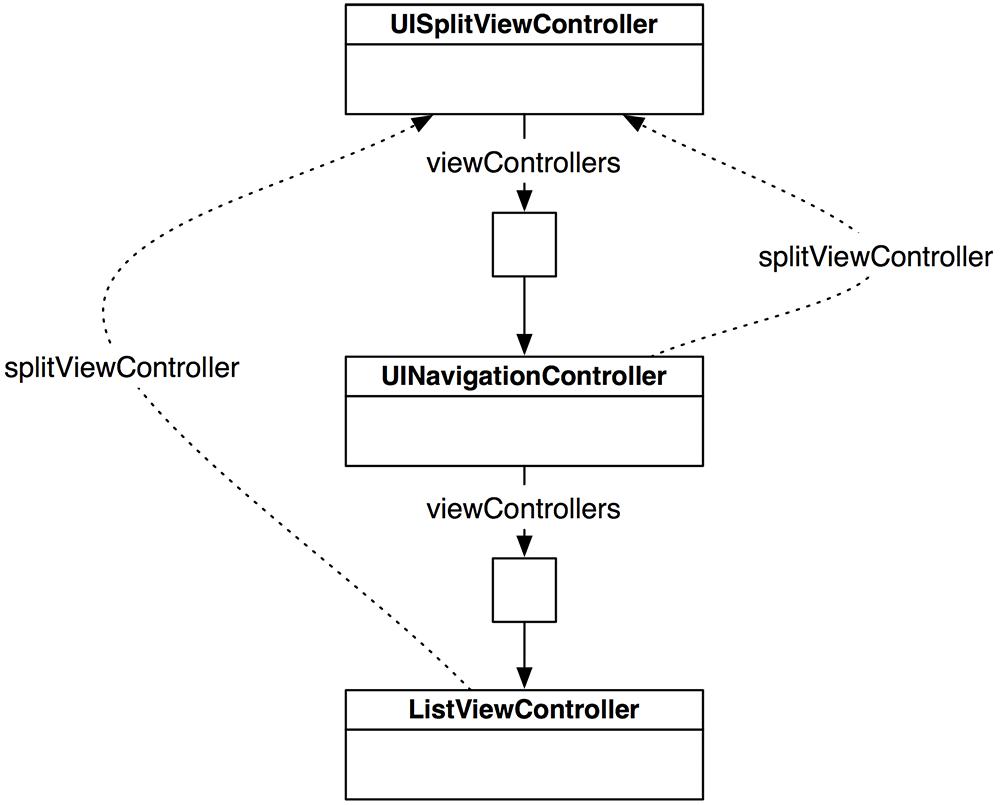
You can send the message
splitViewController
to any
UIViewController
, and if that view controller is part of a split view controller, it will return a pointer to the split view controller (
Figure 26.3
). Otherwise, it returns
nil
. View controllers are smart: a view controller will return this pointer if it is a member of the split view controller’s array or if it belongs to another controller that is a member of a split view controller’s array (as is the case with both
ListViewController
and
WebViewController
).
Figure 26.3 UIViewController’s splitViewController property
In
ListViewController.m
, locate the method
tableView:didSelectRowAtIndexPath:
. At the top of this method, check for a split view controller before pushing the
WebViewController
onto the navigation stack.
didSelectRowAtIndexPath:(NSIndexPath *)indexPath
{
if (![self splitViewController])
[[self navigationController] pushViewController:webViewController
animated:YES];
RSSItem *entry = [[channel items] objectAtIndex:[indexPath row]];
NSURL *url = [NSURL URLWithString:[entry link]];
NSURLRequest *req = [NSURLRequest requestWithURL:url];
[[webViewController webView] loadRequest:req];
[[webViewController navigationItem] setTitle:[entry title]];
}
Now, if the
ListViewController
is not in a split view controller, we assume the device is not an iPad and have it push the
WebViewController
onto the navigation controller’s stack. If
ListViewController
is in a split view controller, then we leave it to the
UISplitViewController
to place the
WebViewController
on the screen.
Build and run the application again. Rotate to landscape and tap on one of the rows. The web page will now load in the detail panel.
In
Chapter 13
, we discussed different options for allowing view controllers to send messages to each other. Using instance variables is the simplest option, and that’s what we’ve done in
Nerdfeed
– we gave the
ListViewController
a pointer to the
WebViewController
. In this simple application, this approach works fine. Now let’s make
Nerdfeed
a little more complex and write a delegate protocol instead.
Right now, the detail view controller displays the
WebViewController
when a row in the master view controller is selected. In a moment, you’re going to create another view controller called
ChannelViewController
that will display metadata about the RSS feed. You will also create an
Info
button on the
ListViewController
’s navigation bar. Then the user will be able choose what to display in the detail panel: tap a row and see a post’s detail view or tap the
Info
button and see the metadata about the RSS feed.
But, first, let’s look at the big picture. The
ListViewController
will need to send messages to two different view controllers: the
WebViewController
and the
ChannelViewController
. Instead of giving the
ListViewController
another instance variable for the
ChannelViewController
, you’re going to write a protocol that both detail view controllers will conform to. Then you can generalize the message that the
ListViewController
sends the two view controllers as a method in that protocol (
Figure 26.4
).
Figure 26.4 Master view controller delegating to detail view controllers
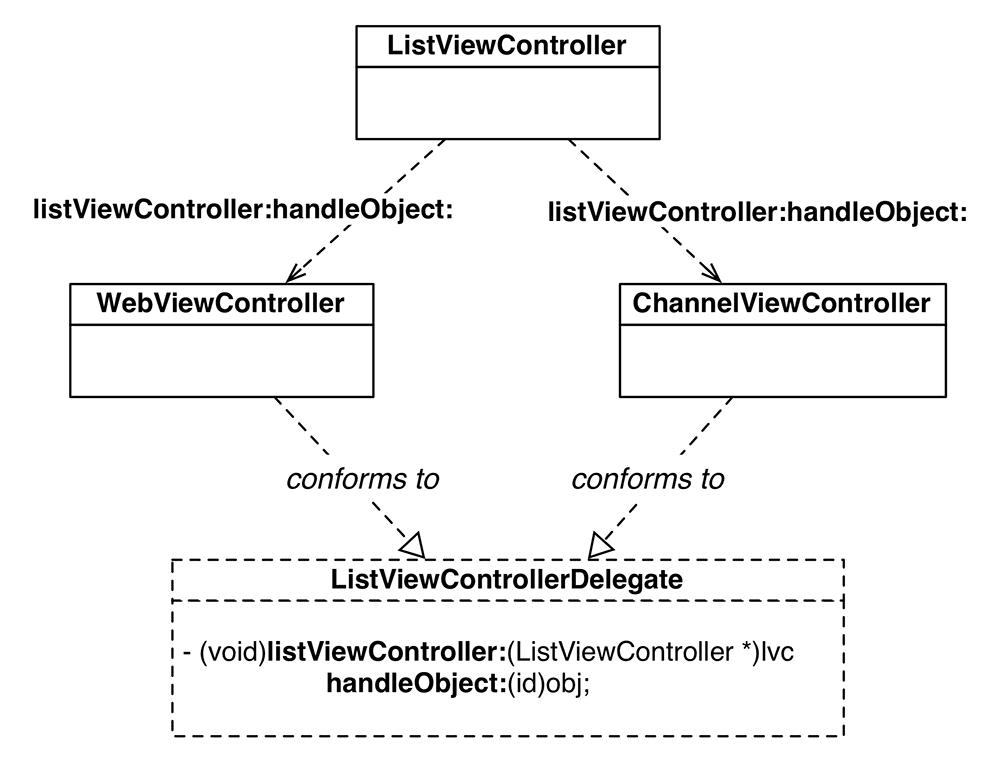
This protocol’s one method will be named
listViewController:handleObject:
. The
ListViewController
will send this message to the
WebViewController
if a row in the table is tapped and to the
ChannelViewController
if the
Info
button is tapped.
Notice that the second label and argument type of this method are very general so that it can be used with a range of classes. When the
ListViewController
sends this message to the
WebViewController
, it will pass an
RSSItem
object. When the
ListViewController
sends this message to the
ChannelViewController
, it will pass an
RSSChannel
object.
In
ListViewController.h
, create the
ListViewControllerDelegate
protocol at the end of the file.
@end
// A new protocol named ListViewControllerDelegate
@protocol ListViewControllerDelegate
// Classes that conform to this protocol must implement this method:
- (void)listViewController:(ListViewController *)lvc handleObject:(id)object;
@end
First, let’s update
WebViewController
. In
WebViewController.h
, declare that this class conforms to
ListViewControllerDelegate
.
#import "ListViewController.h"
@interface WebViewController : UIViewController
@end
When one of the rows is tapped in the table view, the
ListViewController
will send the
listViewController:handleObject:
message to the
WebViewController
. The object passed as the argument will be the
RSSItem
that corresponds to the selected row. In
WebViewController.m
, implement
listViewController:handleObject:
.
@implementation WebViewController
- (void)listViewController:(ListViewController *)lvc handleObject:(id)object
{
// Cast the passed object to RSSItem
RSSItem *entry = object;
// Make sure that we are really getting a RSSItem
if (![entry isKindOfClass:[RSSItem class]])
return;
// Grab the info from the item and push it into the appropriate views
NSURL *url = [NSURL URLWithString:[entry link]];
NSURLRequest *req = [NSURLRequest requestWithURL:url];
[[self webView] loadRequest:req];
[[self navigationItem] setTitle:[entry title]];
}
Notice that the code creating and loading the request is the same code that we are currently running in
ListViewController
.
Next, in
ListViewController.m
, modify the
tableView:didSelectRowAtIndexPath:
method to send
listViewController:handleObject:
to the
WebViewController
.
didSelectRowAtIndexPath:(NSIndexPath *)indexPath
{
if (![self splitViewController])
[[self navigationController] pushViewController:webViewController
animated:YES];
RSSItem *entry = [[channel items] objectAtIndex:[indexPath row]];
[webViewController listViewController:self handleObject:entry];
}
Build and run the application. The behavior of the application should remain the same, but now we’re sending a generalized message to the web view controller.
Now that
WebViewController
conforms to our protocol and implements the required method, let’s create the
ChannelViewController
class.
Create an
NSObject
subclass and name it
ChannelViewController
. In
ChannelViewController.h
, change its superclass to
UITableViewController
, have it conform to the
ListViewControllerDelegate
protocol, and add an instance variable for the
RSSChannel
object.
@class RSSChannel;
UITableViewController
{
RSSChannel *channel;
}
In
ChannelViewController.m
, implement the data source methods to display the metadata in a table:
@implementation ChannelViewController
- (NSInteger)tableView:(UITableView *)tableView
numberOfRowsInSection:(NSInteger)section
{
return 2;
}
- (UITableViewCell *)tableView:(UITableView *)tableView
cellForRowAtIndexPath:(NSIndexPath *)indexPath
{
UITableViewCell *cell =
[tableView dequeueReusableCellWithIdentifier:@"UITableViewCell"];
if (!cell)
cell = [[UITableViewCell alloc] initWithStyle:UITableViewCellStyleValue2
reuseIdentifier:@"UITableViewCell"];
if ([indexPath row] == 0) {
// Put the title of the channel in row 0
[[cell textLabel] setText:@"Title"];
[[cell detailTextLabel] setText:[channel title]];
} else {
// Put the description of the channel in row 1
[[cell textLabel] setText:@"Info"];
[[cell detailTextLabel] setText:[channel infoString]];
}
return cell;
}
- (BOOL)shouldAutorotateToInterfaceOrientation:(UIInterfaceOrientation)io
{
if ([[UIDevice currentDevice] userInterfaceIdiom] == UIUserInterfaceIdiomPad)
return YES;
return io == UIInterfaceOrientationPortrait;
}
@end
Then implement the method from the
ListViewControllerDelegate
protocol in the same file.
{
// Make sure the ListViewController gave us the right object
if (![object isKindOfClass:[RSSChannel class]])
return;
channel = object;
[[self tableView] reloadData];
}
Now you need to show this view controller and get the channel object to it. In
ListViewController.m
, add a
UIBarButtonItem
to the
ListViewController
’s
navigationItem
.
{
self = [super initWithStyle:style];
if (self) {
UIBarButtonItem *bbi =
[[UIBarButtonItem alloc] initWithTitle:@"Info"
style:UIBarButtonItemStyleBordered
target:self
action:@selector(showInfo:)];
[[self navigationItem] setRightBarButtonItem:bbi];
[self fetchEntries];
}
return self;
}
When this button is tapped, the detail view controller in the split view will be replaced with an instance of
ChannelViewController
. In
ListViewController.m
, implement the action method to create an instance of
ChannelViewController
. Then check for a split view controller and set the split view controller’s
viewControllers
array.
@implementation ListViewController
- (void)showInfo:(id)sender
{
// Create the channel view controller
ChannelViewController *channelViewController = [[ChannelViewController alloc]
initWithStyle:UITableViewStyleGrouped];
if ([self splitViewController]) {
UINavigationController *nvc = [[UINavigationController alloc]
initWithRootViewController:channelViewController];
// Create an array with our nav controller and this new VC's nav controller
NSArray *vcs = [NSArray arrayWithObjects:[self navigationController],
nvc,
nil];
// Grab a pointer to the split view controller
// and reset its view controllers array.
[[self splitViewController] setViewControllers:vcs];
// Make detail view controller the delegate of the split view controller
// - ignore this warning
[[self splitViewController] setDelegate:channelViewController];
// If a row has been selected, deselect it so that a row
// is not selected when viewing the info
NSIndexPath *selectedRow = [[self tableView] indexPathForSelectedRow];
if (selectedRow)
[[self tableView] deselectRowAtIndexPath:selectedRow animated:YES];
} else {
[[self navigationController] pushViewController:channelViewController
animated:YES];
}
// Give the VC the channel object through the protocol message
[channelViewController listViewController:self handleObject:channel];
}