JeBouffe Home Canning Step by Step Guide (second edition) Revised and Expanded (2 page)
Read JeBouffe Home Canning Step by Step Guide (second edition) Revised and Expanded Online
Authors: Edith Tremblay,Francois Lafleur
Tags: #Reference, #home canning, #Recipes, #Cookbook, #canning

Boiling water-bath treatment in 12-step
STEP 1
Read the chosen recipe and prepare all equipment and ingredients required.
(For recipes requiring long cooking time:Steps 2-3 and 4 should begin 30 minutes prior to placing the food in the jars).
STEP 2
Check the jars and make sure they are in good condition. Jars with damaged spouts should never be used for canning.
The "snap" lids must be new and the closure bands should not be distorted. Wash jars, lids and bands in hot soapy water. Rinse to remove all traces of soap and dry only the closure bands.
STEP 3
Place the "snap" lids in a small pot and keep them in very hot (but not boiling) water until used.
STEP 4
Prepare the boiler by installing the jars rack and pouring hot water.
Place clean jars in the boiler, fill them with hot water and sterilize them by letting them boil 5 minutes.
Keep the jars hot by gently heating the pot (as for simmering).
STEP 5
Prepare the chosen recipe by following the instructions.
STEP 6
Remove the jars one by one, throw away the water and fill them with food.
Use a funnel for easy filling.
With a non-metallic utensil, stir the contents of the jar lightly to remove air bubbles.
Check that the clearance between the food and the edge is observed. Adjust as necessary before closing the jar.
Jams, marmalades and jellies: 1/4 inch. (0.5 cm.)
Fruit in syrup: 1/2 inches. (1 cm.)
Pickled vegetables, tomatoes: 1/2 inches. (1 cm.)
Relish, chutney, salsa, 1/2 inch. (1 cm.).
STEP 7
Wipe the rim of the jar to remove any food that may interfere with sealing.
Remove a lid from the hot water bath and place on the neck of the jar. Center the lid with the magnetic wand.
Place a closure band on the neck. Lightly screw being careful not to over tighten (you must allow air, which expend under heat, to escape during sterilization).
Place the jar in the boiler.
Repeat for the other jars.
STEP 8
Place the cover on the boiler and bring to a boil.
STEP 9
Treat the jars for the time recommended in the recipe.
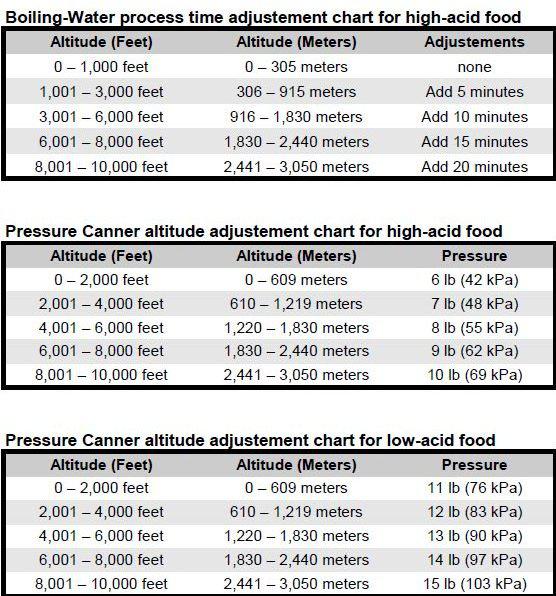
The duration of treatment should be adjusted for altitude.
(Refer to the table in section 2.3 to determine the processing time required.)
The treatment period begins when the water reaches the boiling point in the pot. It is very important that boiling continues for the duration of treatment.
At the end of the processing period, remove the cover of the pot and put the fire out.
Let stand 5 minutes to acclimate the jars to the ambient air.
STEP 10
Using the clamps, remove the jars from the boiler and place them upright on a towel.
Avoid handling the jars for 24 hours because at this stage the lids are not yet sealed.
NEVER place the hot jars in the refrigerator or in a cold air flow.
STEP 11
You should check the lids (they must be curved inward) to confirm that the treatment was successful.

If a lid is rounded up, this jar is not properly sealed. It can be treated a second time or stored in the refrigerator for quick consumption.
STEP 12
Label the jars, taking care to include the nature of the preparation and the date of canning.
The jars should be stored tightly sealed in a cool, dry place, away from light.
For most foods, it is strongly recommended to use it within 12 months after canning.
2.2 - PRESSURE TREATMENT
for canning vegetables and low-acid foods
Foods with a pH above 4.6 require a treatment under pressure to be safely canned at home. Their low acidity can not assist in the preservation of the products. Only a prolonged exposure to high heat ensures the destruction of all harmful microorganisms.
This product category includes all the vegetables (not marinated) and all products of animal origin (meat, poultry, seafood).
Pressure canning, in a pot-type autoclave, is used to process foods at temperatures that can not be achieved by the boiling water-bath method. This high temperature is essential to ensure the destruction of some microorganisms that can survive at 212F (100C).
You will need:
(1) Recipes indicating the required time and pressure for canning.
Warning: If a recipe was published before 1989 it is likely that the recommended storage methods do not take into account the latest research.
(It is possible to establish your own method and processing time but it takes steps for research and testing that goes beyond the scope of this short guide).
If you're taking your first steps in home canning, we strongly recommend that you start with one of the recipes that you will find at the end of this guide.
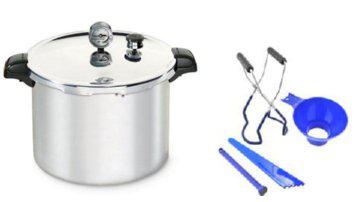
(2) A pressure canner (autoclave) for home canning.
This large pot has a fitting lid, a pressure indicator and a bottom grid.
More costly than a simple boiler but more durable and easier to maintain. This type of pot is easy to find on the market.
Avoid "pressure cookers" that are generally too small and do not have precise mechanism of pressure measurement.
(3)"MASON" glass jars with their "snap" lids and closure rings.
Do not reuse jars of commercial products that are generally designed to be disposable. They may explode when pressure-treated.
(4) A clamp for handling the jars.
(5) A wide-mouthed funnel for filling the jars.
(6) A magnetic wand to remove the lids from the hot water.
(7) A kitchen timer or some other reliable instrument to measure the processing time.
(The funnel, tongs and magnetic strip are often sold in "kit").
Pressure treatment in 12-step
STEP 1
Read the chosen recipe and prepare all equipment and ingredients required.
(For recipes requiring long cooking time:Steps 2-3 and 4 to begin 30 minutes prior to food jar).
STEP 2
Check the jars and make sure they are in good condition. Jars with damaged spouts should never be used for canning.
The "snap" lids must be new and closure bands should not be distorted.
Wash jars, lids and bands in hot soapy water. Rinse to remove all traces of soap and dry only the closure bands.
STEP 3
Place the "snap" lids in a small pot and keep them in very hot water but not boiling until used.
STEP 4
Prepare the canner by placing the grid at the bottom and pouring hot water up to the manufacturer's recommended level.
Pressure canning does not require the jars to be sterelized before canning. If you wish to do it anyway, this is the step where it should be done by boilling the jars 5 minutes in a séparate pot.
STEP 5
Prepare the recipe chosen by following the instructions.
STEP 6
Fill the jars with the food. (when canning hot food, the jars must be warmed prior to this step)
Use a funnel for easy filling.
With a non-metallic utensil, stir the contents of the jar lightly to remove air bubbles. Check that the clearance between the food and the edge is observed. Adjust as necessary before closing the jar.
STEP 7
Wipe the rim to remove any food that may interfere with the formation of the vacuum seal.
Remove lid from the hot water bath and place on the neck of the jar. Center the lid with the magnetic wand.
Place a closure band on the neck. Screw the band being careful not to over tighten (you must allow air, which takes expension uder heat, to get out during sterilization).
Place the jar in the pressure canner.
Repeat for the other jars.
STEP 8
Check that the water level in the pot is at the level recommended by the manufacturer.
Close the lid (without the ventilation duct cap) of the pressure cooker and heat to bring water to a boil.
Allow steam to escape freely through the ventilation duct for 10 minutes.
Place the pressure cap on the pipe to keep the steam in the pot.
Monitor the pressure gauge and start the timer when the pressure recommended in the recipe is reached.
Adjust heat to maintain that pressure for the duration of treatment.
(The duration of treatment and pressure requirements vary greatly depending on the food. Always check in the recipe).
STEP 9
Treat jars for the time recommended in the recipe.
The pressure used should be adjusted according to altitude.
(Refer to the table in section 2.3 to determine the processing time required.)
At the end of the treatment period, turn off the heat.
Wait until the pressure has fallen to zero.
(VERY IMPORTANT: Never open an autoclave which is still under pressure)
Open the pot without moving the jars.
Let stand 5 minutes to acclimate the jars to the ambient air.
STEP 10
Using the clamps, remove the jars from the pot and place them upright on a towel.
Avoid handling the jars for 24 hours because at this stage, the lids are not yet sealed.
NEVER place the hot jars in the refrigerator or a cold air.
STEP 11
Check the lids (they must be curved inward) to confirm that the treatment was successful.
If a lid is rounded up, this jar is not properly sealed. It can be treated a second time or stored in the refrigerator for quick consumption.
STEP 12
Labels the jars, taking care to include the nature of the preparation and the date of canning.
The jars should be stored tightly sealed in a cool, dry place, away from light.
For most foods, it is strongly recommended for use within 12 months after canning.
2.3 Processing adjustments for altitude
2.4 - Canning fresh Fruits
Several fruit will quickly brown by oxidation, once peeled. To prevent this, simply dip the peeled fruit in a bath of water with ascorbic acid or lemon juice. When using an ascorbic acid solution, refer to the manufacturer's instructions. The use of lemon juice is just as effective and much simpler, mix 1/4 cup (75 ml.) of lemon juice to 4 cups (1 L) of water.
The fruits are traditionally preserved in sugar syrup or juice. This method preserves the shapes, colors and flavors optimally. In the case of canned fruit, sugar is only used to enhance the flavor and appearance of products. It does not act as a preservative because the concentration is not hight enough. There is no indication against canning fruit without addeding sugar or use sugar substitutes.
There are many recipes to make syrup for canning fruit. The following table summarizes the four most popular.