Kneadlessly Simple: Fabulous, Fuss-Free, No-Knead Breads (7 page)
Read Kneadlessly Simple: Fabulous, Fuss-Free, No-Knead Breads Online
Authors: Nancy Baggett
Tags: #Cooking


KS Quotient
Super Easy: Short ingredient list, readily available ingredients. No hand-shaping.

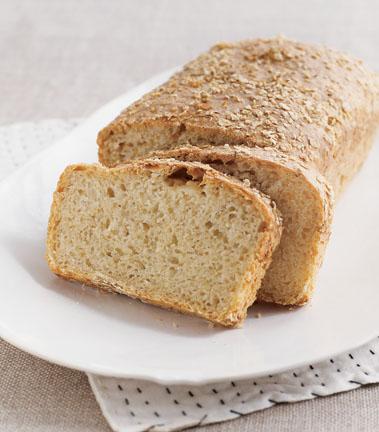
A large, versatile, no-fuss loaf, this has a firm, springy interior, crusty exterior, and wonderfully light, pleasing wheat taste and aroma. It's a fine all-around bread, suitable for eating "as is," for toasting, and for making sandwiches. For a slightly "wheatier" and more nutritious bread, see the variation at right.
Yield: 1 large loaf, 12 to 15 slices
3 cups (15 ounces) unbleached all-purpose white flour, plus more as needed
1 cup (5 ounces) whole wheat flour, plus 1 tablespoon for garnishing loaf top
3 tablespoons granulated sugar
Generous 1¾ teaspoons table salt
¾ teaspoon instant, fast-rising, or bread machine yeast
3 tablespoons corn oil, plus extra for coating dough top and baking pan
2 cups plus 1 tablespoon ice water, plus more if needed
First Rise
In a large bowl, thoroughly stir together the white flour, whole wheat flour, sugar, salt, and yeast. In another bowl or measuring cup, whisk the oil into the water. Then vigorously stir the mixture into the bowl with the flour, scraping down the sides and mixing until thoroughly blended. If too dry to mix together, add just enough more water to facilitate mixing, but don't over-moisten, as the dough should be stiff. If necessary, stir in enough more white flour to stiffen it. Brush or spray the top with oil. Tightly cover the bowl with plastic wrap. If desired, for best flavor or for convenience, you can refrigerate the dough for 3 to 10 hours. Then let rise at cool room temperature for 12 to 18 hours; if convenient, vigorously stir once during the rise.
Second Rise
Vigorously stir the dough. If it is not stiff, stir in enough more white flour to yield a hard-to-stir dough. Using an oiled rubber spatula, gently lift and fold the dough in towards the center all the way around (this organizes the gluten for shaping the dough into a loaf). Invert it into a very well-greased 9 x 5-inch loaf pan. Using an oiled rubber spatula or fingertips, smooth out the top and press the dough out into the pan. Brush or spray the dough top with oil. Evenly sprinkle the top with 1 tablespoon whole wheat flour. Using a well-oiled serrated knife or kitchen shears, make 3 to 4 evenly spaced diagonal ½-inch-deep slashes down the loaf. Cover the pan with nonstick spray—coated plastic wrap.
Let Rise Using Any of These Methods
For a 1½- to 2½-hour regular rise, let stand at warm room temperature; for a 1- to 1½-hour accelerated rise, let stand in a turned-off microwave along with 1 cup of boiling-hot water; or for an extended rise, refrigerate, covered, for 4 to 24 hours, then set out at room temperature. When the dough nears the plastic, remove it and continue the rise until the dough extends 1/8 inch above the pan rim or doubles from its deflated size.
Baking Preliminaries
15 minutes before baking time, place a rack in the lower third of the oven; preheat to 375°F.
Baking
Bake on the lower rack for 50 to 60 minutes, or until the loaf is well browned and crisp on top; as necessary cover with foil to prevent over-browning. Bake for 10 to 20 minutes more, until a skewer inserted in the thickest part comes out with just a few particles on the end (or until the center registers 208° to 210°F on an instant-read thermometer). Then bake for 5 minutes longer to make sure the center is done. Cool in the pan on a wire rack for 10 minutes. Turn the loaf onto a rack and cool thoroughly.

Serving and StoringServe warm, cool, or toasted; the bread slices best when cool. Cool thoroughly before storing in plastic or foil. Keeps at room temperature for 2 to 3 days. May be frozen, airtight, for up to 2 months.
Use 2 cups white flour and 2 cups whole wheat flour. If desired, add 1 tablespoon more sugar to balance the wheat flavor. Proceed exactly as directed in the original recipe.


KS Quotient
Easy: A minimum of easily mixed ingredients. No hand-shaping.

This is my version of
pao de milho,
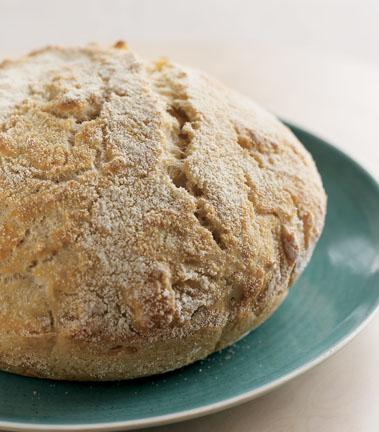
a peasant-style yeasted cornbread popular in the Portuguese-American communities in Massachusetts and Rhode Island. The locals like to make it with a special cornmeal called white cap flint, which, unfortunately, isn't available anywhere else. I've substituted a good-quality stone-ground white cornmeal from my mid-Atlantic region with excellent results.
The large, homespun loaf has a mild, go-with-anything flavor and a delightful crusty-chewy top. It has a finer, moister crumb than most cornbreads, the result of the cornmeal being combined with boiling water and turned into a mush first. This simple, seemingly unimportant step makes a big difference in taste, too: Due to chemical changes that occur as the cornmeal begins to cook, the bread is noticeably mellow and sweet, even though no sugar is added. (For more on the chemistry behind the technique, see
The Chemistry Behind the Steps
.)
Pao de milho
is doubtless a derivative of
broa,
a staple cornbread in the poorer regions of Portugal. Corn was introduced into Portugal and Spain from the New World, probably by whalers or fishermen sailing from the New England coast. The Portuguese immigrants who settled in Massachusetts and Rhode Island eventually returned the favor, introducing this very enticing yeast bread back here. Serve it with meals, along with butter, toast it, or grill it and use in all sorts of hearty meat, cheese, and roasted vegetable sandwiches.
Yield: 1 large loaf, 12 to 14 portions or slices
1 1/3 cups boiling water
1¼ cups cornmeal, preferably white stone-ground, plus 1 tablespoon for garnish
3 cups (15 ounces) unbleached white bread flour, plus more as needed
2 teaspoons table salt
¾ teaspoon instant, fast-rising, or bread machine yeast
1¼ cups ice water, plus more if needed
Corn oil, canola oil, or other flavorless vegetable oil or oil spray for loaf top
First Rise
In a medium bowl, gradually stir the boiling water into the cornmeal until smoothly incorporated. Let cool thoroughly. In a large bowl, thoroughly stir together the flour, salt, and yeast. Gradually but vigorously stir the ice water into the cooled cornmeal until very smoothly blended. Then vigorously stir the cornmeal mixture into the bowl with the flour, scraping down the sides until the ingredients are thoroughly blended. If too dry to mix completely, a bit at a time, stir in just enough more ice water to blend the ingredients; don't over-moisten, as the dough should be stiff. If the dough is soft, vigorously stir in enough more flour to stiffen it. Brush or spray the top with vegetable oil. Cover the bowl with plastic wrap. If desired, for best flavor or for convenience, you can refrigerate the dough for 3 to 10 hours. Then let rise at cool room temperature for 12 to 18 hours.
Second Rise
Vigorously stir the dough, adding more flour if needed to yield a hard-to-stir dough. Using an oiled rubber spatula, fold the dough in towards the center all the way around. Brush or spray the top with oil. Re-cover with nonstick spray—coated plastic wrap.
Let Rise Using Any of These Methods
For a 1½- to 2½-hour regular rise, let stand at warm room temperature; for a 1- to 2-hour accelerated rise, let stand in a turned-off microwave along with 1 cup of boiling-hot water; or for an extended rise, refrigerate, covered, for 4 to 12 hours, then set out at room temperature. Continue the rise until the dough doubles from the deflated size, removing the plastic if the dough nears it.
Baking Preliminaries
20 minutes before baking time, put a rack in the lower third of the oven; preheat to 450°F. Heat a 3 ½- to 4-quart (or larger) heavy metal pot in the oven until sizzling hot (check with a few drops of water), then remove it, using heavy mitts. Taking care not to deflate the dough, loosen it from the bowl sides with an oiled rubber spatula and gently invert it into the pot. Don't worry if it's lopsided and ragged-looking; it will even out during baking. Generously spray or brush the top with water, then sprinkle over a tablespoon of cornmeal. Immediately top with the lid. Shake the pot back and forth to center the dough.
Baking
Reduce the heat to 425°F. Bake on the lower rack for 50 minutes. Remove the lid. Reduce the heat to 400°F. Bake for 15 to 25 minutes longer, until the top is well browned and a skewer inserted in the thickest part comes out with just a few crumbs on the tip (or until the center registers 210° to 212°F on an instant-read thermometer). Then bake for 5 minutes longer to ensure the center is baked through. Cool in the pan on a wire rack for 10 to 15 minutes. Remove the loaf to the rack. Cool thoroughly.

Serving and StoringThis tastes good warm but will cut better when cool. Cool completely before storing. To maintain the crisp crust, store in a large bowl draped with a clean tea towel or in a heavy paper bag. Or store airtight in a plastic bag or foil: The crust will soften, but can be crisped by heating the loaf, uncovered, in a 400°F oven for a few minutes. The bread will keep at room temperature for 3 days, and may be frozen, airtight, for up to 2 months.

