Maida Heatter's Book of Great Chocolate Desserts (63 page)
Read Maida Heatter's Book of Great Chocolate Desserts Online
Authors: Maida Heatter

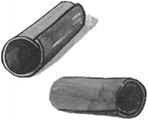
You can make these curls only in a cool, dry, room. If the room is warm and humid, the chocolate may be too sticky to handle. If your kitchen is not air-conditioned, wait for a cool, dry day and then make a lot of these.
For 16 to 20 1½-inch curls—moderately sensational—coarsely chop 3 ounces semisweet chocolate and place it in the top of a small double boiler over warm water on low heat. Stir occasionally until the chocolate is partially melted. Then stir constantly until it is completely melted and smooth.
Tear off two pieces of wax paper, each about 12 inches long. Place one on a smooth work surface. Dry the underside of the section of the double boiler containing the chocolate so that no water drips. Pour the chocolate onto the middle of the wax paper and cover it with the other piece of wax paper. With your fingers gently smooth over the top piece of wax paper, spreading the chocolate into a 6- or 7-inch squarish shape—don’t worry about an even surface or exact edges, just make it rather square.
Then, with a rolling pin, preferably one that is not too heavy, gently roll over the top piece of paper several times in each direction to spread the chocolate into about a 10-inch square shape. Again, don’t worry too much about the edges but now the chocolate must be as smooth and level as you can make it, and about inch thick (thin).
Slide a cookie sheet under the bottom paper and transfer it to the freezer for a few minutes until the chocolate is set and the paper can be peeled away easily. Peel off the top piece just to release and then replace it. Invert both pieces of paper with the chocolate between them. Peel off the other piece of paper and do not replace it. Let stand for just a few minutes until the chocolate has reached room temperature and is flexible but not wet or sticky. (Don’t walk away and leave it until later; if it stands too long the curls might crack as you roll them. It sounds as though it would be the opposite, but that is what happens.)
With a small, sharp knife and a ruler trim one side of the chocolate square to make an even edge; remove excess. With the knife and the ruler cut strips 1½ inches wide, parallel with the trimmed side. Then cut the strips into 2½-inch lengths.
Using the knife as a spatula, transfer one of the strips to the edge of your work surface (the edge closest to you). Now use the handle of a large wooden spoon—the handle must be round and should be about ⅜ to ½ inch in diameter. A smaller diameter will make a tighter, less dramatic curl.
Don’t touch the chocolate any more than necessary or the heat of your hands may melt it. Place the end of the handle along the 1½-inch edge of the chocolate nearest you. With your fingers, start the curl by loosely curling the end of the chocolate over the handle. Then roll the handle toward the other end of the chocolate, rolling the chocolate as you do. Do not roll too tightly or the curl will not slide off the handle easily.
Carefully slide the curl off the handle and place it on wax paper, seam down. Shape all of the curls.
Slide a cookie sheet under the wax paper, transfer to the freezer or refrigerator until firm, and then place the curls in a small freezer box. Store the curls in the refrigerator or the freezer.
NOTES
:
1. If the chocolate is sticky when you start to form a curl, let it stand at room temperature for just a few minutes.
2. If the chocolate doesn’t behave beautifully, the room is too warm or you have rolled it too thin or not thin enough. It may be remelted and rerolled. (Leftover scraps may be remelted, if you wish.)
3. After you have tried these you will see that they can be made any length, shorter or longer, and they can be made fatter or thinner.
4. Don’t attempt more than 3 ounces of chocolate at a time, or the last pieces of chocolate will have stood too long and may crack while they are being formed.

Chocolate Cones
These take time and patience, and an ability to work with something small. Making them can be a delightful way to spend a spare hour or so; then they can be stored indefinitely in the freezer or refrigerator. It is a luxury to have these on hand for decorating a dessert in the most elegant, but simple, style. They are tiny, hollow cones of chocolate, and they do look very special. The smaller they are, the more chic and classy; also, the more difficult to make.
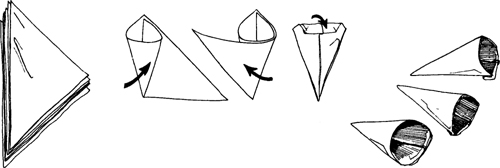
Cut wax paper into squares measuring 4 to 5 inches. Cut each square in half to form two triangles. Roll each triangle into a cone by rolling the two outer points, one around the other, to the center point. Then double-fold the points to hold it all in place securely (see illustrations). The tip must be tightly closed or the chocolate will run out. (Several people have told me that they find it helpful to secure the cone with a piece of Scotch tape over the seam and around the cone before the points are double-folded.) You will need one paper cone for each chocolate cone.
These can be made with any semisweet chocolate (real or compound, see page 5). A few ounces of chocolate will be enough for a moderate number of cones. Coarsely chop the chocolate and place it in the top of a small double boiler over hot water on low heat. Cover until partially melted, then uncover and stir until completely melted and smooth. Remove the top of the double boiler.
With a small, pointed paring knife, spread the inside of a cone with the chocolate. Coat it completely, making sure that you do not leave any empty spots, or any spots that are so thin that the chocolate will break when you remove the paper. The chocolate should not run over the top of the cone onto the outside of the paper.
Place the chocolate-lined cone on its side on a small plate in the freezer or the refrigerator for a few minutes only until the chocolate is set and firm.
Then gently and carefully, with a light touch, peel off the wax paper, handling the cone as little as possible. (Sometimes it seems easiest to unfold the double-folded point and then unroll the paper. Or you might prefer to start a small tear anywhere in the top of the cone, and unroll from there.) If you have used Scotch tape it should be cut first with small scissors.
Repeat to make additional cones. Pack them carefully in a small, strong box. Store in the refrigerator or the freezer.
To use these, place them on a cake before the icing is dry—one cone to a portion. Place them on their sides with the open ends pointing out and the pointed ends toward the center. Resist the temptation to fill them with a squirt of whipped cream or buttercream; it would hide their thinness and delicacy.

Chocolate Cigarettes
These are long, thin, cigarette-shaped curls; dramatic and professional. They must be made with a compound chocolate (see page 5), and you will need a marble surface to work on.
To make a very generous amount (you can make much less) coarsely chop about 8 ounces of a compound chocolate. Place it in the top of a double boiler over hot water on low heat. Cover until partially melted, then uncover and stir until completely melted and smooth. Do not allow the chocolate to get any hotter than necessary. Remove it from the heat, stir gently for a minute or so to cool a bit, and then pour it out onto the marble, forming a strip about 10 inches long and 3 to 4 inches wide. The chocolate strip will be about ¼ to⅜ inch thick. Let stand at room temperature until the chocolate is no longer soft or sticky to the touch.
To shape the cigarettes, use a long, heavy knife—I use a Sabatier cook’s knife with a 12-inch blade. Hold the knife straight across the 3- to 4-inch width of the chocolate, very close to (almost against) the right-hand end of the chocolate, with the blade of the knife tilted at a 45-degree angle (the sharp edge of the blade against the right-hand end; the top of the blade tilted toward the opposite end).
Cut down slowly and firmly. The chocolate will roll around itself as it is cut. Repeat, each time placing the blade close to the cut end; the curls should be paper-thin.
Gently transfer the curls with a wide metal spatula to a tray or a firm box. Cover the tray with plastic wrap, or cover the box. Store in the refrigerator or the freezer.

Drinks
BONANZA CHOCOLATE DRINK, HOT OR COLD
MOCHA-BRANDYCHOCOLATE THICK SHAKE
HOMEMADE CHOCOLATE SYRUP (with 19 different drinks and suggested variations)
Bonanza Chocolate Drink, Hot or Cold
5
C
UPS
This is smooth/rich/creamy/flavorful/satisfying—it is the ultimate hot or cold chocolate drink. Mocha-flavored. Serve it any time, from breakfast to a midnight supper; take a thermos of it, hot or cold, on a trip, on a picnic, or to a sporting event. It may be made a day or two ahead.
1½ cups milk
6 ounces semisweet chocolate (see Note)
¼ cup granulated sugar
⅛ teaspoon salt
2 cups strong, hot coffee (I use 4 tablespoons of instant coffee dissolved in 2 cups of boiling water)
1 cup heavy or light cream
1 teaspoon vanilla extract
Place the milk and chocolate in a 2- to 3-quart heavy saucepan over moderate heat. Stir occasionally until the chocolate is melted. Stir with a wire whisk until smooth; if the mixture is not perfectly smooth—if there are little flecks of chocolate—beat it with an electric mixer or an egg beater. (It might be necessary to transfer the mixture to the small bowl of an electric mixer to beat it.)
Add the sugar and salt, stir, and bring the mixture to a boil. Reduce the heat and let simmer for 5 minutes, scraping the pan occasionally with a rubber spatula. Stir in the coffee and cream; then let it just come to a simmer again. Stir in the vanilla.
Serve immediately. Or keep it warm, stirring occasionally, over low heat. Or let it cool, stirring occasionally to prevent a skin from forming.
It may be refrigerated and served very cold (in chilled glasses). Or it may be refrigerated and then reheated before serving, and served very hot. If you serve this hot you may, if you wish, beat or whisk it until foamy before serving.
