Maximum Flavor: Recipes That Will Change the Way You Cook (7 page)
Read Maximum Flavor: Recipes That Will Change the Way You Cook Online
Authors: Aki Kamozawa,H. Alexander Talbot
Tags: #Cooking, #Reference, #Courses & Dishes, #General, #Methods

Remove the dough from the refrigerator. Liberally dust a countertop or cutting board with flour and transfer the dough to the floured surface. Roll the dough into a large rectangle that is about ½ inch (13 mm) thick, using just enough extra flour to keep it from sticking. Fold the two outside sections inward to meet in the center of the dough. Gently shape the dough so that the layers sit evenly and the entire thing forms a new rectangle that is half as wide as the original. Use your rolling pin to gently roll the dough out to a thickness of ¼ inch (6 mm), being careful to keep the layers together and the shape of the rectangle. Position the dough so that it is taller than it is wide. Fold the top third of the dough down to cover the middle third of the dough, and then fold the bottom third of the dough up over those 2 layers, as if you were folding a letter to be put in an envelope. If the edges of the rectangle are uneven, use a sharp knife to trim them in a straight line. If the dough is too soft to cut evenly, wait until after you have chilled the dough for the next step before trimming.
Put the dough onto the prepared baking sheet and cover with plastic wrap. Put the dough in the refrigerator to chill for at least 1 hour and no more than 3 hours. Remove the dough from the refrigerator and roll the dough out into a rectangle ½ inch (13 mm) thick and repeat the tri-fold process described above. Refrigerate for at least 1 hour and no more than 3 hours and then repeat the folding process one more time. After the last fold, put the dough back onto the baking sheet, cover with plastic wrap, and refrigerate overnight.
MAKE THE FILLING:
In a medium bowl, whisk together the cream cheese,
sugar, egg yolk, salt, and mace. Use immediately or put the mixture in a covered container and refrigerate until ready to use, up to 2 days.
When ready to make the Danish, put the filling in a pastry bag fitted with a ½-inch (13 mm) plain tip. Remove the dough from the refrigerator. Cut the dough in half, put the other half back on the baking sheet, cover with plastic wrap, and return it to the refrigerator. Lightly flour a countertop or cutting board and roll the dough out into a 10 × 18-inch (25 × 46 cm) rectangle. Pipe two lines of filling, side by side, across the length of the dough, from edge to edge, and about 3 inches (8 cm) up from the bottom of the dough. Fold the bottom of the dough up over the filling and continue to roll the dough into a log, as if you were making cinnamon rolls. Cut the log of dough crosswise into 8 equal pieces and arrange them on a parchment paper–lined baking sheet in a 2 by 4 grid. Cover loosely with plastic wrap and repeat the process with the other half of the dough and a second baking sheet. Let both sheets of Danish proof at room temperature for 1 hour, until they have risen and look puffy and marshmallow-like.
Preheat the oven to 380°F (195°C).
In a small bowl, mix the crème fraîche and egg yolks with a pastry brush until they are well blended. Brush each Danish with the egg wash twice. Sprinkle with the raw sugar. Bake the Danish for 20 minutes, rotate the pans, turning them from front to back and switching racks from top to bottom, and bake until they are a deep golden brown, 10 more minutes more. Transfer the Danish to racks to cool for 10 minutes. Serve warm.
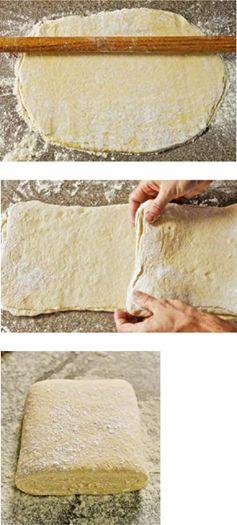
From top:
ROLLING THE DOUGH; FOLDING THE DOUGH; THE FINISHED ROLLED AND FOLDED DOUGH
RAW SUGAR, or turbinado sugar, is made from unrefined sugarcane juice, so it may contain trace minerals and nutrients. The reason we like raw sugar is because it generally has a coarse texture and doesn’t melt as easily as granulated or brown sugars. This means that when you sprinkle it on baked goods before baking, you get a nice crunchy top on the finished sweets. It also gives crumbles and streusel toppings an unexpected texture and soft crunch that is very appealing.
CURDS & WHEY
We love to cook with buttermilk, crème fraîche, ricotta, and cream cheese. In many cases culturing dairy products and making cheese at home will be less expensive and the results will taste better than what you can buy from a store. When we “culture” dairy products we introduce beneficial bacteria to the milk to jump-start the fermentation process, which changes the texture and flavor of the milk to create ingredients like crème fraîche, buttermilk, and various cheeses. It is so easy to make fresh cheeses at home—all it takes is time, heat, a thermometer, and a strainer.
These days natural buttermilk, a by-product of the butter-making process, is hard to come by unless you churn your own butter. Cultured buttermilk is the kind we buy at supermarkets and farmers’ markets and is usually referred to as simply “buttermilk.” It adds the same creamy dairy effect as milk in recipes, with the added benefit of a hint of acid to balance the flavors. When you make it at home you can use whole milk, which results in buttermilk so thick you can practically spoon it out of the container.
Cultured dairy products, either homemade or store-bought, can be used as a starter to make other cultured dairy products. For example, we add buttermilk to cream to make crème fraîche—an ingredient notable for its rich texture and the fact that it doesn’t curdle when you cook with it. If you let your crème fraîche sit out at room temperature for a day or two, it will separate, the thickened cream rising to the top of the container, leaving the whey on the bottom. When you spoon off the top layer you have something closer to American sour cream, which is thicker and creamier than traditional French crème fraîche. Either version can be used to make cultured butter in the recipe opposite.
Buttermilk that is allowed to sit out at room temperature for 1 to 3 days will also separate. The top layer is a delicious uncooked cream cheese, which can be seasoned to your taste and used as traditional store-bought cream cheese. The type of milk you use to make your buttermilk will dictate how much fat is in the finished cheese. It is tangy and smooth and has a wonderful fresh flavor.
A by-product of playing with dairy fermentation at home is the whey. Cultured whey is unbeatable for the home pickling process. Pickles are a product of lactic fermentation, and adding whey to your pickling liquid makes a huge difference in both the speed of fermentation and the quality of the finished product. The less time it takes for your pickles to ferment, the fresher and crisper the finished pickles. Whey is also a stellar cooking ingredient. We use it for marinades and brines and for cooking grains and beans. We also infuse it with spices and use it to poach fruit. It has a gentle tartness and an inherent sweetness that make for a wonderful background note in many savory and sweet preparations.
All of the recipes in the book will work with store-bought dairy products, but in the interest of flavor, we wanted to give you a few good recipes for making your own.
BUTTER & NATURAL BUTTERMILK
You can make this butter with either heavy cream or crème fraîche. If you are an adventurous cook, we suggest that you try making both kinds and then doing a side-by-side comparison so that you taste the difference that fermentation makes. You may be surprised by how thin the buttermilk is. That’s because almost all of the buttermilk that you buy from a store is cultured buttermilk. Buttermilk that comes from cultured butter, despite the difference in texture, can be used in the same way as any other cultured buttermilk.
MAKES ABOUT 8 OUNCES / 226 GRAMS BUTTER AND 3 CUPS / 720 GRAMS BUTTERMILK
1 quart / 960 grams
heavy cream
or crème fraîche
Let the cream sit out at room temperature for about 1 hour to warm up to about 50°F (10°C). Put the cream in a food processor and let it run continuously until it whips into firm peaks. At this point, pulse the food processor until the whipped cream separates into butter and buttermilk, 3 to 5 minutes. The butter will form small granules floating in a milky liquid. Line a large strainer with damp cheesecloth and set the strainer over a large bowl. Pour the mixture into the strainer and let drain for about 10 minutes. Alternatively, you can refrigerate the butter in its liquid for up to 48 hours to allow the flavor to develop.
Once most of the liquid has drained off, twist the top of the cheesecloth to contain the butter and gently squeeze it over the strainer to remove excess buttermilk. Once it seems dry, take the butter (still in the cheesecloth) over to the sink and rinse it under cool, running water, squeezing it gently, to remove any remaining buttermilk. Transfer the butter to a cool cutting board or marble slab and knead gently with damp, cool hands until all of the buttermilk is expelled. Wrap the butter tightly in plastic wrap and refrigerate for up to 4 weeks. The buttermilk can be stored in a covered container in the refrigerator for up to 2 weeks.
CULTURED BUTTERMILK
Cultured buttermilk, the kind normally found in supermarkets, is thicker and creamier than natural buttermilk and it can be made from whole or low-fat milk because the texture is more directly a result of the fermentation process than of the fat content.
MAKES 1 QUART / 900 GRAMS
1 quart / 1,040 grams
whole
or
low-fat milk
¼ cup / 60 grams
cultured buttermilk,
homemade or store-bought
Pour the milk into a generous quart container and add the buttermilk. Close the lid and shake to blend. If your container holds exactly a quart, omit ¼ cup (65 grams) of the milk. Leave the container out at room temperature for 24 to 48 hours until it has thickened. Store the finished buttermilk in a covered container in the refrigerator for up to 2 weeks. The finished buttermilk can be used to culture the next batch.
RICOTTA
This recipe uses the acid from the buttermilk to coagulate the cheese. You will find that the gentle lactic acids and the combination of milk and heavy cream transform your basic ricotta into a true delicacy to be savored and enjoyed.
MAKES 1 GENEROUS QUART / 1,000 GRAMS
6 cups / 1,560 grams
whole milk
1 pint / 480 grams
cultured buttermilk,
homemade (above) or store-bought
3 cups / 720 grams
heavy cream
In a large saucepan, combine the milk, buttermilk, and cream. Set over medium heat and stir to blend in the beginning and then do not stir again. Bring the mixture to 190°F (88°C); do not overheat the mixture. Remove the pan from the heat. Cover the pot and let it sit at room temperature until cool, 5 to 6 hours.
Line a large strainer with damp cheesecloth and set the strainer over a bowl. Ladle the ricotta cheese into the strainer and let drain for about 1 hour. The ricotta and the whey can be stored in separate covered containers in the refrigerator for up to 2 weeks.
FRESH CREAM CHEESE
One of the by-products of this naturally fermented cream cheese is whey. Whey is also found in many store-bought products like yogurt and sour cream. It is the clear liquid that separates out in the container. It is used to jump-start lactic fermentation in pickles and in recipes for cooking grains and beans as a flavorful replacement for some of the water.
MAKES 7 OUNCES / 200 GRAMS
1 quart / 960 grams
cultured buttermilk,
homemade (opposite) or store-bought
Fine sea salt (optional)
Put the buttermilk in a covered container and let sit at room temperature for 2 to 3 days. The curds and whey will separate and a layer of whey will appear at the bottom of the container.
Line a large strainer with damp cheesecloth and set the strainer over a bowl. Put the buttermilk in the cheesecloth and let drain for 3 to 4 hours until all of the whey has drained off the cheese. Transfer any whey to a covered container. Twist the top of the cheesecloth closed over the cream cheese and tie it to a long wooden spoon set over the top of the strainer so that it hangs slightly above the strainer, using its weight to help it drain. Refrigerate for 8 hours. Transfer any whey to your container, and put the cream cheese in a covered container in the refrigerator. If you like, you may season the cream cheese with salt (0.3%) at this point. Both the cream cheese and the whey can be kept in separate, covered containers in the refrigerator for up to 2 weeks.