Oracle RMAN 11g Backup and Recovery (114 page)
Read Oracle RMAN 11g Backup and Recovery Online
Authors: Robert Freeman

322
Part III: Using RMAN Effectively
Step 4.
Under the Retention Policy heading, change the policy to the second option,
Retain
backups that are necessary for a recovery to any time,
and set the value to
7
days.
Step 5.
Under Host Credentials, set the host server username and password to the user that installed your database software. Then click OK.
Step 6.
Confirm that the changes have taken effect for this database. Connect to the host server where this database resides:
Export ORACLE SID v112
rman target /
RMAN> show all;
using target database control file instead of recovery catalog
RMAN configuration parameters are:
CONFIGURE RETENTION POLICY TO RECOVERY WINDOW OF 7 DAYS;
CONFIGURE CONTROLFILE AUTOBACKUP ON;
…
CONFIGURE CONTROLFILE AUTOBACKUP FORMAT FOR DEVICE TYPE DISK TO
'/u01/backup/%F';
…
CONFIGURE DEVICE TYPE DISK PARALLELISM 2 BACKUP TYPE TO BACKUPSET;
CONFIGURE CHANNEL DEVICE TYPE DISK FORMAT '/u01/backup/%U'
MAXPIECESIZE 500 M;
…
CONFIGURE CHANNEL DEVICE TYPE 'SBT TAPE' MAXPIECESIZE 500 M;
…
Configuring Recovery Settings
After configuring the backup settings, you will need to configure the database recovery settings.
You can access this page from the main Availability tab of the database target by clicking the Recovery Settings link. Configuring the recovery settings actually covers a wide scope of options.
On the Recovery Settings page, OEM further divides the recovery settings into three types of recovery: Instance Recovery, Media Recovery, and Flash Recovery, as described in the following sections.
Instance Recovery
Only one setting refers to instance recovery, FAST_START_MTTR_TARGET, as shown next. This is an initialization parameter that determines a target value, in seconds, which you are interested in hitting when instance recovery is initiated on the database. MTTR is an acronym for
mean time
to recover
and is a common name for exactly how long it takes for a database to be operational again after it has crashed for some reason.
Chapter 13: Using Oracle Enterprise Manager for Backup and Recovery
323
Instance recovery is initiated automatically by Oracle when a database is started after a hard crash (or a shutdown abort). Instance recovery uses online redo logs and undo segments to remove any transactions that were uncommitted at the time of the crash and to set the database to a clean, synchronized state for further activity. Instance recovery must complete before the database can be started, so minimizing how long this takes affects how fast your database comes back to life after a crash.
FAST_START_MTTR_TARGET is a combination of a number of changes that are made internally to facilitate the speedy recovery of your instance (also referred to as
automatic checkpoint tuning
).
This parameter makes the LOG_CHECKPOINT_TIMEOUT and LOG_CHECKPOINT_INTERVAL
parameters obsolete. From OEM, you can specify this value in seconds. The valid range is 0 to 3600
seconds (or 0 to 60 minutes).
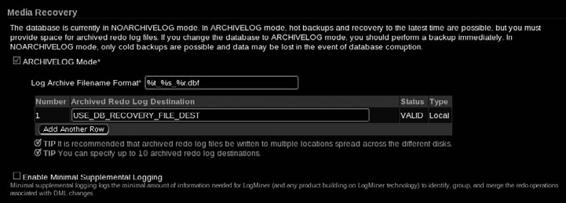
Media Recovery
The ARCHIVELOG mode/NOARCHIVELOG mode switch appears in the Media Recovery section of the Recovery Settings page. It’s hard to find if no one has told you to look there—you might mistakenly start looking in, say, the Archive Logs link from the Server page of the database target.
But here it is, halfway down the Recovery Settings page. It shows up here as a simple check box, but do not think that OEM has fired some magic bullet at the Oracle RDBMS: you still must reboot before this will take effect. In fact, OEM will submit a job to the OS to restart the database and perform the change.
In addition to enabling ARCHIVELOG mode, you can specify your LOG_ARCHIVE_FORMAT
and LOG_ARCHIVE_DEST parameters here. By default in 11
g,
the parameter USE_DB_RECOVERY_
FILE_DEST, also referred to as the flash recovery area (FRA), is set.
In 11
g,
a new check box (shown next) has been added to Enable Minimal Supplemental Logging. This configures the database for additional logging required for using the LogMiner utility.
Flash Recovery
Under the heading Flash Recovery, you can configure your FRA, providing both an FRA destination and size. More useful, and unfortunately buried here in a configuration page, is an excellent pie graph displaying current used space in the FRA, broken down by file type. This is an excellent

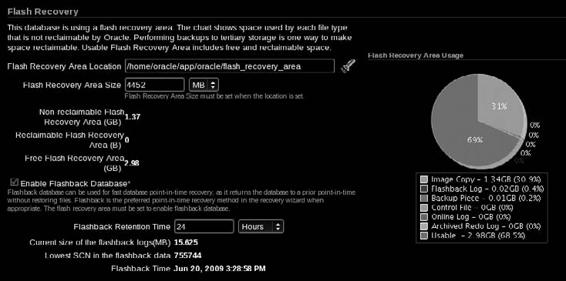
324
Part III: Using RMAN Effectively
quick view of the FRA that is hard to find anywhere else. Remember it is here under the Flash Recovery configuration settings; it can save you valuable time down the road.
In addition to being where you configure the FRA, the flash recovery area is where you can turn on Flashback Database, functionality introduced in 10
g
that can radically reduce point-in-time recovery by rewinding the database (literally). Flashback Database, and all of the different configuration requirements and resource needs thereof, are discussed in Chapter 15.
As with ARCHIVELOG mode, turning on Flashback Database requires a database reboot; we suggest that you do them both at the same time to save yourself a bit of hassle. Along with turning on Flashback Database, you can set your flashback retention time target, in hours.
Note, finally, the Apply Changes to SPFILE Only check box. Checking this option is the same as changing parameters like this:
alter database set db recovery file dest '/u01/fra' scope spfile;
Note, of course, that checking this box will not “save” the ARCHIVELOG mode and Flashback Database changes. Either you restart the database and change them, or you wait and restart the database and change them later.
Why Are My Archive Log and Flash Recovery Options Grayed Out?
If you arrived at the Recovery Settings page only to find the options to turn on ARCHIVELOG
mode and to modify the LOG_ARCHIVE_DEST locations grayed out in OEM (disallowing you from making changes to the mode or the flash recovery options), you have logged in as a user that does not have SYSDBA privileges. You must log out of Grid or Database Control, and log back in as user SYS with the role SYSDBA, to make changes on the Recovery Settings page.
Chapter 13: Using Oracle Enterprise Manager for Backup and Recovery
325
RMAN Workshop:
Configure Recovery Settings in OEM
Workshop Notes
This workshop makes changes that set a second archive destination in addition to the FRA, add more space to the FRA, and enable Flashback Database. This workshop assumes you are already in ARCHIVELOG mode (see Chapter 3 if you are not, or just choose the ARCHIVE Log check box on the Recovery Settings page).
Step 1.
Log into OEM as user SYS with role SYSDBA. If you are not logged in as SYS, the options on the Recovery Settings page will be grayed out.
Step 2.
Navigate to the Database | Availability | Recovery Settings page.
Step 3.
Set a new archive log destination to
/u01/backup
. Click Add Another Row and then specify the location (here, we use /home/oracle/backup).
Step 4.
Change the Flash Recovery Area Size to
4GB
.
Step 5.
Check the Enable Flashback Database check box. Set the Flashback Retention Time to
24 Hours
.
Step 6.
Click the Apply button. This prompts you to restart the database. Click Yes. You then need to provide host and database credentials for the shutdown.
Step 7.
After the database is restarted, navigate back to the Recovery Settings page to confirm the changes.
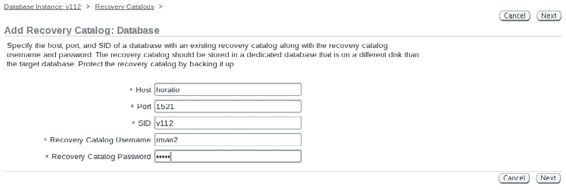
Configuring Recovery Catalogs in OEM
Enterprise Manager cannot actually create a recovery catalog. You still need to manually create the catalog user, grant the user the RECOVERY_CATALOG_OWNER role, and then connect RMAN to this user and issue the command
create catalog
. There is no wizard or anything for these steps in OEM. This can be a bit confusing, as there is an Add Recovery Catalog button on the Recovery Catalog Settings page. However, this button only adds an existing recovery catalog to the Enterprise Manager repository; that is, we make EM aware of the existence of a recovery catalog, so that it can then add this particular database to the specified catalog.
Once the catalog is created, you can inform OEM that you wish to use the recovery catalog.
After you have registered the recovery catalog with OEM, you can register targets in the catalog. If you have registered more than one recovery catalog, you can specify that a particular one be put in use during different backup and recovery operations.
326
Part III: Using RMAN Effectively
RMAN Workshop:
Register the Recovery Catalog with OEM
Workshop Notes
This workshop creates a catalog in the database emrep manually and then registers it for use in OEM.
Step 1.
Connect to the repository database as user SYS and create the user for the catalog: SQL> create tablespace reco cat datafile
'/u01/app/oracle/oradata/emrep/reco cat1.dbf' size 100m;
Tablespace created.
SQL> create user rman identified by rman
2 default tablespace reco cat
3 quota unlimited on reco cat;
User created.
SQL> grant connect, resource, recovery catalog owner to rman;
Grant succeeded.
SQL> connect rman/rman
Connected.
Step 2.
Make sure that you have the 11.2 $ORACLE_HOME/bin in your path before this step so that the RMAN executable is 11.2. Otherwise, OEM will not be able to register your catalog!
$ echo $PATH
/u01/app/oracle/product/10.2.0/bin
[oracle@dex oracle]$ rman catalog rman/rman@v112
Recovery Manager: Release 11.2.0.0.2 on Wed Dec 21
Copyright (c) 1982, 2009, Oracle. All rights reserved.
connected to recovery catalog database