Passionate About Pizza: Making Great Homemade Pizza (18 page)
Read Passionate About Pizza: Making Great Homemade Pizza Online
Authors: Curtis Ide
Tags: #Baking, #Cookbook, #Dough, #Pizza

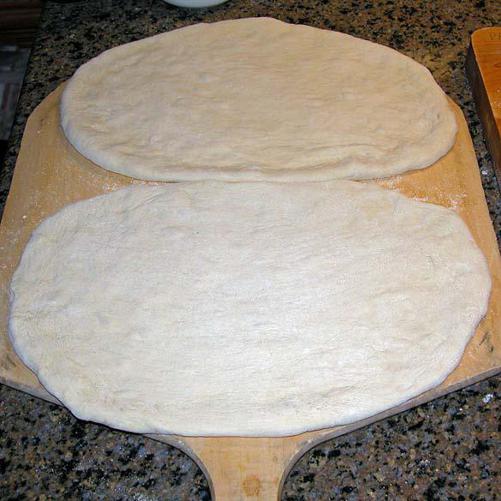
Prepare the pizza peel by spreading a small amount of flour over its surface and sprinkle a little cornmeal where the pizza will rest; the cornmeal and flour allow the completed pizza to slide off the peel easily. A wooden pizza peel will work best; metal peels or other kitchen implements may work, but it will probably be harder to slide the pizza into the oven without losing some toppings if you do not use a wooden peel.
Once the dough is close to the desired size, carefully lay the dough onto the prepared pizza peel or pizza screen. Gently configure the dough into its final shape. Two individual sized pizzas can fit easily on the pizza peel (and the baking stone) together. Arrange the pizzas so that they fit without overlapping each other. It is fine for the edges of the two pizzas to touch each other. After you have practiced a little, you should be able to slide both pizzas into the oven at the same time.
Hand Tossing Pizza Dough
Hand tossing is an adaptation of the hand stretching technique. You will see hand tossing used by pizza chefs primarily in pizzerias. It is not necessary to toss the pizza dough; it is a means of showing off or having fun, but I admit that I do it occasionally for just that purpose! The steps that follow are my version of the basic hand tossing method. You begin by stretching the dough into a partially stretched disk, and then it stretches further as you toss it. You will probably be ready to place the stretched dough on a pizza peel right after you finish tossing it, so you should get the peel ready before you start stretching. Sprinkle some cornmeal on the pizza peel as described in “Pizza Peel Technique” on
page 73.
Recommendation – use stiff dough. Since you will be tossing the dough, you should use dough that is not too soft. To make your dough stiff, use slightly more flour when mixing. In addition, you should not let the dough rest overly long after punching it down and making a dough ball. To stiffen up dough that is too soft for tossing, let it rest in the refrigerator for ten minutes or so rather than letting it rest on the counter top.
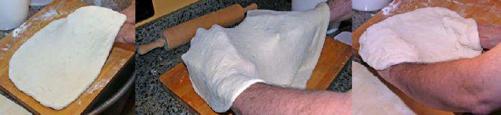
When you are ready to begin tossing the dough, stretch it until the dough disk is about half its final diameter and uniformly thin. Be careful not to stretch the center too much because it stretches very easily and can get too thin. Practice and the softness of the dough will dictate how long to continue this step. This initial stretching thins the dough in preparation for tossing!
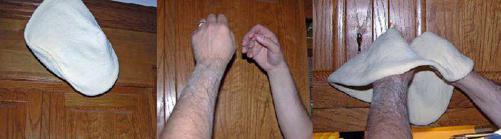
Lay the dough down on the work surface and dust the top with flour then gently brush the flour around on the surface, being careful not to squash the rim. Gently turn the dough over and repeat the dusting and brushing on the other surface of the dough. Adding this flour gives the dough some extra strength and it keeps it from sticking to your hands. Pick up the dough and drape it over your fists and wrists. Each of your fists should be near the edge and at opposite sides from each other. When tossing a pizza, you use your forearms, wrists, and fists to hold, throw, and catch the pizza dough.
The motion of your hands and arms will spin and lift the dough. First, try rotating the dough without trying to toss it. Move the dough slowly clockwise by moving your arms, keeping your forearms parallel to the floor while you are doing this; now do the same thing to rotate the dough counterclockwise. You should see the dough pivot on each fist while it moves on and off your wrists as it pivots. Now try lifting the dough without trying to toss it. Move the dough down towards your waist then up towards your chest.
Now that you have done each movement separately, try them together, again without trying to toss the dough. Move your hands up and rotate the dough one way while raising the dough. Then move your hands down and rotate the dough the other way while simultaneously lowering the dough. Go up and down a few times to practice.
Now, go ahead and toss the dough! To make the toss, you will do the raise and rotate move a little faster and with more oomph; the dough will leave your hands and spin in the air. After the dough leaves your hands, keep them raised and ready to catch the dough. As it lands on your fists, lower and rotate your hands in the same direction as the dough is spinning to catch the dough on your fists, wrists, and forearms. Try short tosses then work towards tossing as high as you want, or as high as your ceiling allows, as you gain practice.
Continue tossing or stretching the dough until it is about the same size as the pizza peel. If the dough has not reached its final size after a few tosses, go back to stretching it on or near the work surface. When you finish stretching, you can lay the dough down on the work surface or directly onto the pizza peel. Be careful not to stretch the dough too thinly. If you poke a hole in it, just pinch the hole closed. If things get too bad, knead the dough back into a ball for a minute or so, let it rest and start the stretching and tossing process over again. Some pizza chefs use a variation of tossing I call the hand-to-hand toss. In the early stages of tossing the dough, they place the dough on the palm of one hand with their fingers splayed out wide. Then, they toss the dough onto the palm of their other hand, again with the fingers splayed out wide. As you toss the dough back and forth, it stretches. Frequently, they will start with the hand-to-hand toss the finish stretching the dough in the normal way. You can gather ideas about various methods of hand tossing by watching the pizza chefs at your local pizzerias. These people do this for a living and the can be a great source of ideas that you can incorporate into your pizza-making repertoire.
Prepare the pizza peel by spreading a small amount of flour over its surface and sprinkle a little cornmeal where the pizza will rest; the cornmeal and flour allow the completed pizza to slide off the peel easily. A wooden pizza peel will work best; metal peels or other kitchen implements may work, but it will probably be harder to slide the pizza into the oven without losing some toppings if you do not use a wooden peel.
Once the dough is close to the desired size, carefully lay the dough onto the prepared peel. You can slide your hands, wrists, and forearms under the stretched dough to support it, if you wish. Gently configure the dough into its final shape and remember not to squash the edge.
Adjusting Pizza Thickness
You determine the thickness of a pizza by how much dough you have to shape and the size to which you shape it. This seems obvious and it is. Nevertheless, you can use knowledge this to your advantage especially if you are making pizza repeatedly. You will prefer a certain thickness of pizza; everyone does. Therefore, if the pizzas coming out of these recipes are not too your liking you can change it!
If you want the pizza to be thinner than the recipe gives, you have two choices. You can use less dough or you can stretch or shape it to be bigger. Conversely, if you want thicker pizza you can use more dough or shape it smaller. Since the pizza pan, screen, or peel frequently determines the size of your pizzas changing the amount of dough is frequently easier. If you want less dough right before shaping the dough just cut off a piece and set it aside (or throw it away). If you want more dough just adjust the recipe to make more by multiplying each ingredient by 1 1/2. Remember, you are making these pizzas to please yourself so customize them!
New York pizza chefs frequently stretch the dough to a size larger than the pizza will end up being. As they place the shaped dough on the peel, it stretches back to a slightly smaller size with little ripples as it sits on the peel. This makes for a very thin, floppy pizza crust.
Handling Shaped Dough
Now you have shaped the pizza dough and you are ready to go to the next step. If you pressed the dough into a pan, the next step is easy; you move right on to assembly. On the other hand, if you rolled out dough or if you stretched it you now have a big, floppy piece of dough. It will be fairly thin, somewhat slack, and stretchy, and it can be a little daunting to handle. You first need to prepare the pizza peel, pizza pan, or pizza screen as the resting place for the shaped dough. If you have not already done that, now is the time to do so.
Prepare the pizza peel by spreading a small amount of flour over its surface and sprinkle a little cornmeal where the pizza will rest. The cornmeal and flour allow the completed pizza to slide off the peel easily. Do not worry about placing too much cornmeal on the peel (within reason) as the cornmeal will fall onto the stone and will not overly stick to the pizza. As I have mentioned, I have found that a wooden pizza peel works best for handling uncooked pizza dough. Metal peels or other kitchen implements may work, but it will probably be harder to slide the pizza into the oven without losing some toppings than using a wooden pizza peel.
You can use a pizza screen in place of a pizza peel for most styles of pizza. Lightly oil the pizza screen before placing the shaped dough onto the pizza screen. You can also use a pizza pan for most recipes. Lightly oil the pizza pan before placing the shaped dough on the pizza pan. If you want to you can sprinkle a little cornmeal on the oiled pizza pan to give a hint of taste and texture to the bottom of the pizza. Do not use too much or the cornmeal will dominate the taste of the pizza crust.
Now you are faced with a 14 to 16 inch circle of dough (yes, it might be a different size or shape) that is not yet in a position to assemble into a pizza. You do not know the shaped pizza is big enough and that it is the right shape until you set it down somewhere and look at it. Usually you will set it down on your work surface. So, you will probably have to move the shaped dough from the work surface to the pizza peel, pizza screen, or pizza pan.
You will pick up the shaped dough, move it to its location on the peel (or screen or pan), and adjust its final shape and position. Sounds easy, right? Well, I know that it can be scary. The dough will stretch and deform a little as you do this; that is okay. It may also stick a bit together and that is okay, too. So, how do you make this move happen smoothly and without incident? You need to support the dough as much as possible. Here is how to do it.
Reach across the dough and pick up the opposite side of the dough with one hand (remember, do not touch pinch or deflate the rim on the edge if you have one) and slide your other hand under the dough with your palm facing downward and your fingers splayed out as wide as you can. Slide your hand in as far under the dough as you can such that your hand, wrist, and forearm support as much of the dough as you can.