Pie and Pastry Bible (170 page)
Read Pie and Pastry Bible Online
Authors: Rose Levy Beranbaum

DECORATIVE TECHNIQUES
CHOCOLATE FLURRIES
I call these flurries because they should be so thin that they melt instantly on the tongue. This is an easy garnish to make, as there is no need to melt or temper the chocolate. Use white chocolate for white snowflakes. Dark chocolate makes pale brown flakes.
The chocolate needs to be as hard as possible to make thin flakes, so don’t leave it in a warm kitchen. A large piece of chocolate is easiest to work with, but a flat bar will also work.
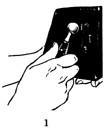
Use a melon bailer to scrape the chocolate, making short, light strokes that do not cut too deeply into the chocolate. A good-quality melon bailer, produced by a knife manufacturer such as Wüsthof, has sharpened edges and works best to cut thin flurries of chocolate. (Figure 1)
Allow the flakes to fall onto a small cool baking sheet. Place the sheet inside a large plastic bag and shake the flakes into the bag. (Avoid touching them, because they melt very easily.) Store refrigerated or at cool room temperature. Use a large spoon or bench scraper to lift the flakes and scatter them onto the pie or tart.
CHOCOLATE CURLS
Another simple decorative technique that doesn’t require tempering, curls are easy to make providing the correct chocolate is used and that it is at the right temperature and has not absorbed moisture from humidity. (I tried to make these once during a New Orleans summer, and, although the room was air-conditioned, I could not get the chocolate to curl.) Couverture chocolate (see page 627), which comes in large blocks, makes the most attractive, shiny curls.
If the chocolate has been left in an 80°F. room for several hours, it is usually at a good working temperature. Alternatively, a small block of chocolate can be softened to perfect consistency by placing it under a lamp (from the heat of the light bulb) or in a microwave oven using 3-second bursts of high power. It takes a few tries to get the chocolate soft enough without oversoftening it, but once this point is reached, it will stay perfect for at least 10 minutes, during which time many curls can be formed. Chocolate can be curled with a melon bailer, but my favorite utensil is a sharp potato peeler.
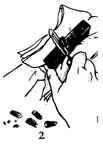
Hold the chocolate block in one hand, against a wad of paper toweling so that heat of your hand doesn’t melt the chocolate. Hold the peeler against the upper edge and, digging in one edge of the cutter, bring the blade toward you. (Figure 2) Greater pressure forms thicker, more open curls. Lighter pressure makes tighter curls. If the chocolate is not warm enough, it will splinter. If too warm, it will come off in soft strips that will not curl. If not extremely soft, these strips can be rolled into curls with cool fingertips. Lift the curls with a wooden skewer to place on the pie or tart.
CHOCOLATE LEAVES
This simple decoration makes a dramatic decoration for a chocolate pie or tart. They are especially appropriate as a seasonal decoration for Halloween or Thanksgiving. Use a variety of leaves and types of chocolate for the most interesting effect. If only a few chocolate leaves are needed, summer coating is the best choice because it doesn’t require tempering. Couverture (see page 627) makes the most glossy, elegant leaves. Rose, lemon, maple, and geranium leaves are some of my favorite shapes. Select wellshaped leaves with no holes. Make sure they are unsprayed. Wash the leaves and dry them thoroughly. Each leaf can be used several times, until it tears.
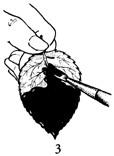
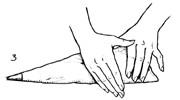
Holding a leaf by its stem and supporting it underneath with a finger or the palm of your hand, use a small metal spatula or artist’s brush to smooth an even layer of chocolate on the underside of the leaf. (Figure 03) (Be sure to use the veiny underside so all the delicate lines will be
imprinted on the chocolate.) Don’t allow any chocolate to get on the other side of the leaf, or it may break when peeling off the leaf.
Carefully place each chocolate leaf on a baking sheet lined with foil, parchment, or waxed paper and refrigerate or freeze for 3 minutes, until set and no longer shiny. If using large leaves, add a second coat of chocolate for stability and let set. White chocolate and couverture also require second coats, as the chocolate is thinner when melted and the light would shine through in spots.
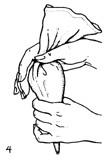
To remove the chocolate from the leaf, peel back the stem end, touching the chocolate as little as possible. (Figure 4) If chocolate adheres to the leaf, it has not set long enough.

PIPED DECORATIONS, CREAM AND MERINGUE
The two most important criteria for success when piping decorations with a pastry tube (in addition to icing consistency) are the position of the bag and the amount and type of pressure applied.
FILLING THE PASTRY BAG
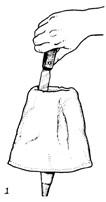
TO FILL BAG
Fold down the top to form a generous cuff and hold it beneath the cuff. Use a long spatula to fill the bag half full. Filling it more risks melting and softening the icing from the heat of your hand. (Figure 01)
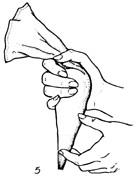
To remove the icing from the spatula, hold the bag on the outside between your thumb and fingers and pull the spatula out of the bag, pinching the icing. (Figure 02) Unfold the cuff and, using the side of your hand, force icing toward the top. (Figure 03) Twist the bag closed. To be sure that no air is trapped in the bag, squeeze a small amount of icing into a bowl. It is a good idea to do this when refilling the bag, or the little explosion of air when old icing meets new can disrupt the piped decoration.