Sew What! Bags: 18 Pattern-Free Projects You Can Customize to Fit Your Needs (9 page)
Read Sew What! Bags: 18 Pattern-Free Projects You Can Customize to Fit Your Needs Online
Authors: Lexie Barnes

FRAY PREVENTER
. There are several fray-prevention glues on the market; just follow the directions on the bottle. Be careful or you might end up with glue where you don’t want it. It helps to place a piece of heavyweight paper between the seam allowance and the fabric to catch any stray drips.
CUTTING CORNERS
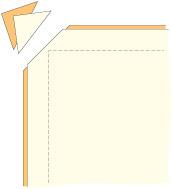
For most of the bags, you will essentially stitch squares of fabric together and turn them right side out. If you are not finishing the seams, you should at least trim them to a narrower, neater width to prevent bulkiness. The corners will need special attention. Clip the fabric diagonally across the corners to get rid of extra material that will get in the way of turning a neat corner.
We think of hems as something on the bottom of a skirt or dress, but any raw edge that is not part of a seam, like the edge of a pocket, will need to be hemmed. The best way to do that is with a double-fold hem. Here’s how you make one.
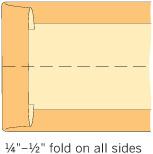
1. Press the raw edge ¼" or ½" to the inside.
2. Press under another ½". If you like, put in a few pins to hold the hem in place while you stitch.
3. Stitch as close to the first fold as you can. With a double-fold hem, the bobbin stitches show on the outside, so choose your thread color accordingly.

There are essentially two ways to make a strap, a drawstring, or an apron belt, and both methods are fairly similar. You can fold and stitch, or stitch and turn.
The first method is mostly a lot of folding, and is the best bet for making narrow straps. For instance, if you start with a 3"-wide strip of fabric, you will end up with a 1"-wide strap. (
Note:
To make a strap that has a different color fabric on opposite sides, see the Reversible Tote on page 81.)
1. Fold the strip of fabric in half lengthwise, wrong sides together, and press along the fold. Each half will be 1½" wide. Open up the strip, press each side under ½".
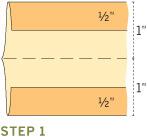
2. Refold the strip with the sides tucked in, and edgestitch along the length of both sides for greater strength.

FOR LARGER STRAPS AND BELTS
For a wider strap that will be used as a belt (
see the
Tool Apron
on page
129), the method is the same, but turn under the ends ½" before refolding. If the fabric is bulky, trim away excess fabric at the folded corners, then stitch across the folded ends.
This method works best for wide straps, like the DJ Bag (
page
115) and the City Satchel (
page
121), which start with fabric strips that are 6" to 8" wide.
1. Fold the strips in half lengthwise, right sides together. Stitch the entire length, ½" away from the raw edge.
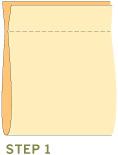
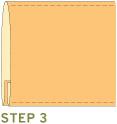
2. Attach a safety pin securely to one open edge and push it into the opening at one end. Work the safety pin through to the other end, turning the strap right side out as you go.
The Box Stitch3. Press the strap flat, and edgestitch along the length of both sides to strengthen the strap.
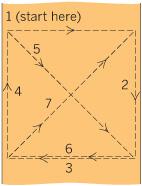
A box stitch is made by stitching a square or rectangular box, and then stitching an “X” inside the box. This stitch is used to secure handles to the body of the bag and is especially useful on larger bags, which will need extra reinforcement for strength.
Throughout this book, you’ll find instructions for three different kinds of pockets: individual pockets, pocket panels, and pleated pockets. All three are found on the Caddy (
see page
143
). To make an individual pocket, start with a rectangle that is about 1" larger than the desired finished size, and do the following:
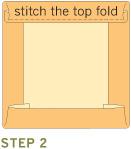
1. Press under the sides and bottom raw edge ½". It helps to press or trim the corner edges at a bit of an angle so the fabric doesn’t stick out on the sides.
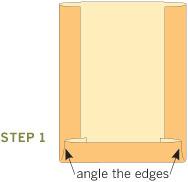
2. Press under the top edge ¼". Press it another ½" and edgestitch along the first fold as shown.
