Sins and Needles (33 page)
Authors: Monica Ferris

Knitting Pattern by Denise E. Williams
Skill level: Enthusiastic Intermediate
A knitting pattern for an “anatomically correct” U.S. flag, with a suggestion of apple-pie top crust!
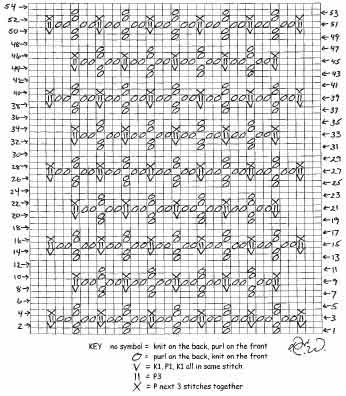
The Star Field is written as a graphed chart. A knitting chart is really a knitter's lingua francaâif you can read a chart, you can knit patterns from all over the universe!
This design uses one color, in pattern stitches to withstand pillow fights and dedicated lounging. The ambitious among us could add red, white, and blue to spectacular effect. Or, embellish the final piece with beads, ribbon, sequinsâ¦
Dimensions will vary, but the finished piece will be about 14" W Ã 22" L.
Â
ABBREVIATIONS:
K = knit
P = purl st. = stitch(es)
CO = cast on
P2tog = purl two stitches together
Moss Stitch = 1st row, K1, P1.
2nd row, K the Ps and P the Ks
Repeat these two rows.
Cable 2B = [P1, slip next 2 st. onto cable needle and hold in back of work, K2, K2 st. from cable needle, P1]
Â
MATERIALS:
- 2 skeins Patons Decor worsted weight, pale taupe heather. Or substitute your favorite worsted-weight wool.
- Size 7 knitting needles, or size to get a comfortable gauge
- 1 cable needle
- 14 ring markers
Â
PATTERN
CO 76 using your favorite cast-on method.
Â
Rows 1-7:
Moss Stitch.
Row 8:
This row sets up the border and the thirteen stripes.
Moss Stitch 5 st., place marker.
P1, K4, P1, place marker. This will be a “red” stripe, in a four-stitch cable.
K4, place marker. This will be a “white” stripe.
P1, K4, P1, place marker
K4, place marker
P1, K4, P1, place marker
K4, place marker
P1, K4, P1, place marker
K4, place marker
P1, K4, P1, place marker
K4, place marker
P1, K4, P1, place marker
K4, place marker
P1, K4, P1, place marker
Moss stitch 5 st.
Your piece should now have a five-stitch wide Moss Stitch border on either end and the thirteen stripes marked off in the body of the piece.
Â
Row 9:
Moss Stitch 5 st. K the Ks and P the Ps across. End Moss Stitch 5 st.
Row 10:
Repeat row 8, slipping markers instead of placing them.
Row 11:
Repeat row 9, slipping markers as you go.
Row 12:
Moss Stitch 5 st. *Cable 2B; P2tog twice* repeat between *'s across body, end Cable 2B. Moss Stitch 5 st.
Row 13:
Moss Stitch 5 st. *K1, P4, K1; P1 in front and back of next 2 st. *repeat across body. End K1, P4, K1. Moss Stitch 5 st.
Row 14:
Moss Stitch 5 st. *P1, K4, P1; K4* repeat across. End P1, K4, P1. Moss Stitch 5 st.
Row 15:
Keeping Moss Stitch border as established, K the Ks and P the Ps across stripes.
Â
Now that the Moss Stitch border is established, the remaining instructions will assume five stitches of Moss Stitch on either side of the outermost markers. The instructions continue for the stripes only.
Row 16:
*Cable 2B, K4* end Cable 2B.
Row 17:
K the Ks and P the Ps across.
Row 18:
K the Ks and P the Ps across.
Row 19:
K the Ks and P the Ps across.
Row 20:
*Cable 2B; P2tog twice* repeat across body, end Cable 2B.
Row 21:
*K1, P4, K1; P1 in front and back of next 2 st. *repeat across body. End K1, P4, K1.
Row 22:
K the Ks and P the Ps across.
Row 23:
K the Ks and P the Ps across.
Row 24:
*Cable 2B, K4* end Cable 2B.
Row 25:
K the Ks and P the Ps across.
Row 26:
K the Ks and P the Ps across.
Row 27:
K the Ks and P the Ps across.
Row 28-87:
Repeat rows 20-27. The instructions are much
Â
more daunting in print than in yarn on needles in your hands. Basically, you will be twisting the cables every four rows, and drawing in and expanding the white stripes every 8 rows.
THE STAR FIELD

Row 88:
Moss Stitch 5 st. P across the next 36 stitches, removing markers and decreasing 1 st. so the Star Field totals 35 stitches. Place marker. Continue stripes as established. End Moss Stitch 5 st.
Â
Your piece should now have the five-stitch wide Moss Stitch border on either end and the star field and remaining six stripes marked off.
Row 89:
Keeping stripes and Moss Stitch borders as established, K across the Star Field.
Row 90:
Keeping Moss Stitch borders and stripes as established, begin reading Row 1 of the star field chart.
Complete Row 54 of the star field chart. Decrease 1 st. toward the center of the piece to adjust the stitch count so that it will be in step with the Moss Stitch border.
Remove all markers, and Moss Stitch 7 rows. Bind off in Moss Stitch!
