The Granny Square Book: Timeless Techniques and Fresh Ideas for Crocheting Square by Square (35 page)
Authors: Margaret Hubert
Tags: #Crafts & Hobbies, #Needlework, #Crocheting

ROW 3:
ch 2, 1 dc in each of next 50 dc, 1 sc in each of next 12 sc, ch 11, turn.
ROW 4:
Starting in 2nd ch from hook, 1 sc in each next 10 ch, 1 sc in each of next 12 sc, 1 dc in each dc across, turn (73 sts).
ROW 5:
Ch 2, 1 dc in each of next 50 dc, 1 dc in each st across to last 2 sts, 2 dc in next sc (inc made), 1 dc in next sc, turn (74 sts).
ROW 6:
Ch 2, 2 dc in next dc (inc made), 1 dc in each dc across, turn (75 dc).
ROWS 7–12:
Rep row 5 and 6 (3 times) (81 sts at end of last row).
ROW 13:
Ch 2, 1 dc in each of next 50 dc, 1 sc in each of next 30 dc, turn.
ROWS 14–16:
Ch 2, 1 dc in each st across, turn.
ROW 17:
Rep row 13.
ROW 18:
Ch 2, dc2tog over next 2 sts (dec made), dc in each st across, turn (80 dc).
ROW 19:
Ch 2, dc in each st across to last 3 sts, dc2tog over next 2 sts (dec made), 1 dc in tch, turn (79 dc).
ROWS 20–25:
Rep rows 18 and 19 (3 times) (73 dc at end of last row).
ROW 26:
Ch 1, 1 sc in each of next 20 dc, 1 dc in each st across (73 sts), turn.
ROW 27:
Ch 2, 1 dc in each of next 50 dc, 1 sc in each of the next 12 sts, turn, leaving remaining 10 sts unworked.
ROW 28:
Ch 1, 1 sc in each of the next 12 sc, 1 dc in each st across, turn (63 sts).
ROW 29:
Ch 2, 1 dc in each of the next 52 sts, leaving remaining 10 sts unworked. Fasten off.
FINISHING
With E, sew right side shoulder, center back, and center top of hood. Sew underarm sleeve seam. Mark center of sleeve cap, pin in place matching underarm seam, matching center of cap with shoulder seam, sew in place.

FRONT AND HOOD BORDER
ROW 1:
With right side facing, join E at bottom right corner, ch 1, sc evenly across working 18 sc across each square, turn (306 sc).
ROW 2:
Ch 1, 1 sc in each of the next 216 sc, ending at the end of the 12th square, *ch 2, sk 2 sc (buttonhole made), 1 sc in each of the next 7 sc, rep from * 4 times, (5 buttonholes made), 1 sc in each sc across, turn.
ROW 3:
Ch 1, *1 sc in each st to next ch-2 sp, 2 sc in next ch-2 sp, rep from * 4 times, 1 sc in each sc across to bottom edge. Fasten off.
Sew buttons to left front edge, opposite buttonholes.
BLOCKING:
Place garment on a padded surface, sprinkle with water, pat into place, allow to dry. Ironing is not recommended.
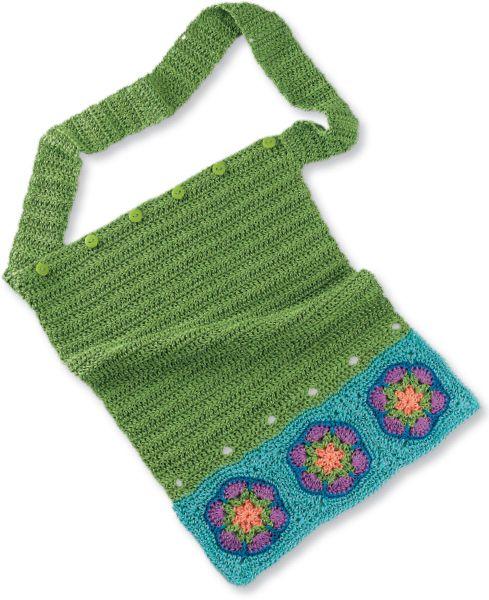
MAT CARRIER
SQUARES
Make 3 #28 Paula’s Pendant Squares (
page 61
), working first 6 rows only, following colors as for the tunic (
page 127
).
Sew sides together to form a row of 3 squares.
When 3 squares are sewn together, with E, work 1 row sc all around outside edges.
MAIN BODY
ROW 1:
With right side facing you, join B in first corner, ch 2 (counts as dc), *1 sc in each of next 17 dc, 1 sc in corner, rep from * twice more, end last dc in last corner (54 dc), turn.
ROW 2
(buttonhole row): Ch 1, 1 sc in first dc, ch 1, sk 2 dc, *1 sc in each of next 8 dc, ch 1, sk 2 dc, rep from * 4 times more, end 1 sc in the 3rd ch of the beg ch-3, (six ch-1 sps for buttonholes) turn.
ROW 3:
Ch 2 (counts as dc) sk first sc, 2 dc in the next ch-1 sp, *1 dc in each of the next 8 sc, 2 dc in next ch-1 sp, rep from * 4 times more, end 1 dc in the last sc, turn.
ROWS 4–29:
Ch 2 (counts as dc), sk first dc, 1 dc in each of next 52 dc, 1 dc in the turning ch. Fasten off after row 29.
STRAP
FOUNDATION ROW:
With B, ch 12, starting in 3rd ch from hook, work 1 dc in each ch (10 dc), turn.
ROWS 1–67:
Ch 2 (counts as dc), sk first dc, 1 dc in each of next 8 dc, 1 dc in tch, turn.
FINISHING
With right side facing, sew short ends of strap to sides of main body at opposite end of motifs. Sew buttons along the same edge as straps.
Blocking not necessary.
POPCORN FLOWER CARDIGAN

If you know me, you know I love flowers. I designed this cardigan using eighty #54 Popcorn Squares, with some slight adjustments. This cotton yarn comes in many beautiful colors, so I chose a handful of cheerful brights for the popcorn flowers and a rich, deep orchid for the background. I love how the flowers seem to be floating on top of the fabric.
Beginning popcorn (beg pc): Ch 2, work 4 hdc in designated st, remove hook from last loop, place hook from front to back in top of the first of last 5 dc, pick up dropped loop, draw through loop on hook to complete pc.
Popcorn (pc): Work 5 hdc in designated st, remove hook from last loop, place hook from front to back in top of the first of last 5 dc, pick up dropped loop, draw through loop on hook to complete pc.
Single crochet 2 together (sc2tog): [Insert hook in next st, yo, draw yarn through st] twice, yo, draw yarn through 3 loops on hook.
Reverse single crochet (rev sc): Working from left to right, insert hook in next st to the right, yo, draw yarn through st, yo, draw yarn through 2 loops on hook.
YARN
Ratons Grace, 100% mercerized cotton, 1.75 oz (50 g)/136 yd (125 m): orchid #62307 (MC), 12 (13, 14) skeins; 1 skein each (for all sizes) ginger #62027 (A), azure #62104 (B), lemon lime #62222 (C), viola #62322 (D)
HOOKS
C/2 (2.75 mm) and D/3 (3.25 mm)
GAUGE
1 square = 3" × 3" (7.5 × 7.5 cm) with D/3 (3.25 mm) hook
20 dc = 4" (10 cm)
4 rows dc = 1 1/2 " (4 cm)
NOTIONS
Tapestry needle
seven 3/4" (2 cm) buttons
sewing needle and matching thread
FINISHED SIZE
Small (Medium, Large)
Finished bust: 43" (44 1/2", 46") (109 [113, 117] cm)
SKILL LEVEL
Experienced

MOTIFS
Using D/3 (3.25 mm) hook, make 80 #54 popcorn squares (
page 89
), 20 each using a, B, C, and D for contrasting center color (CC). Always use MC for rounds 3, 4, and 5.
With CC, ch 8, join with a sl st to form a ring.
RND 1:
With CC, ch 1, work 16 sc in ring, join with a sl st to first sc (16 sc).
RND 2:
Beg pc in first sc, ch 3, *pc in next sc, ch 3, sk next sc, rep from * 6 times, join with a sl st in beg pc (8 pc, 8 ch-3 sps). Fasten off CC.
RND 3:
With right side facing, join MC in any pc, ch 1, sc in same st, *ch 4, 1 sc in top of next pc**, ch 6, 1 sc in top of next pc, rep from * twice, rep from * to ** once, ch 3, dc in first sc (counts as last ch-6 sp) (4 ch-4 sps, 4 ch-6 sps).
RND 4:
Ch 2 (counts as hdc), 4 hdc in same sp (half corner), *ch 3, 1 sc in next ch-4 sp, ch 3**, (5 hdc, ch 3, 5 hdc) in next ch-6 sp (corner), rep from * twice, rep from * to **, 5 hdc in the same sp as beg half corner, ch 3, join with a sl st to 2nd ch of beg ch-2 (completes corner).
RND 5:
Ch 5 (counts as hdc, ch 3), *1 sc in next ch-3 sp, ch 3, 1 sc in next ch-3 sp, ch 4**, (5 hdc, ch 3, 5 hdc) in next ch-3 sp (corner), ch 3, rep from * twice, rep from * to ** once, (5 hdc, ch 3, 4 hdc) in next ch 3 sp, join with a SI st to 2nd ch of beg ch-5 (completes corner). Fasten off.
JOINING MOTIFS
SIZE MEDIUM:
Before joining, add 1 row of dc along vertical edges of 8 underarm squares.
SIZE LARGE:
Before joining, add 2 rows of dc along vertical edges of 8 underarm squares.
ALL SIZES:
Join motifs together following diagram above as follows:
JOINING ROW:
With right sides together, working through double thickness of 2 motifs, join MC with sc in both corner sps, ch 3, sc in both center hdc of next 5-hdc group, ch 2. (sc, ch 2) in each of next 3 ch-3 sps, sc in center hdc of next 5-hdc group, ch 3, sc in both corner sps. Repeat joining row joining all motifs. For Medium and Large side motifs, join adjacent motifs to corresponding dcs on sides of underarm motifs to join.
When all motifs are joined as per assembly diagram, shape shoulders as follows:
BACK RIGHT SHOULDER:
ROW 1:
With right side facing, join MC in top right corner of back, work 24 dc evenly between corner sts of first motif and center of next motif, turn (25 dc).
ROW 2:
Ch 3, dc2tog over next 2 sts, dc in each st across, turn (24 dc).
ROW 3:
Ch 3, dc in each dc across (24 dc), turn. Fasten off size Small.
SIZES MEDIUM AND LARGE ONLY:
ROWS 4–5 (4–7):
rep row 3. Fasten off.
BACK LEFT SHOULDER:
ROW 1:
Sk center 2 motifs on back, join MC in center of next motif (1 1/2 motifs from end), ch 3, work 24 dc evenly spd across to top left-hand corner of back, turn.
ROW 2:
Ch 3, dc in next 22 dc, dc2tog over last 2 sts, turn.
ROW 3:
Ch 3, dc in each dc across. Fasten off size Small.
SIZES MEDIUM AND LARGE ONLY:
ROWS 4–5 (4–7):
rep row 3. Fasten off.
Work front shoulders to correspond. Sew shoulder seams together.
BOTTOM BORDER
SIZE SMALL ONLY:
ROW 1:
With right side facing, and D/3 (3.25 mm) hook, join MC in bottom left-hand corner sp, *ch 3 in corner sp (counts as dc), 1 dc in first, 3rd and 5th hdc of next 5-hdc group, 2 dc in next ch-sp, 1 dc in next sc, 1 dc in next ch-sp, 1 dc in next sc, 2 dc in next ch-sp, 1 dc in first, 3rd and 5th hdc of next 5-hdc group**, 1 dc in corner sp, 1 dc in junction between motifs, rep from * across, ending last rep at **, dc in 2nd ch of last ch-3 sp, turn (15 dc per motif block, plus 1 dc in each junction—223 dc).