The Naked Pint (49 page)
Authors: Christina Perozzi

STEP FOUR
Cool down the mixture, also known as the wort. There are several ways to do this, none of which is particularly simple, but you
must
cool it down before you transfer the liquid to your fermentation vessel (the plastic bucket or carboy). This goes for both ales and lagers; both must be cooled down before you add the yeast. You can put the pot into a sink or tub full of ice, or you can use a wort chiller, which is a spiral copper tube that you will have sanitized and can put into the wort. You then run cold water through the tube; the water travels through the copper and cools the wort before coming out the other end. The good thing about this is that it is fast; the slower you cool the wort, the longer you leave it open to contamination. We recommend catching the water at the end of the wort chiller and using it to water your yard.
STEP FIVEmust
cool it down before you transfer the liquid to your fermentation vessel (the plastic bucket or carboy). This goes for both ales and lagers; both must be cooled down before you add the yeast. You can put the pot into a sink or tub full of ice, or you can use a wort chiller, which is a spiral copper tube that you will have sanitized and can put into the wort. You then run cold water through the tube; the water travels through the copper and cools the wort before coming out the other end. The good thing about this is that it is fast; the slower you cool the wort, the longer you leave it open to contamination. We recommend catching the water at the end of the wort chiller and using it to water your yard.
Get ready to pitch your yeast. If you have liquid yeast from a vial, just shake it up and wait for the wort to reach the correct temperature. This temperature should be around 78°F. The temperature has to be cool enough to keep the yeast alive; high temperatures will kill the yeast, and you will have no beer. If you are using a dehydrated yeast, you’ll have to rehydrate it, using boiled water for sanitation purposes.
STEP SIXBefore you pitch the yeast, move the wort to the fermentation vessel (either a bucket or a carboy). Be careful and get help so that you don’t spill too much. If you want to filter out some of the stuff left in the wort, like the hops you may have added, use a funnel with a mesh bag, or hop bag, in it. Make sure everything has been sanitized! Most recipes require filtration because hops and malt can go bad if left in the beer. You can also use a siphon tube called a racking siphon. This will transfer your wort to the carboy quite well.
STEP SEVENPitch that yeast! Go ahead, you’ve earned it! But wait! Use your thermometer to make sure the wort is at 78°F or below. Be patient and wait for the mixture to cool down to this temperature. If the temperature is above this, the yeast may produce off-flavors or die.
STEP EIGHTPut in your airlock, which allows the CO
2
to get out without letting air with bacteria in. These thingies have a little tube you need to fill up with vodka (you can use another type of alcohol, but vodka is the best because it lacks taste, so if some of it gets into the beer, it won’t alter the flavor). The alcohol helps keep any bacteria from getting in.
STEP NINE2
to get out without letting air with bacteria in. These thingies have a little tube you need to fill up with vodka (you can use another type of alcohol, but vodka is the best because it lacks taste, so if some of it gets into the beer, it won’t alter the flavor). The alcohol helps keep any bacteria from getting in.
Let the beer be. Ales are happiest fermenting between 60°F and 70°F, so find a cool dark spot. Lagers need to be fermenting between 45°F and 55°F, so you’ll need a refrigerated spot. If you are using the glass carboy, keep it away from sunlight because this may ruin the beer. After a bit, the airlock will start to bubble, and you’ll know that fermentation is happening. Let this sit for 10 to 14 days. You’ll know the fermentation is done if the bubbling in the airlock has decreased to about one bubble a minute.
STEP TENBottle your beer. You need to sanitize the bottles and caps. You can soak the bottles in sanitizer, or run them through the dishwasher alone, or be super thorough and use the bottle brush to be sure they’re clean. The bottle caps need to be sanitized, too, but make sure you don’t ruin the seal by overheating them in any way. This could affect the seal on the bottle and in turn ruin your beer. Before bottling, transfer the beer via a siphon hose to your bottling bucket and add dissolved priming sugar, which will get the yeast eating again and create a secondary fermentation in the bottle (good for flavor, CO
2
, and a higher ABV). Again, via siphon, you will send the beer to the bottles and then cap them. Leave 1 to 1.5 inches below the cap.
STEP ELEVEN2
, and a higher ABV). Again, via siphon, you will send the beer to the bottles and then cap them. Leave 1 to 1.5 inches below the cap.
You wait. An ale will take about a week until it’s ready, a lager about two weeks. You can always test this by opening a bottle and tasting. Put your beer somewhere cool and out of direct light. Many people use a closet, but beware, beers have been known to explode if the fermentation in the bottle gets out of hand. This is rare, but it happens, so don’t put it with your clothes or anything you don’t want beer on.
If you want to put labels on your beers, which is fun and makes the beer a great gift, try
www.worldlabel.com/Pages/bottle-labels.htm
, which offers printable bottle labels and a downloadable bottle label template. Now you get to name your beer and put whatever image on it you want (we hope you don’t use a huge picture of your face, ’cause that’s, well, lame).
www.worldlabel.com/Pages/bottle-labels.htm
, which offers printable bottle labels and a downloadable bottle label template. Now you get to name your beer and put whatever image on it you want (we hope you don’t use a huge picture of your face, ’cause that’s, well, lame).
Don’t get discouraged if your beer comes out subpar. It’s going to take a few batches before you start to understand how best to brew. Try to wait before making beers with fancy ingredients until you have perfected a simpler recipe. Once you graduate to another level, however, you can get creative, adding various spices, yeasts, and fruit. This is where the chef in you can express his or her artistry. Most breweries started out with a determined homebrewer trying different recipes and finding a true passion for the beverage. You never know, this hobby may become your new profession.
Advanced Brewing Techniques: Beer 401I
f you have conquered some of the easier brewing recipes, you may be ready to get all crazy and create your own funky beer. You can do this by using advanced yeast strains, adding unique flavorings, changing up the hop varieties, and so on. Or perhaps you are ready to make your first lager and ferment at low temperatures. Once you delve into the more creative world of brewing, you will definitely end up with some pretty gross mistakes, and you have to accept that as part of experimentation and learning. But you may also end up with a truly unique brew that will give you a sense of satisfaction you hadn’t yet felt in the world of beer—the satisfaction of being a beer artist.
f you have conquered some of the easier brewing recipes, you may be ready to get all crazy and create your own funky beer. You can do this by using advanced yeast strains, adding unique flavorings, changing up the hop varieties, and so on. Or perhaps you are ready to make your first lager and ferment at low temperatures. Once you delve into the more creative world of brewing, you will definitely end up with some pretty gross mistakes, and you have to accept that as part of experimentation and learning. But you may also end up with a truly unique brew that will give you a sense of satisfaction you hadn’t yet felt in the world of beer—the satisfaction of being a beer artist.
The following sections discuss a few advanced aspects of brewing that you may want to experiment with.
Yeast Is Complicated: BrettanomycesYeast is a bit hard to control, as it has a mind of its own, and using more advanced yeast is tricky. The sour yeasts can invade everything if not properly cared for, and sometimes the flavors they impart will be unbearable at first, but after some aging, they can become wonderful. There are more strains of yeast than we can count, and some breweries create their own “scientific” mix and keep vials safely stored away. Each beer style has anywhere from 20 to 40 yeast strains for you to choose from. Most recipes will ask for a specific traditional yeast strain that isn’t too complex, and these have all kinds of different names, like American Ale Yeast and Muntons Premium Gold. The more advanced recipes, however, will require some complex yeasts that can get a little funky. If you are into this and want to start experimenting, get to know this word:
Brettanomyces
.
Brettanomyces
.
Brettanomyces
is the most famous of the funky ale yeasts and is affectionately called Brett for short. This is a determined and invasive little fungus that will eat pretty much any sugar, whether it be in the beer or the barrel or the floor. It’s famous for the complex flavors it imparts, which tend to conjure up these words: sour, funky, smoky, earthy, horse blanket, barnyard, dirty socks, sweaty saddle, and old cheese. Though this may sound really disgusting, trust us, it can be the perfect flavor addition to many different beers. We love earthy, funky, sour beers, and we count ourselves among those who desperately seek out Brett. Brett is notoriously hard to control, and some homebrewers will have entirely separate equipment for their Brett brews. If Brett gets loose, it could get into all of your present and future brews.
is the most famous of the funky ale yeasts and is affectionately called Brett for short. This is a determined and invasive little fungus that will eat pretty much any sugar, whether it be in the beer or the barrel or the floor. It’s famous for the complex flavors it imparts, which tend to conjure up these words: sour, funky, smoky, earthy, horse blanket, barnyard, dirty socks, sweaty saddle, and old cheese. Though this may sound really disgusting, trust us, it can be the perfect flavor addition to many different beers. We love earthy, funky, sour beers, and we count ourselves among those who desperately seek out Brett. Brett is notoriously hard to control, and some homebrewers will have entirely separate equipment for their Brett brews. If Brett gets loose, it could get into all of your present and future brews.
Brett beers are also a bit advanced because they require some aging. The funk of Brett can taste quite harsh if the beer isn’t allowed to mellow out and develop more complexity. Your Brett beer may need six months to a year before the sour earthy flavors become a good thing. Brett is often used as an additional yeast, something you add at the end after the original yeast is pitched. This will create a complex fermentation process that can go a bit wild, and it will no doubt take some practice for you to befriend Brett, but if you love the sour funky flavor like we do, the practice is well worth it.
Partial Mash and All Grain: Not for KidsIf you are wondering what lies beyond the world of malt extract, then get to know these terms:
partial mash
and
all grain
. As you know, using malt extract is the quick way to create your wort. Someone else has gone through all the trouble of turning grain into malt and has reduced it to a nice sweet syrup or powder you can easily dump into the boil. But if you want to get more involved with your malt, you can begin by making partial-mash homebrews. This means that you will use some of the malt extract and some dry malt, which you will grind in a grist and steep yourself (almost like tea). There are many recipes that offer this combo brew, and it’s a great way to begin to understand the complexities of all-grain or full-mash brewing, the process that most professional brewers go through. The great thing about using some quality grains in your brew is that you can add some layers of flavor that you can’t get with a tub of malt extract. You can do a mix of a pale and chocolate malt that will bring out a complexity to your Brown Ale you hadn’t had before. The quality of beer will improve greatly as you move to more and more grain. If you feel ready, and have the room to make an all-grain or full-mash beer, be prepared for a bit of a mess. This is not a popular choice for most homebrewers because it involves a lot of space for the boil. See the recommended brew books at the end of this chapter for more info on partial-mash and all-grain brewing.
Just Throw in the Spice Rack: Flavorings and Adjunctspartial mash
and
all grain
. As you know, using malt extract is the quick way to create your wort. Someone else has gone through all the trouble of turning grain into malt and has reduced it to a nice sweet syrup or powder you can easily dump into the boil. But if you want to get more involved with your malt, you can begin by making partial-mash homebrews. This means that you will use some of the malt extract and some dry malt, which you will grind in a grist and steep yourself (almost like tea). There are many recipes that offer this combo brew, and it’s a great way to begin to understand the complexities of all-grain or full-mash brewing, the process that most professional brewers go through. The great thing about using some quality grains in your brew is that you can add some layers of flavor that you can’t get with a tub of malt extract. You can do a mix of a pale and chocolate malt that will bring out a complexity to your Brown Ale you hadn’t had before. The quality of beer will improve greatly as you move to more and more grain. If you feel ready, and have the room to make an all-grain or full-mash beer, be prepared for a bit of a mess. This is not a popular choice for most homebrewers because it involves a lot of space for the boil. See the recommended brew books at the end of this chapter for more info on partial-mash and all-grain brewing.
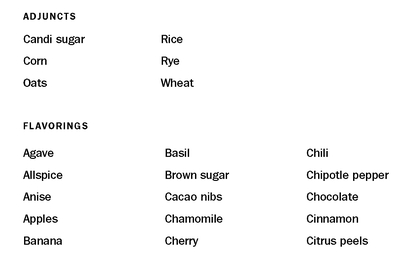
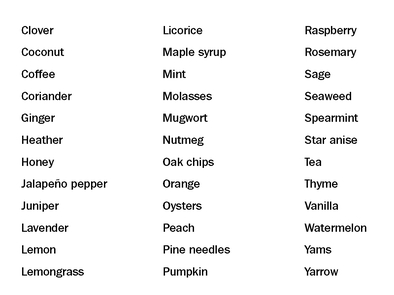
If you want to get super crazy with your brewing, try adding some adjuncts and flavorings. As in cooking, fruit, spices, and herbs are a huge part of brewing beer. Also like cooking, these ingredients may not turn out the way you expected them to once you taste the final product. So start out simply. We recommend using a beer you feel you’ve mastered, perhaps a Porter of some sort, then add a flavoring that isn’t too complicated and would obviously go well with the flavors of that Porter, perhaps chocolate or vanilla. It’s tempting to throw in a bunch of crazy things, but try to build up to flavorings like chai, which uses a collection of spices. After you perfect the vanilla or chocolate or cinnamon Porter, you can add nutmeg the next time and cardamom the next, to keep building complexity. Use some recipes that do a few adjuncts or flavorings and note how much the brewer recommends adding and when. Just to get your creative juices flowing, we’ve made a suggestion list of adjuncts (unmalted grains added as a supplement to malted barley for brewing) and flavorings (extras added to some beers solely for flavor) we’ve seen used in craft brewing:
Advanced HopsWhen you get into brewing and drinking hoppy beers, you will, no doubt, come across these two suggestive phrases: wet-hopped and dry-hopped. They’re not as dirty as they sound. Dry-hopping is the process in brewing when dried hops are added to the wort after the boil or to the fermenter. This would be after you’ve made other hop additions during the boil. Dry hopping is not meant to add bitterness and dryness but to enhance aroma and flavor. Wet hopping (get your giggles out now), on the other hand, uses freshly picked hops that have not been dried or put onto pellet form. This process is said to impart a green flavor to your beer, a grassier, earthier taste. Wet- and dry-hopping are often used to make seasonal specialty beers seen around the holidays, as hops are harvested in September.
Here is one wet- and one dry-hopped beer to try:
 SIERRA NEVADA HARVEST ALE :
Sierra Nevada Brewing Company, Chico, California. This wet-hopped American IPA has the fresh grassy notes that are typical of wet-hopping. Notes of caramel, citrus, and pine; nice oily bitterness. 6.7% ABV.
 OLD GUARDIAN BARLEY WINE DOUBLE DRY HOPPED:
Stone Brewing Company, Escondido, California. A dry-hopped Barleywine with notes of spice and dried fruit, and an aromatic hop bitterness. 11.3% ABV.
SIERRA NEVADA HARVEST ALE :Sierra Nevada Brewing Company, Chico, California. This wet-hopped American IPA has the fresh grassy notes that are typical of wet-hopping. Notes of caramel, citrus, and pine; nice oily bitterness. 6.7% ABV.
OLD GUARDIAN BARLEY WINE DOUBLE DRY HOPPED:Stone Brewing Company, Escondido, California. A dry-hopped Barleywine with notes of spice and dried fruit, and an aromatic hop bitterness. 11.3% ABV.
Other books
Death in the Desert by Jim Eldridge
Torn in Two by Ryanne Hawk
Some Wildflower In My Heart by Jamie Langston Turner
Love's Deception by Adrianne Byrd
The Secret Pilgrim by John le Carré
The Secret of Skull Island by Zack Norris
Kye's Heart by Marisa Chenery
Lola and the Boy Next Door by Stephanie Perkins
The King's Mistress by Sandy Blair
The Orphans of Race Point: A Novel by Patry Francis