The Vertical Gardening Guidebook (5 page)
Read The Vertical Gardening Guidebook Online
Authors: Tom Corson-Knowles

Compost is the stuff of life! Plants need healthy soil to grow so if you’re planning to grow on land that’s been damaged or compressed, make sure to use good healthy compost.
You can read more about composting later on in Chapter 7.
pH Level of Soil
Depending on the type of plants that you are growing, you will need to have a certain pH level for your soil. Some vegetables require soil that is slightly acidic, between 6.0 and 7.0. Level 7.5 and higher is considered to be alkaline and anything below that is considered acidic. It’s important that you pay attention to the alkalinity and acidity levels of your soil because if not at the right levels, it could deprive your plants of certain nutrients, resulting in poor growth. A soil pH test can be used regularly to keep an eye on things.
To make your soil more alkaline, you can use lime. Then to lower your soil to acidic levels, sulfur can be used. This should be done six months in advance, since it takes time for them to take effect. There are also store-bought products that you can purchase that may work faster.
Fertilizer
Just like with manure, you should place down your fertilizer in advance, so that the soil can absorb its nutrients. You can combine this with your compost, since it can give your soil phosphorous, potassium and nitrogen, among other types of micronutrients.
There are different types of fertilizers that you can use for your garden, including manure, fish emulsion and blood meal. Organic materials are lower in phosphorous, unlike with fish emulsion and manure.
If you decide to buy your fertilizer prepackaged, make sure to look at the label to see what the contents are made up of. Some fertilizers have to be absorbed in water before being applied to your garden and others come in the form of granules. When reading the label, you want to check to see how much phosphate, nitrogen and potassium it has. You will find many that are made up of 8% nitrogen, 32% phosphate and 16% potassium.
Make sure that you don’t over fertilize your garden because it can cause excessive plant growth, which means you’ll receive less yields of veggies and fruits. A soil test can be done to check the nutrient levels of your soil.
After planting your garden, you can place down a nitrogen fertilizer once your plants have already started growing. This should only be done if your soil has been depleted of nitrogen and requires more.
If you are growing tomatoes, the fertilizer should be placed six to eight inches away from the main stem and for onions, it should be placed three to four inches away from the main stem. You can use a store-bought nitrogen fertilizer that is made up of 20 to 30 percent nitrogen, but it should not contain any seed germination inhibitors or weed killers.
If you’re growing leafy vegetables, such as cabbage, lettuce, sweet corn and spinach, you can put down the nitrogen fertilizer once the plants have grown between three and five true leaves. Nitrogen fertilizer shouldn’t be used on tomatoes, peppers, pumpkins, cucumbers, squash or eggplants until they have started to bear fruit. Doing it too soon could minimize the amount of fruit they produce, or worse, it could prevent them from growing fruit at all.
C
HAPTER 4.
H
OW TO
B
UILD A
F
REE-
S
TANDING
V
ERTICAL
G
ARDEN
A free-standing vertical garden can be much easier to build than you might think! There are a couple of ways you can build one, but we’ll focus on the two most common and easiest ways.
For a free-standing garden, you will need several feet of space. This works best if you have a small sized yard and grass to work with. It’s probably not a good option if you live in an apartment or condo – you may went to use an aeroponics gardening system if you have only a few feet of space to work with.
The first one we’ll discuss looks like a fence and can be used as such if you’re looking to increase the privacy of your yard, patio or balcony. The difference is that the free-standing structure has a double layer, so that plants can be placed in the middle of the layers.
You can make your free-standing vertical garden as wide and tall as you want it, but just keep in mind the accessibility of it. You don’t want to have to climb ladders to reach the top and you don’t want to have to bend too low to reach the bottom if you have back problems.
The tools and materials you will need to build a free-standing vertical garden structure are:
Hammer or drill
Nails or screws
Two-by-fours
Extra wood for small pieces to be cut
Wooden posts
Tape measure
Saw
A free-standing vertical garden is ideal if you don’t have a wall or roof to hang your plants. It’s cheap to make and quite easy if you’ve ever worked with carpentry projects. If you don’t have any experience, ask your friends or family to come over and help you – it will make for a fun and productive day!
Keep in mind that there are many different designs for free-standing vertical gardens that you can purchase online, but this is only one of the two examples of how you can do it yourself.
Here are the steps to follow to build your free-standing vertical garden:
The Fence-Like Vertical Garden
- Cut eight two-by-fours into the length of your choice (The length of these boards will be the length of your garden)
- Cut four wood posts into the height of your choice (The post height will determine the height of your garden)
- Begin nailing the two-by-fours to the front and back of the wooden posts until it makes four equal rows.
- Nail smaller cut pieces of wood that are a few inches wide at the ends of the two-by-fours to close them off (This helps provide more support for the structure).
- Nail blocks of wood every four inches in between the two-by-fours, so that the plant can sit on something inside of the two-by-fours.
- The final construction can be dug into the dirt like a fence, so that it doesn’t tip over and fall.
- Close up the bottoms of the two-by-fours with a strainer-like net and place your soil and plants inside these nets – you can buy plant hangers or plant holders at any gardening supply store or online.
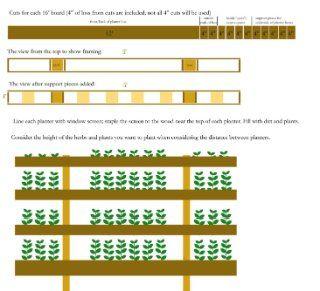
Below is a picture of the design and layout of the fence-like vertical garden wall. If you need to see the picture in greater detail you can see the
full-size version here on the website
.

When the garden is complete it should look like the picture below.

The Communal Wall Method
This is another way that you can construct your free-standing vertical garden. It is easily moved and can be placed anywhere you have the space for it. You can place flowering pots at the bottom of the communal wall and allow them to creep up the sides.
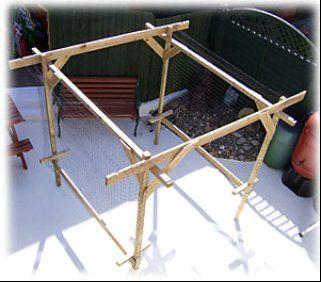
The structure is simple, four wooden poles are stood upright and attached together by four other wooden poles that are nailed together and placed at the top to hold the other four together. Two more wooden boards are placed a foot from the bottom to hold the structure steady.
At the end, it would look like a room with no walls. A wire mesh is placed on adjacent sides, which is used for your creeping vertical growing plants. Think of a pergola-style structure.
Supplies Needed
10 2x4s at the length you choose
Extra wood for supports
Nails or screws
Hammer or drill
Saw
Wire mesh
Steps
- Nail together three of the boards at the ends, into the shape of street sign that has two signs. There should be one pole standing upright and two boards that are perpendicular at the top.
- Cut diagonal pieces of wood to hold up the wood that is at the top of the structure. Nail to the outside of the top board and the pole that ascends downward.
- Nail the other two boards a foot from the bottom on the north and south sides, using four foot long pieces of wood to nail them to the upright poles.
- Attach the wire mesh to the north and south sides. The four pieces of wood that were nailed at the bottom can be used as spacers to attach additional wire meshes on the opposite side of the structure for more plants, giving you four walls in total.
When all done the structure should look like the picture below.

The boards you use should be long enough to give you sufficient space, so that your plants are able to get east and west sunlight. Make sure to place your structure in an area that receives at least 6-8 hours of sunlight.
This structure will allow you to enter into your vertical garden through the two open sides, providing you with enough room to water, pluck and seed your garden.
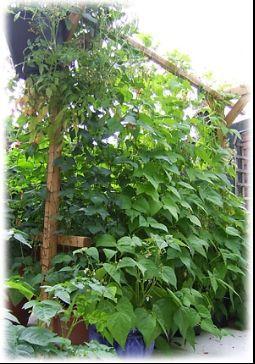
Below is a picture of the communal wall happily supporting a new vertical garden.

C
HAPTER 5.
M
AINTAINING
Y
OUR
V
ERTICAL
G
ARDEN
Building and starting your vertical garden is great, but what would it matter if you don’t know how to properly maintain it?
Luckily, one of the other great reasons about vertical gardening is that it is so much easier to take care of than an outward growing in-the-ground garden. There are a few things that you need to frequently maintain to keep your vertical garden flourishing beautifully.
Water
This is a no-brainer. You should have set up your vertical garden in a way that makes watering your plants easy. This could be setting up a water drip system or other automated irrigation system.
