Windows Server 2008 R2 Unleashed (212 page)
Read Windows Server 2008 R2 Unleashed Online
Authors: Noel Morimoto

level when it comes to group nesting.
Controlling Group Membership Using Restricted Groups
Restricted groups can be used to control the membership of a group using the member
setting, which is detailed next. When this setting is defined for a group, only the members
added to this list will be a member of the group and any existing members will be
removed when the policy is applied or refreshed. The only exception to this rule is when
the local Administrator user account is a member of a member server Administrators local
group or the Administrators domain security group. The same exception applies to manag-
ing the membership of domain groups, if the Administrator account in the domain is a
member of the Administrators domain group, this account will remain even when a
restricted group member setting is defined that does not include the Administrator
account. This does not apply to any other security group that the Administrator account is
a member of.
The restricted groups Administrator account exception was added as a fix with specific
service pack revisions so if the computers in the organization are not up to date on
supported operating systems and current service pack revisions, the administrator account
can be removed by a restricted groups member policy. As a best practice, when the local or
1082
CHAPTER 27
Group Policy Management for Network Clients
domain administrator account needs to be a member of a restricted group, do not count
on the GPO to leave it in; instead, define it within the member policy setting. As an
example of how to control membership of a local group on a member server or worksta-
tion using restricted groups, perform the following steps:
1. Log on to a designated Windows Server 2008 R2 administrative server.
2. Open the Group Policy Management Console from the Administrative Tools menu.
3. Add the necessary domains to the GPMC as required.
4. Expand the Domains node to reveal the Group Policy Objects container.
5. Create a new GPO named NetCfgOpsRestrictedGroupGPO.
6. Open the NetCfgOpsRestrictedGroupGPO policy for editing and in the Group
Policy Management Editor, expand the Computer Configuration node, expand
Policies, expand Windows Settings, expand the Security Settings node, and select
Restricted Groups.
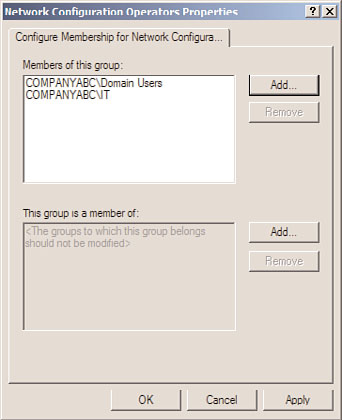
7. In the tree pane, right-click the Restricted Groups node and select Add Group.
8. When the Add Group window opens, do not browse; just type in Network
Configuration Operators and click OK.
9. When the Network Configuration Operators window opens, click the Add button in
the Members of This Group section.
ptg
10. When the Add Member window opens, type in the name of a user or group and
click OK, or click the Browse button to locate and select users and/or groups, click
OK, and click OK again. Domain accounts should be entered as domain\username
and multiple entries should be separated by semicolons.
11. After all the entries are added, click OK to finalize the settings, as shown in Figure
27.26.
12. Back in the Group Policy Management Editor window, close the GPO.
13. In the GPMC, link the new NetCfgOpsRestrictedGroupGPO policy to an OU with a
computer account that can be used to test this policy. Network Configuration
Operators groups exist in Windows XP, Windows Server 2003, Windows Server 2008,
Windows Vista, and Windows 7 systems.
14. Log on to a system to which the policy applies with an account with administrative
privileges and verify the membership of the group. If the policy has not yet been
applied, run the gpdate.exe /force command in a Command Prompt window.
15. Add additional users to the group and reapply the GPO by running the
gpupdate.exe /force command in a Command Prompt window. Verify that the
new users have been removed by the domain group policy.
16. Log off of the workstation and log back on to the Windows Server 2008 R2 system.
Link the GPO to the appropriate organizational unit to complete this task.
Using this function of restricted groups is not recommended for the Administrators local
group on domain workstations or in Active Directory unless the organization is certain
that no users have been added to allow for legacy application or other additional rights.
For this example, the Network Configuration Operators group membership has been
Managing Active Directory with Policies
1083
FIGURE 27.26
Configuring members using restricted groups.
ptg
defined by the policy. This group has the rights to completely manage and configure
network settings of the computer.
Modifying Group Membership Using Restricted Groups
When defining the membership of a group is not the desired change, the Restricted
27
Groups Member of function can be used. This is a less-invasive method of updating or
modifying group membership using domain policies. As an example, if an organization
wants to add the COMPANYABC\IT domain security group to the local Administrators
group of all computers in the HQ Workstations organizational unit, the following process
can be followed:
1. Create an OU called HQ Workstations and place all the necessary computer accounts
into the OU.
2. Create a new domain group policy called HQWorkstationsRestrictedGroupGPO and
open it for editing.
3. Click the Computer Configuration node, expand Policies, expand Windows Settings,
expand Security Settings, and then select Restricted Groups. Add a group but do not
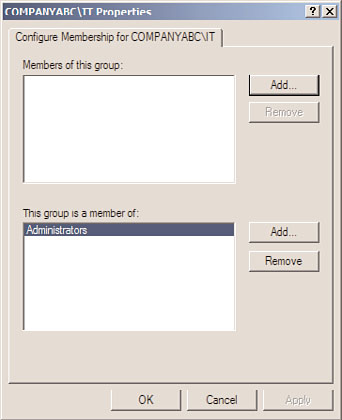
specify the Administrators group; instead, specify the COMPANYABC\IT group.
4. In the properties of the COMPANYABC\IT restricted group, click the Add button in
the This Group Is a Member Of section. In the Add window, do not browse; simply
type in Administrators and click OK. The properties of the group should appear, as
shown in Figure 27.27.
1084
CHAPTER 27
Group Policy Management for Network Clients
FIGURE 27.27
Adding members to the local Administrators group using the Restricted Group
Member of function.
ptg
5. Click OK again to close the COMPANYABC\IT Restricted Group Properties window.
6. Back in the Group Policy Management Editor window, close the GPO.
7. In the Group Policy Management Console, link the new
HQWorkstationsRestrictedGroupGPO policy to an OU with a computer account that
can be used to test this policy.
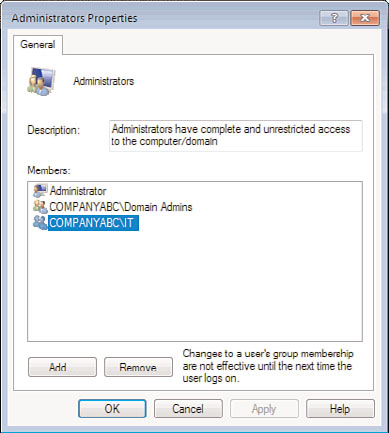
8. Log on to a system that the policy applies to using an account with Administrators
group membership, and verify the membership of the local Administrators group, as
shown in Figure 27.28.
9. Log off of the workstation and log back on to the Windows Server 2008 R2 system.
Link the GPO to the appropriate organizational unit.
Configuring restricted groups to manage domain groups can be performed using the same
steps as previously outlined. The only difference is that the GPO will need to be linked to
the Domain Controllers organizational unit, or the domain itself. Even if membership or
member of configuration of a group is managed with restricted groups, it does not prevent
users with the correct access from modifying the membership of these groups between
Group Policy refresh cycles. To mitigate this, try to keep the membership of
Administrators, Domain Admins, Account Operators, and Enterprise Admins in the
domain to a minimum. On the local systems, try to keep the local Administrators group
membership limited as well.
Managing Active Directory with Policies
1085
FIGURE 27.28
Verify that the restricted groups policy has updated the local Administrators
group membership.
ptg
Extending Group Policy Functionality
When the settings included in Group Policy do not provide the necessary settings or
configuration options, Group Policy can be extended by adding additional administrative
27
templates. Many third-party software vendors, and Microsoft, provide administrative
templates that can be imported into group policies to add functionality. As detailed in
Chapter 19, Windows Vista, Windows 7, Windows Server 2008, and Windows Server 2008
R2 support a new administrative template format consisting of an ADMX file that contains
the administrative template settings, and a corresponding ADML file that contains the
language-specific information that allows for the editing of the administrative template
settings in the local language of the system administrator. To extend Group Policy func-
tionality to manage Office 2007 settings as an example, perform the following steps:
1. Follow the procedure outlined in Chapter 19 to create a domain central store.
2. Download the Office 2007 administrative templates from Microsoft.
3. Execute the download and select a target folder.
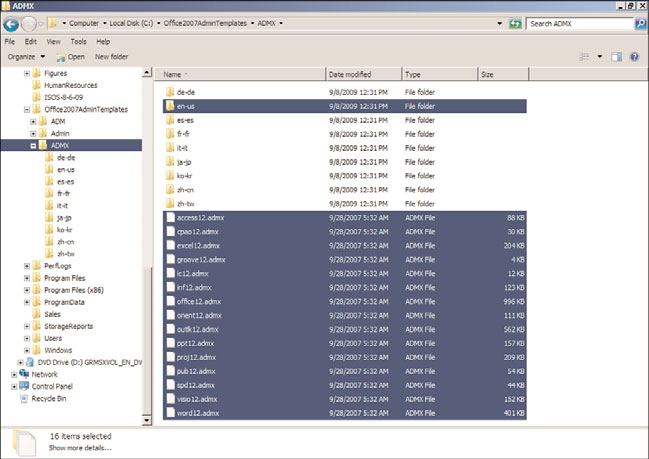
4. Open this folder to locate the ADMX folder and open it to reveal the ADMX files and
the language-specific subfolders that contains the respective ADML language files.
5. For this example, our Group Policy management will only be performed using the
English language templates. Select all of the ADMX files at the root of the folder and
also select the en-us folder, as shown in Figure 27.29.
1086
CHAPTER 27
Group Policy Management for Network Clients
FIGURE 27.29
Selecting all of the Office 2007 ADMX files and the English United States
ptg
language-specific folder.
6. Copy the selected ADMX files and the en-us folder to the Clipboard by right-clicking
and choosing Copy.
7. Navigate to the domain central store network location and open the folder. For the