Windows Server 2008 R2 Unleashed (218 page)
Read Windows Server 2008 R2 Unleashed Online
Authors: Noel Morimoto

with the operating system. Most disk-related tasks can be performed using the Disk
Management console, the Share and Storage Management console, or the diskpart.exe
1110
CHAPTER 28
File System Management and Fault Tolerance
command-line utility, but to manage a new disk just added to Windows, the Disk
Management console must be used.
The Disk Management MMC Snap-In
The Disk Management console, or snap-in, can be used to initialize and configure new
disks; import previously configured disks; convert basic disks to dynamic disks; create,
extend, and shrink disk volumes; format disk volumes; enable shadow copies; and many
more disk-related tasks. Disk Management can also be used to create and attach or mount
VHD files to the host operating system for quick volume access and data management.
This snap-in is included as part of the Computer Management console and the Server
Manager console, but it can also be added to a separate Microsoft Management Console
window. The Disk Management console can be used to manage disks on remote machines
as well as local disks.
Diskpart.exe
Command-Line Utility
Diskpart.exe is a command-line utility that administrators can use to manage Windows
disks. Most disk tasks that can be performed using the Disk Management console can also
be performed using this command-line utility except for initializing new disks. When
issues are encountered with a Windows Server 2008 R2 that won’t boot, diskpart.exe
ptg
might be the only option available when booting into the recovery environment, so
administrators should be well versed and comfortable with this tool.
Adding a New Disk to Windows
When a disk is added to a Windows Server 2008 R2 system, the only tool that can be used
to get the disk configured is the Disk Management snap-in. Windows Server 2008 R2 is
able to detect most disks without a reboot. This, of course, depends on the disk type and
the disk controller type. For example, if a new disk is added to a system with a RAID-
compatible disk controller, it will not be detected or available to Windows until the new
disk is configured using the RAID controller configuration utility. When a new disk is
ready to be added into the Windows Server 2008 R2 operating system, perform the
following steps:
1. Log on to the Windows Server 2008 R2 system with an account with administrator
privileges.
2. Click Start, click All Programs, click Administrative Tools, and select Server Manager.
3. In the tree pane, double-click the Storage node, and select Disk Management.
NOTE
In many cases, when a new disk is added to Windows, it is automatically detected and
an Initialize Disk pop-up Window opens; please close this window.
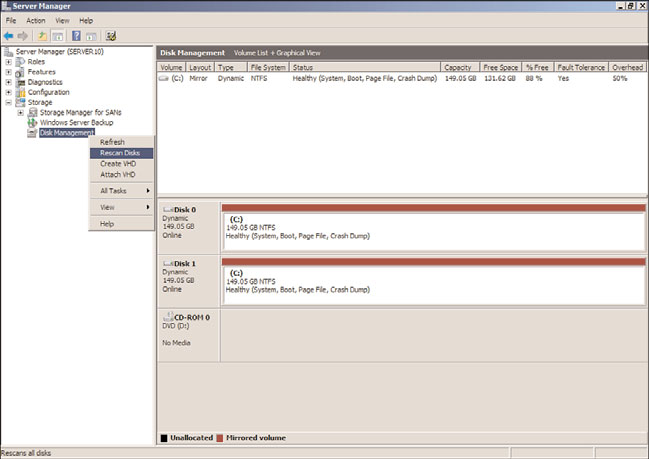
4. Right-click Disk Management and select Rescan Disks, as shown in Figure 28.1.
Managing Windows Server 2008 R2 Disks
1111
FIGURE 28.1
Rescanning disks using Disk Manager.
ptg
5. After the disk scan completes, scroll down in the tasks pane to locate the new disk
that was just added. Right-click the disk and select Online.
6. The new disk will be listed as Unknown and Not Initialized. Right-click the disk and
select Initialize Disk.
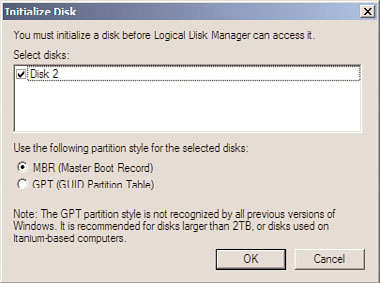
7. When the Initialize Disk window opens, check the disk or disks to initialize, and
select the option button to create either an MBR or GPT type disk, as shown in
Figure 28.2.
28
FIGURE 28.2
Initializing a new Windows disk.
1112
CHAPTER 28
File System Management and Fault Tolerance
8. After the disk initialization completes, the disk will be listed as a basic disk. Repeat
the online and initialize task for any additional disks that were added to the
Windows Server 2008 R2 system.
At this point, the disk is ready to have a volume defined, formatted, and added to Windows.
Converting Basic Disks to Dynamic Disks
In many cases, if disk fault tolerance is desired in a server configuration, the disks need to
be converted from the default basic disk configuration to a dynamic disk configuration.
After the disks are set to Dynamic, the fault-tolerance configuration can be applied. To
convert basic disks to dynamic disks, perform the following steps:
1. To convert a disk to a dynamic disk, right-click the basic disk to be converted, and
select Convert to Dynamic Disk.
CAUTION
After a disk is converted to a dynamic disk, it cannot be changed back to a basic disk
without removing all the volumes and losing the data.
ptg
2. When the Convert to Dynamic Disk window opens, select the disk to convert by
checking the box next to the desired disk and clicking OK to convert the disk.
Creating Fault-Tolerant Volumes Using Disk Management
Windows Server 2008 R2 supports fault-tolerant disk arrays configured and managed on a
RAID disk controller or configured within the operating system using dynamic disks. To
create arrays using a RAID controller, refer to the manufacturer’s documentation and use
the appropriate disk utilities. To create a fault-tolerant volume within the Windows
Server 2008 R2 operating system using the Disk Management snap-in, perform the
following steps:
1. Log on to the Windows Server 2008 R2 system with an account with administrator
privileges.
2. Click Start, click All Programs, click Administrative Tools, and select Server Manager.
3. In the tree pane, double-click the Storage node, and select Disk Management.
4. In the tasks pane, verify that each of the disks that will be part of the fault-tolerant
volume is listed as online. If the disks are not online or initialized, perform the steps
in the previous section, “Adding a New Disk to Windows,” before proceeding.
NOTE
If the disks that will be members of the fault-tolerant array are not dynamic, when the
fault-tolerant volume is created, the wizard can convert the disks as part of the process.
Managing Windows Server 2008 R2 Disks
1113
5. After all of the necessary disks are online and initialized, they should be converted
to dynamic disk using the steps in the preceding section, “Converting Basic Disks to
Dynamic Disks.” Once all of the disks are ready, right-click any of the disks and
select either New Mirrored Volume or New RAID-5 Volume to create a fault-tolerant
volume. For this example, we will be creating a RAID-5 volume, but the steps would
be the same for a spanned or striped volume.
NOTE
To create a striped or RAID-5 volume, a minimum of three disks are required.
6. After selecting New RAID-5 Volume, a New RAID-5 Volume window opens; click
Next on the Welcome page.
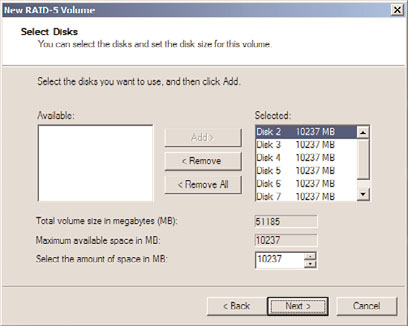
7. The disk that was right-clicked will already be selected. For each remaining disk that
will be part of the RAID-5 volume, select the disk in the Available section, and click
the Add button to move it to the Selected section. For this example, we will create a
RAID-5 volume using disks two through seven, as shown in Figure 28.3.
ptg
28
FIGURE 28.3
Selecting disks for the RAID-5 volume.
8. After all the necessary disks are listed in the Selected section, unless only a section
of the disk will be used in the volume, the entire disk space will be used. Click Next
to continue.
9. On the Assign Drive Letter or Path page, select the drive letter to assign or browse to
a folder location to mount the volume into an empty folder, and then click Next.
10. On the Format Volume page, accept the defaults to format the volume as NTFS,
accept the default allocation size, and type in the volume label as required to easily
identify the drive in Disk Manager, diskpart.exe, and Explorer. Uncheck the
Perform a Quick Format check box, and click Next.
1114
CHAPTER 28
File System Management and Fault Tolerance
TIP
When you’re formatting RAID-5 volumes, perform a complete format to avoid loss of
disk performance later when data is first copied to the volume.
11. On the Completing the New RAID-5 Volume Wizard page, review the settings and
click Finish to create and format the volume.
12. If any of the disks were not previously converted to dynamic disks before the start of
the volume creation, a window opens to confirm that all disks will be converted;
click the Yes button to accept the conversion of the necessary disks.
Because a quick format was not selected, the time it takes to format the volume might be
extensive, so please plan accordingly.
Creating a Fault-Tolerant Volume Using
Diskpart.exe
This section provides step-by-step instructions for creating the same RAID-5 volume as in
the preceding section using diskpart.exe. For reference, these steps will be used to
converts disks 2 through 7 to dynamic disks, create a RAID-5 volume using the entire disk,
ptg
add a volume label, format the drive as NTFS, and assign a drive letter to the volume. As a
prerequisite, each of the disks needs to already be initialized using Disk Manager. To create
a fault-tolerant RAID-5 volume using diskpart.exe, perform the following steps:
1. Log on to the Windows Server 2008 R2 system with an account with administrator
privileges.
2. Click Start, click All Programs, click Administrative Tools, and select Server Manager.
3. In the tree pane, double-click the Storage node, and select Disk Management.
4. In the tasks pane, verify that each of the disks that will be part of the fault-tolerant
volume is initialized and listed as dynamic.
5. Any disk that is listed as unknown and offline, right-click the disk, and select
Online. Repeat for each disk that will be part of the volume.
6. Any disk that is listed as not initialized, right-click the disk, and select Initialize Disk.
Repeat for each disk that will be part of the volume.
7. Close Disk Manager.
8. Click Start, All Programs, Accessories, and double-click the Command Prompt short-
cut. Each of the remaining steps will be typed in the command prompt window.
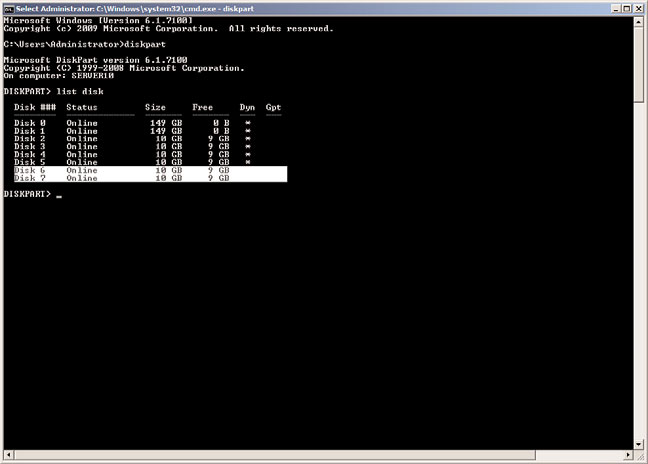
9. Type diskpart.exe and press Enter.
10. Type List Disk and press Enter. Note which disks are listed as online and dynamic. As
an example, Figure 28.4 shows that disks 0, 1, 2, 3, 4, and 5 are online and dynamic