Windows Server 2008 R2 Unleashed (293 page)
Read Windows Server 2008 R2 Unleashed Online
Authors: Noel Morimoto

X
X
Advanced FF/RW
X
X
Advertising server support
X
X
Broadcast AutoStart
X
X
Cache/proxy support
X
X
Custom plug-in support
X
X
Event-based scripting support
X
X
Fast Cache
X
X
Fast Reconnect
X
X
Fast Recovery
X
X
Fast Start
X
X
Fast Streaming
X
X
Internet authentication method (Digest)
X
X
Internet Group Management Protocol version 3
X
X
(IGMPv3) support
1488
CHAPTER 36
Windows Media Services
TABLE 36.1
Comparing the Editions of Windows Media Services
Feature Item
Standard, Foundation,
Enterprise and Data
and Web Editions
Center Editions
Internet Protocol version 6 (IPv6) support
X
X
Intranet authentication methods (Negotiate
X
X
authentication, Anonymous access)
Multicast content delivery
X
Multiple authorization methods (NTFS ACL, IP
X
X
Address)
Multiple control protocol support (MMS, HTTP,
X
X
RTSP)
Multiple media parser support (Windows
X
X
Media, MP3)
Multiple playlist parser support (WSX,
X
X
Directory)
Play While Archiving
X
X
ptg
RTSP streaming
X
X
Robust event notification (WMI, SNMP)
X
X
Server-based content repacketization
X
X
Unicast content delivery
X
X
To end this section on a high note, there isn’t a need to purchase a separate license for
Windows Media Services because the software is included as a free download from
Microsoft’s website. For this reason, a separate client access license (CAL) is not required to
run the services. However, there is still a need to license the server product for Windows
Server 2008 R2.
Updating the Windows Media Services Platform to Windows Server
2008 R2
It will likely be necessary for most organizations to upgrade their systems running the
Windows Media Services platform to Windows Server 2008 R2. For those currently
running Windows Server 2003, it is a matter of upgrading to Windows Server 2008 R2.
However, a direct upgrade from Windows NT 4.0 or Windows 2000 Server is not
supported. Organizations in this predicament that are running a legacy version of
Windows Media Services on Windows NT 4.0 or Windows 2000 Server will need to first
Installing Windows Media Services
1489
upgrade the Windows Media Services platform to Windows Server 2003 and then upgrade
again to Windows Server 2008 R2.
TIP
It is a best practice to first back up the legacy Windows Media Services platform
before upgrading to Windows Server 2008 R2. This includes capturing and backing up
the configuration settings, log files, and digital media content.
Determining Which Windows Media Services Administration Tools to
Leverage
When planning to run Windows Media Services on Windows Server 2008 R2, organiza-
tions should consider the numerous ways it can be administered and managed to find
their best fit. The following bullets identify the tools available for administering Windows
Media Services:
.
Windows Media Service snap-in—
This is the most common interface for manag-
ing Windows Media Services. This interface is based on the traditional Microsoft
Management Console (MMC). It can be added as a snap-in to any server running
Windows Server 2008 R2, Windows Vista, or Windows 7.
ptg
.
Windows Media Services Administrator for the web—
Organizations can choose
36
to administer Windows Media Services over the web. The web interface for adminis-
tration is particularly useful and appreciated by users who manage Windows Media
Services from a non-Windows machine over the Internet or on a network with low
latency.
.
Command-line scripts—
Like many of the Windows Server products, Windows
Media Services administration tasks can be automated through the command line by
using a series of scripts.
When the full installation option for Windows Media Services is utilized, both the
Windows Media Service snap-in and the Windows Media Services Administrator for the
web are included. It should be noted that the Windows Media Service Administrator for
the web requires the Web Server (IIS) server role to be installed on the Windows Server
2008 R2 system. Alternatively, the Windows Media Services 2008 R2 Remote Server
Administration tool can be downloaded from the Microsoft website.
Installing Windows Media Services
IT professionals will quickly recognize that the installation process for Windows Media
Services on Windows Server 2008 R2 is not as simplistic as it was with previous Windows
Server operating systems. In the past, an IT professional would simply add the Windows
Media Services component through Add and Remove Programs as it was included with the
1490
CHAPTER 36
Windows Media Services
base Windows Server operating system. With Windows Server 2008 R2, more steps are
involved in the installation process. Windows Media Services is no longer included with
the Windows Server 2008 R2 family of operating systems, as it is offered as a separate out-
of-band download. Therefore, IT professionals will need to download the Microsoft
Update Standalone (MUS) package from the Microsoft website and install it on Windows
Server 2008 R2. Unlike Windows Server 2008, there is only one MUS package that needs
to be downloaded for all editions of Windows Server 2008 R2. After the installation is
complete, the next step is to add the Streaming Media Services role in Server Manager.
Downloading the Windows Media Services Source Files
As mentioned earlier, the first step when installing the Windows Media Services role on
Windows Server 2008 R2 is to obtain the Windows Media Services for Windows Server
2008 R2 installer files from the Microsoft website.
The out-of-band Windows Media Services installation files for Windows Server 2008 R2
can be obtained from the Windows Media Services 2008 website at http://www.microsoft.
com/windows/windowsmedia/forpros/serve/prodinfo2008.aspx.
Conducting the Windows Media Services Installation
ptg
To install the Windows Media Services role on a Windows Server 2008 R2 system, perform
the following steps:
1. Obtain the appropriate Streaming Media Services installer file from the Microsoft
website.
2. Click Download and run the installation immediately by clicking Open in the File
Download dialog box or click Save to download the file to your computer. The latter
choice allows you to conduct the installation at a later time.
NOTE
If the incorrect installation file is selected, the Windows Update Standalone Installer
will provide a warning message to indicate the update does not apply to your system.
3. After the installation for Windows Media Services is complete, click Start,
Administrative Tools, Server Manager. If Server Manager was running during the
install, close and reopen it to display the newly available role.
4. Select Add Roles by right-clicking Roles in Server Manager, which is located in the
left pane.
5. On the Select Server Roles screen, install the role by selecting Streaming Media
Services in the Roles section, and then click Next.
6. Review the messages in the Streaming Media Services screen, and click Next.
7. Select the desired Streaming Media Services role services to install. The role services
options include Windows Media Server, Web-based Administration, and Multicast
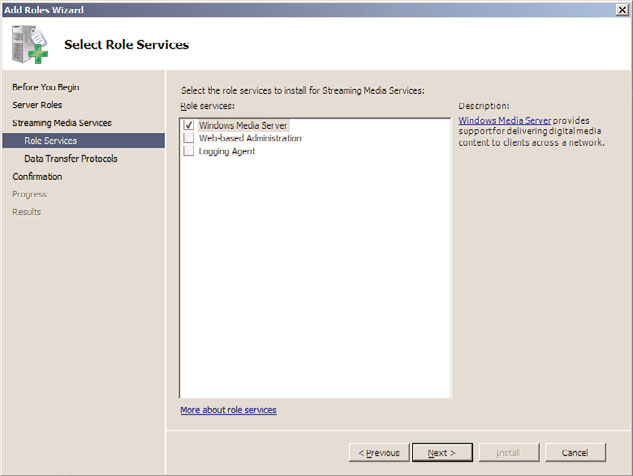
Installing Windows Media Services
1491
and Logging Agent. For this example, Windows Media Server was selected, as illus-
trated in Figure 36.1. Click Next to continue.
ptg
36
FIGURE 36.1
Selecting the role services to install for Streaming Media Services.
8. Select the data transfer protocol for streaming media content, and then click Next.
The two options available are as follows:
.
Real Time Streaming Protocol (RTSP)—
Delivers unicast streams to comput-
ers running Windows Media Player 9 Series or later, or Windows Media
Services 9 Series.
.
Hypertext Transfer Protocol (HTTP)—
Delivers unicast streams to all
versions of Windows Media Player and Windows Media Services, regardless of
version. This option is only available to install if Internet Information Services
(IIS) is installed.
9. Confirm the installation selections, and click Install to install the selected roles, role
services, and features.
10. To complete the installation, review the installation results, and then click Close.
Configuring Windows Media Services
After being installed, the services for Windows Media Services are set to start automati-
cally. The next step is to configure Windows Media Services to meet the video and audio
publishing requirements of your organization. To do so, launch the Windows Media
Services MMC administration tool by selecting Start, All Programs, Administrative Tools,
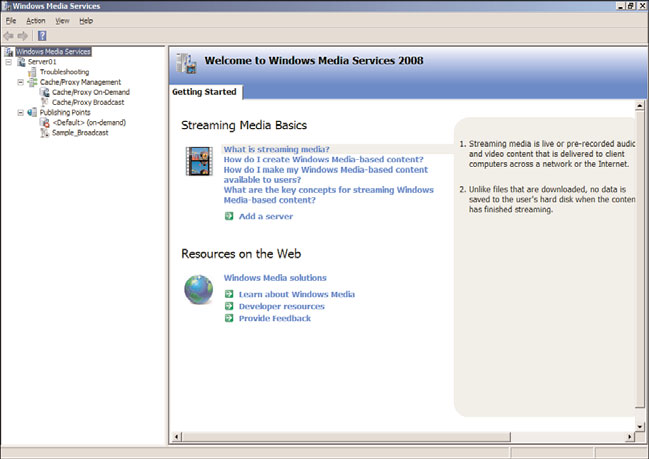
1492
CHAPTER 36
Windows Media Services
Windows Media Services. You will see a screen similar to the one shown in Figure 36.2.
The Getting Started tab includes informational items on Streaming Media Basics and
Resources on the Web. In addition, if you select the server in the left pane, additional
Getting Started tabs can be found in the right pane.
ptg
FIGURE 36.2
The Windows Media Services MMC administration tool.
Using Windows Media Services for Real-Time Live
A Windows Media Services server can be used as the host to broadcast real-time videos.
With a camera attached to the broadcasting server, video can be captured and published
to multiple users. Real-time live broadcast videos are commonly used for organizational
press releases or announcements, distributed broadcasting of conference sessions or train-
ing classes, or video-published company meetings.
Configuring a Server for Real-Time Live Broadcasts
To configure a Windows Media Services system for real-time live broadcasts, a publish-
ing point needs to be configured for live communications. The configuration process is
as follows:
1. In the Windows Media Services MMC, right-click on Publishing Points in the naviga-
tion tree, and select Add Publishing Point (Wizard).
2. Click Next to move past the Welcome screen.
Using Windows Media Services for Real-Time Live Broadcasts
1493
3. Enter a publishing point name that describes the function. In the case of this live
broadcast, you might choose something like Live Company Mtg 09-05-09. Click
Next to continue.
NOTE
The name of a publishing point should not have special characters, such as <, >, \, ?,
%, &, ‘, #, “, {, }, [, ], or *. These characters can interfere with the successful publishing