Windows Server 2008 R2 Unleashed (78 page)
Read Windows Server 2008 R2 Unleashed Online
Authors: Noel Morimoto

be established. To establish WINS replication between two WINS servers, complete the
following steps:
1. Install WINS on two designated servers as previously outlined. For our example, we
will use SERVER10 and SERVER60.
2. On one of the servers, log in and open the WINS console (Start, All Programs,
Administrative Tools, WINS). If prompted, click Continue to confirm the action.
3. Expand the WINS server in the console tree, and then choose Replication Partners.
The right pane will display any existing replication partners.
366
CHAPTER 11
DHCP/WINS/Domain Controllers
EURWINS01
EUR
REDWINS01
RED
TOKWINS01
T
SWWINS01
SFWINS01
SFWINS02
BAKWINS01
ptg
LAWWINS01
LA
LAWINS01
LAWWINS02
LA
LAWINS02
HONWINS01
SDWINS01
SD
FIGURE 11.18
Sample WINS push/pull topology.
4. If the desired replication partner is not already defined, in the console tree, right-
click Replication Partners and select New Replication Partner.
5. Enter the name of the desired WINS server and click OK. This adds the designated
WINS server as a push/pull partner, meaning that these servers will replicate and
synchronize their database with one another.
6. In the WINS console tree, right-click the WINS node and choose Add Server.
7. Type in the name of the WINS server previously defined as a replication partner.
8. Once the second WINS server is added to the console, repeat the preceding steps to
add the first server as a replication partner.
Installing and Configuring WINS
367
WINS replication partners need to be defined on both systems before replication will func-
tion.
11
WINS replication partners will replicate their database information with one another every
30 minutes by default. If you, the WINS administrator, want to change this replication
schedule, complete the following steps:
1. Open the WINS console (Start, All Programs, Administrative Tools, WINS). If
prompted, click Continue to confirm the action.
2. Expand the WINS server in the console tree, and then choose Replication Partners.
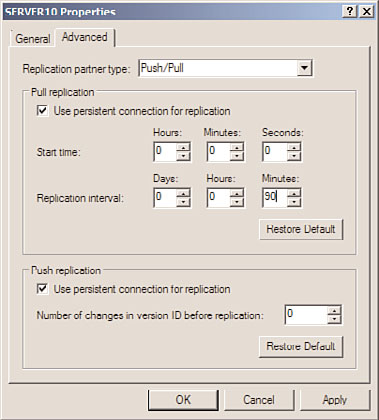
3. Right-click Push/Pull Partner (if one does not exist, it will have to be created), and
choose Properties.
4. In the replication partner property pages, select the Advanced tab, and change the
Replication Interval time to the desired length, as indicated in Figure 11.19, and
click OK to save the settings.
ptg
FIGURE 11.19
WINS replication settings.
5. Repeat this process on the other replication partner.
This can also be used to change other partner replication settings, such as number of
retries, start replication at service startup, persistent connections, and other pertinent
replication information.
368
CHAPTER 11
DHCP/WINS/Domain Controllers
Understanding NetBIOS Client Resolution and the LMHOSTS File
A Windows client does not immediately resort to a WINS server to determine the IP address
of a NetBIOS name. This knowledge is essential in the troubleshooting of name resolution
on a Windows client. Instead, a client first accesses its local NetBIOS cache for resolution. If
an IP address changes, this cache might report the old address, impeding troubleshooting.
To flush this cache, run nbtstat -R (with uppercase R) at the command line.
In addition to the local cache, clients by default always parse an LMHOSTS file, if one
exists, before contacting a WINS server. If the LMHOSTS file contains erroneous informa-
tion, it will impede proper name resolution. Always check to see whether this file is popu-
lated (it is usually located in %systemroot%\system32\drivers\etc on clients) before
beginning to troubleshoot the WINS server.
Planning, Migrating, and Maintaining WINS
As previously mentioned, WINS is necessary in most production environments because
the overriding dependencies on NetBIOS that were built in to Windows have not entirely
been shaken out. In fresh installations of Windows Server 2008 R2, WINS might not be
necessary, but for older, upgraded environments, plans should be made for WINS being
ptg
around for a few years.
Upgrading a WINS Environment
The WINS service itself is one of the more straightforward services to migrate to a separate
set of servers as part of an upgrade to Windows Server 2008 R2. A simple upgrade of the
existing WINS server will do the trick for many environments; however, migrating to a
separate server or set of servers might be beneficial if changing topology or hardware.
Migration of an existing WINS environment is most easily accomplished through the
procedure described in this section. This procedure allows for the migration of an entire
WINS database to a new set of servers, but without affecting any clients or changing WINS
server settings. Figure 11.20 illustrates a WINS migration using this procedure.
In Figure 11.20, the existing servers, OldServer1 and OldServer2, handle WINS traffic for the
entire network of fictional CompanyABC. They are configured with IP addresses 10.1.1.11
and 10.1.1.12, which are configured in all clients’ IP settings as Primary and Secondary
WINS, respectively. OldServer1 and OldServer2 are configured as push/pull partners.
The new servers, NewServer1 and NewServer2, are added to the network with the WINS
service installed and configured as push/pull partners for each other. Their initial IP
addresses are 10.1.1.21 and 10.1.1.22. OldServer1 and NewServer1 are then connected as
push/pull partners for the network. Because the servers are connected this way, all data-
base information from the old WINS database is replicated to the new servers, as illus-
trated in step 1, shown in Figure 11.20.
After the entire WINS database is replicated to the new servers, the old servers are shut
down (on a weekend or evening to minimize impact), and NewServer1 and NewServer2
Planning, Migrating, and Maintaining WINS
369
New Push/Pull
Relationship Set Up for
Migration
11
10.1.1.11
10.1.1.21
OldServer1
v
NewSer
Ne
ver1
v
10.1.1.12
10.1.1.22
OldServer2
NewServer2
FIGURE 11.20
The first step in the WINS migration procedure.
are immediately reconfigured to take the IP addresses of the old servers, as illustrated in
step 2, shown in Figure 11.21.
ptg
10.1.1.11
X
OldServer1
v
NewSer
Ne
ver1
v
New Push/Pull Relationship
Reestablished after IP
Change
10.1.1.12
X
OldServer2
NewServer2
FIGURE 11.21
The second step in the WINS migration procedure.
The push/pull partner relationship between NewServer1 and NewServer2 is then reestab-
lished because the IP addresses of the servers changed. The entire downtime of the WINS
environment can be measured in mere minutes, and the old database is migrated intact.
In addition, because the new servers assume the old IP addresses, no client settings need
to be reconfigured.
There are a few caveats with this approach, however. If the IP addresses cannot be
changed, WINS servers must be changed on the client side. If you’re using DHCP, you can
do this by leaving all old and new servers up in an environment until the WINS change
can be automatically updated through DHCP. Effectively, however, WINS migrations can
be made very straightforward through this technique, and they can be modified to fit any
WINS topology.
370
CHAPTER 11
DHCP/WINS/Domain Controllers
Exploring Global Catalog Domain Controller Placement
The placement of domain controllers in Windows Server 2008 R2 is a critical factor in
providing quality communication between Active Directory clients and domain
controllers. Without prompt response from a domain controller, a user might have to wait
several seconds to several minutes to merely log on to the network or a computer to
complete booting up.
This section deals with specific server placement issues for Active Directory domain
controllers and global catalog servers. For more in-depth coverage of these concepts, refer
to Chapter 4, “Active Directory Domain Services Primer,” and Chapter 5, “Designing a
Windows Server 2008 R2 Active Directory.”
Understanding the Role of the Active Directory Global Catalog
The global catalog in Active Directory holds an indexed subset of frequently queried or
accessed objects in an Active Directory forest. Not all domain controllers in the Windows
Server 2008 R2 Active Directory are global catalog servers by default. That being said,
when installing a new Windows Server 2008 R2 forest, the first Windows Server 2008 R2
domain controller in the forest will be configured as a global catalog server because this is
ptg
a necessary service for Active Directory to function properly. Also, the DCPROMO Wizard
on Windows Server 2008 R2 defaults to deploy all domain controllers as global catalog
servers. Domain controllers that are not global catalog servers can be established as such
through the following procedure:
1. Open Active Directory Sites and Services by clicking Start, All Programs,
Administrative Tools, Active Directory Sites and Services.
2. In the console tree, click the server to which you want to add the global catalog. Do
this by navigating to Sites\
server in the console or tree pane.
3. In the Details pane, right-click NTDS Settings node of the selected server, and then
click Properties.
4. Select the Global Catalog check box on the General tab.
5. Click OK to finish.
NOTE
To complete this process, the administrator must be a member of the Enterprise
Admins group in the forest or a member of the Domain Admins group in the domain of
the selected domain controller or equivalent permissions. Security best practices dic-
tate that this process be performed with the lowest-level user account and using the
Run As Administrator option to manage Active Directory Domain Services.
Exploring Global Catalog Domain Controller Placement
371
Placing Global Catalog/Domain Controllers
11
It is important to understand that global catalog objects must be physically located close
to all objects in a network that require prompt logon times and fast connectivity. Because
a global catalog entry is parsed for universal group membership every time a user logs on,
this effectively means that this information must be close at hand. This can be accom-
plished by placing global catalog and domain controller (GC/DC) servers on the same
WAN site or by using a process called universal group caching.
Exploring Universal Group Caching
Universal group caching is a process by which an Active Directory site caches all universal
group membership locally so that the next time clients log on, information is more
quickly provided to the clients and they are able to log on faster.
Universal group caching can be more effective than placing a GC/DC server locally
because only those universal groups that are relevant to a local site’s members are repli-
cated and are cached on the local domain controller. The downside to this approach,
however, is that the first logon for clients will still be longer than if a local GC/DC were
provided, and the cache eventually expires, requiring another sync with a GC/DC.
ptg
Examining Global Catalog and Domain Controller Placement
As illustrated in the preceding sections, decisions must be made regarding the most effi-
cient placement of DCs and GC/DCs in an environment. Determining the placement of
GC/DCs and universal group caching sites must be done with an eye toward determining
how important fast logons are for users in a site compared with higher replication through-
put. For many Windows Server 2008 R2 environments, the following guidelines apply:
.
Sites with fewer than 50 users—
Use a single DC configured with universal group