Yoga for a Healthy Lower Back (19 page)
Read Yoga for a Healthy Lower Back Online
Authors: Liz Owen

FIG. 3.3
Happy Baby lengthens the sacral joints. It is often a good stretch when pain is present because the hips and lower back are supported by the floor, which allows them to release tension while in a supported and balanced position.
Free-Your-Sacrum Pose
Stretch | Dwi Pada Apanasana Variations
Lie on your back with your legs straight down on the floor. Lift your knees into your chest, holding the backs of your thighs or your shins with both hands. Though I don't often get into the particulars of the poses' Sanskrit names in this book, I want to pause a moment to look at a word that appears in both this pose and the next one:
apanasana
. If the word sounds familiar, it's because I talked about the apana vayu, the downward, grounding energy of the lower abdomen and hips, in chapter 2. Similarly, Apanasana grounds and brings freedom to the whole pelvis. Stay in your base position for three or four breaths. With each exhalation, bring your knees a little closer to your chest while keeping your back hip bones grounded on the floor. Visualize the layers of myofascia around your hips and buttocks broadening and lengthening, then relaxing into the support of the earth.
The following variations are great if your sacral band or lower back feels tight, but they may be contraindicated for strained sacral joints or overly flexible sacral ligaments.
Variation 1: Partner-Assisted Leg Press
Start with both knees bent into your chest with your arms by your sides. Have a partner stand facing you with her knees slightly bent. Ask your partner to place her hands on your shins while you lift your tailbone slightly upward, releasing your sacral joints and lower back into the floor. Press your legs up into your partner's hands while she presses gently down. The push through your legs and your partner's hands should be equalâyou are not trying to push your partner away (
fig. 3.4
). If this feels comfortable, both of you can increase the pressure. Hold this position for fifteen to twenty seconds and release. Rest while you check in with your sacral band to feel how it has openedâit should feel comfortable and soft. Repeat the leg press two more times, and feel how it spreads and broadens the sacral joints.
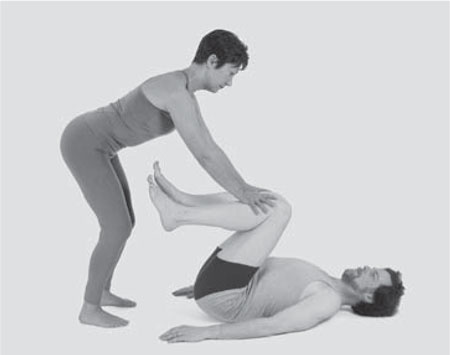
FIG. 3.4
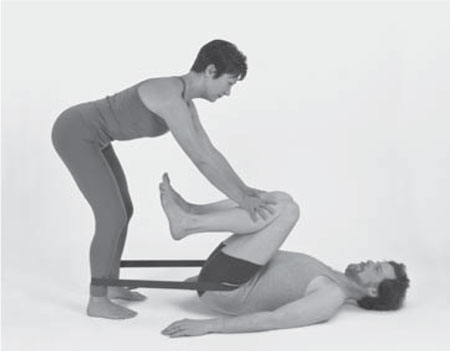
FIG. 3.5
Variation 2: Partner-Assisted Sacrum Traction
Start in the base pose, then make a large loop in a belt and place it around your front groins, the crease where the very tops of your thighs meet your hips. Have your partner stand facing you with knees slightly bent, and have her step into the belt. The belt should be around the top of your partner's ankles or slightly up along the calves; the belt should be parallel to the floor. If it's possible, position yourself so you can reach your arms all the way over your head and hold onto something heavy, such as a post or a heavy piece of furniture, to create as much traction in your sacral joints as possible.
Now have your partner gently hold your legs in place (no pressing down this time) while she presses her legs backward and walks slowly back, each small step gently increasing the traction along your sacral joints (
fig. 3.5
). If the belt digs into your front groins, place a folded towel or blanket between the belt and your groins.
Poses that use traction are excellent for freeing compressed sacral joints and lengthening the lower back. Rest with your hands on your lower abdomen when you are done, gently massaging your hips along the floor. Feel energy circulating a little more freely now that your muscular body has released some of its holding, and feel that your hips and sacrum are more spacious.
Reclining Sacral-Balancing Pose
Balance and Strengthen | Eka Pada Apanasana Varaiation 2
Once you've loosened up your sacral joints in Free-Your-Sacrum Pose, you're ready to work on balancing them, one leg at a time. This pose has two steps, each of which helps your sacrum in a different way. Practice both steps two or three times on your right side, resting for a few breaths after each cycle, then repeat on your left side an equal number of times.
Step 1: Bent-Leg Sacral Balancer
Lie on your back with your knees bent and feet flat on the floor, and bring your right thigh to your chest. Lift your tailbone slightly up toward the ceiling while your hips stay grounded on the floor. Stretch your left leg down onto the floor. If you have discomfort in your right sacral joint, try placing a folded blanket under your hips. If you have discomfort in your lower back, place a rolled-up towel underneath it. Hold your right shin or behind your thigh with both hands. Press your right thigh away from your chest until your arms are straight (
fig. 3.6
), and press your hands equally back into your thigh. Hold your leg in position using the equal pressure of your leg and your arms.
7
Your leg, abdominal core, and back hip muscles should all feel active and engaged as you create traction in your body without the help of a partner.
Move your right outer hip and right sit bone toward your left foot (your right foot can move slightly to the left to help initiate these actions). Hold the position for fifteen to twenty seconds, then release the muscular effort of your leg, arms, abdomen, and hips, and as you exhale, draw your knee toward your chest. This pose, while subtle in its movements, helps to bring your right hip bone and sacral joint into balance and can help your sacral band to feel softer and more spacious. Repeat the pose on your left side. A word of caution, thoughâif your lower back is tight and this exercise creates compression and pain, release it and move on to step 2.
Step 2: Raised-Leg Sacral Balancer
Bring your right thigh as close as possible to your chest, and hold the back of your thigh with both hands. As in step 1, stretch your left leg straight onto the floor. However, this time your arms should stay bent. Hold your thigh close to your chest while you slowly start to stretch your right leg up toward the ceiling (
fig. 3.7
).
8
You may not be able to completely straighten your leg; that's not as important as holding your thigh in position close to your chest. As you press up into your hands, lengthen your right hip away from your waist. Lift your left leg about three inches from the floor (but keep it active and straight) in order to feel your right hip bone tip back. Maintaining the position of your right hip, slowly place your left leg back down and see if your hips can remain in place. Repeat this step two more times.
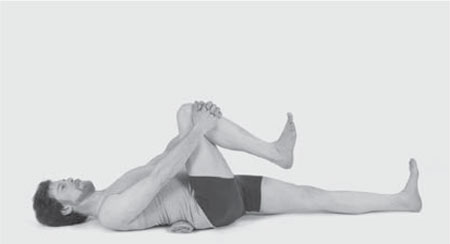
FIG. 3.6
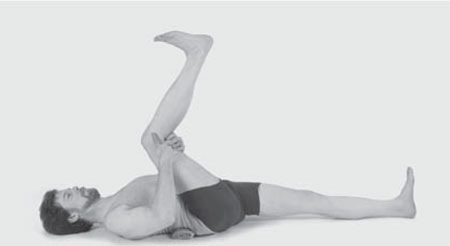
FIG. 3.7
This pose helps move a forward-rotated hip bone back into place, and helps to realign your sacral joints as it does so. If your hips are already balanced, practicing this pose on both sides will bring stability into your sacral joints. After you've practiced both steps, repeat the sequence on both sides. As well as balancing your hips and sacral joints, this pose helps relieve pain and release tension in your lower back.
9
Reclining Hand-to-Foot Pose
Stretch | Supta Padangusthasana I
Now that you've balanced your sacral joints, you're ready to take the next step and stretch each leg straight up toward the sky. This pose lengthens your hamstring and hip muscles. If you have discomfort in your lower back when you bring your knee into your chest, try placing a small rolled towel under your lumbar region.
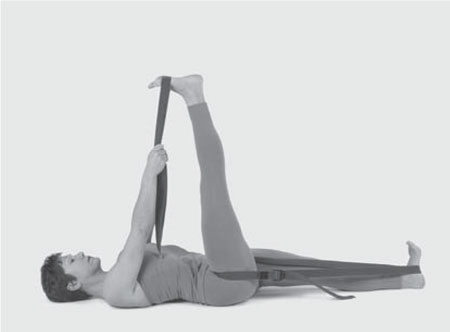
Bring your right knee into your chest and place a belt around the arch of your foot. Hold the belt with both hands, straighten your arms, and slowly stretch your leg up toward the ceiling (
fig. 3.8
). Straighten your leg completely by engaging all the muscles of your leg, and imagine hugging your inner knee with your kneecap. Press the center of your arch up into the belt, making your foot parallel with the ceiling. If your hamstrings are tight, lengthen the distance between your foot and your hands along the belt, lowering the angle of your leg relative to the floor. Roll your left leg slightly inward and stretch it away from your torso. Engage your abdominal core by drawing your frontal hip bones up toward your ribs, keeping your hips grounded on the floor.
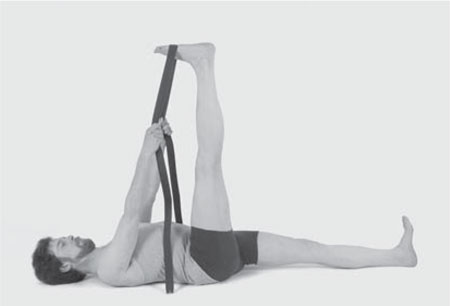
FIG. 3.8
Right now you may be feeling a huge hamstring stretch and wondering what this pose has to do with your sacrum. Stick with it! Lengthening your hamstrings and deep hip muscles is one of the best things you can do for your sacrum because when your hamstrings are tight, they tug on your hip and lower back muscles and create misalignments and imbalances in your sacral joints. It's always worthwhile to take the time to lengthen your hamstrings. When you do, you will discover a sense of fluid movement and ease all through your hips and spine.
In Reclining Hand-to-Foot Pose, and in the variations described below, remember to move your right outer hip and right sit bone toward your left foot just like you did in Reclining Sacral-Balancing Pose. This action will help bring your hip bones into balance. Be mindful to keep your sacral joints flat and resting on the floor. If you have discomfort in your lower back, place a rolled towel beneath it.
