Bread Matters (28 page)
Authors: Andrew Whitley

If you are using a decorative tin, you need do no more than mould the dough into a neat, round cob and drop it in. For extra effect, keep about 10 per cent of the dough back, mould this into a little ball and press it firmly into the top of the main piece. If you are using plain bread tins, something more interesting than a plain domed crust is required. Try rolling the dough out into a sausage about 30cm long and either forming it into an ‘S’ shape or folding it in half and then twisting it around on itself to form a corkscrew effect. Or divide the dough into 4 equal pieces, mould them up into rounds and drop them side by side into the tin.
Brush the top of the brioche with beaten egg, being careful not to let any run down the inside of the tin, where it may stick like glue. Give the brioche a good proof in a warm place until it has risen significantly. Test it with gentle finger pressure. If the dough is beginning to feel a bit fragile and reluctant to push back against your finger, it is time to put it in the oven. Bake in a moderate oven (about 175°C) until golden brown. Small loaves will bake in 15-20 minutes, larger ones in 30-35 minutes.
Crust
Almost everyone loves crusty bread. Perhaps it’s because crunchiness is a sign that bread is not long out of the oven. Perhaps it’s the combination of sound, texture and aroma that makes sinking one’s teeth into a fresh crust so satisfying. There is more flavour in crust than in crumb because of the complex gelatinisation of starches and caramelisation of sugars that occur as they are baked. This crust flavour is arguably more significant in breads with a bland-tasting crumb. But ‘crustiness’ is not the only measure of a crust’s quality. Thick or thin, crunchy or leathery, a crust performs multiple roles – as dust-guard, moisture retainer and handle, for example – in its mutual relationship with the crumb.
There was a traditional compromise that accentuated the differing qualities of crust and crumb. It was the Scottish batch bread which evolved to make efficient use of coke-fired brick ovens. In this system, dough pieces were half proved in boxes and then transferred with a long peel (a flat shovel on the end of a pole) to the sole of the brick oven. They were placed very close to each other so that they could expand only vertically. The whole oven was filled with dough, divided only by L-shaped beechwood frames, which made it easier to remove whole sections of bread once it was baked. No precious energy was wasted in heating up tins and trays, and no space in the oven was wasted as it is when round loaves are set apart from each other to gain an all-round crust. In a Scotch oven full of batch bread it took a long time for the heat to penetrate through the solid mass of dough, so baking took ages. The resulting bread had thick, dark crusts top and bottom and no crust at all on the sides.
There are other ways of tipping the balance of a bread in favour of crust. Flattening it is the most obvious. Before ovens were invented, all bread must have been baked on some kind of hot surface. The greater the contact between dough and heat, the quicker the bread would bake – an important consideration if fuel was scarce. Of course, a bread with little crumb would dry out quickly, but we are talking subsistence, not ‘shelf life’. Indeed, in some traditions, dryness was a precondition of long-term storage. From the Finnish rye breads baked with a hole in the middle, to be strung on a pole above the stove away from damp and rodents, to the oatcakes and ship’s biscuits that were dehydrated to last out long journeys, crust was often the necessary condition of bread.
Nowadays, it seems, crust is both a selling point and a dirty word. On the one hand, ‘crusty’ is a commonplace and always approving description of bread, and considerable effort, in the form of steam during baking and the use of special packaging films, goes into making bread with a particular kind of brittle, crunchy surface. On the other hand, many people cut off the crusts, thereby wasting prodigious amounts of bread – or so we are told by the marketing department of one of the country’s leading bakeries. Believe it or not, this company has recently spent a small fortune developing that ultimate symbol of the infantilisation of our food culture: ‘crustless’ bread, baked in special tins and ovens, which presumably poses no challenge to delicate gums and teeth
2
.
In the world of real food, most people want breads that balance the different attractions of crust and crumb. One of the nicest examples of this is the stottie. It is really just a large roll, but baking it on both sides gives it a subtly different character. Stotties are easy to make and are excellent for filling: with the same sort of crust top and bottom, they hold together well – even if stuffed, as any Geordie would expect, with prodigious amounts of filling.
Stotties
To ‘stot’, I learned from my Scots mother, is to bounce, perhaps slightly unpredictably. The connection with stottie cakes, to give them their full name, must be the fact that they are flipped over during baking. If they were light enough, perhaps they might bounce a bit.
Stotties are a rare example of a truly regional bread. It is almost impossible to find them outside the Northeast, but in their home territory they are enormously popular and have probably assured their future by being an ideal vehicle for sandwich fillings.
Like many flat breads and yeast cakes, they may well have originated among people who had no ovens to bake in. If you have only a girdle or hotplate, your loaves will not bake through unless they are fairly flat and/or baked on both sides. Muffins and stotties are essentially the same thing, though muffins are smaller. Nowadays, it is a rare bakery that flips its stotties halfway through baking. Most just roll them flat and dock (prick) them to stop the middles puffing up. But bottom crusts, especially if they have been in direct contact with the oven sole or a hotplate, have a distinctive texture and flavour, which is very different from the crust formed on the top of a loaf. So baking on both sides is essential if the true character of a stottie is to be discovered.
Makes 5 stotties (or 8 muffins)
1025g Scottish Morning Roll Dough (page 151)
Rice flour, semolina or coarse maize meal for dusting
Make a roll dough as described on page 151. If anything, add a little more water to the final dough. The end result should seem almost too soft to handle.
After the first rising, divide the dough into 5 pieces (or 8 for muffins) and mould these up into rounds. If the dough is sticky, lightly dust your hands with flour but do not put any flour on the worktop where you are moulding because this will simply make the dough pieces skid around rather than tighten up into neat rounds. When they are nicely rounded, put the pieces on a floured area of worktop to rest for about 5 minutes. This will let the gluten relax, which will make it easier to roll them out.
You will need to be able to transfer the stotties from their proving place to the hotplate (or a girdle or a large heavy frying-pan), so it is important that they should not stick. Rice flour (ground rice), semolina or coarse maize meal are all better than wheat flour for ‘lubricating’ dough in these circumstances (rice flour is known in the bakery trade as rice ‘cones’ because of the shape of the particles). Dust a tray or an area of worktop liberally with rice flour. Using a little rice flour to dust your hands, the worktop and the rolling pin, roll out each dough piece until it is about 12.5cm in diameter (7.5cm for muffins).
Stotties should not be given maximum proof or they may collapse as you move them to the hotplate (or oven). But they should have increased in volume enough to ensure that they do not split drastically during baking. Unless you have a big hotplate, you will have to bake the stotties in batches, so start the first one bearing in mind that the last one will continue proving for some time.
Using a wide fish slice, 2 plastic scrapers or something like a loose cake base, pick up a stottie and place it on the preheated hotplate. Do not overheat the hotplate or the crust will take too much colour before the inside is done. Bake for 5-7 minutes on one side, until quite dark underneath, then flip over and finish baking on the other.
If you prefer to use the oven, heat it to about 220°C and try to arrange a surface, such as an unglazed quarry tile, which can be preheated. This will give a better crust than if the stotties go in on trays. Bake them for about 10 minutes, then turn them over and bake for another 5 minutes or so.
Crispbread
It is possible, of course, to bake bread that is almost pure crust. We tend to call it crispbread these days, though often that term refers to an extruded mixture rather than a dough. The recipe below shows how to use breadmaking techniques to make a dough that might easily be baked into a soft-crusted, porous flatbread, but which in this case is rolled out so thinly that it bakes all the way through.
These crispbreads are easy to make. There are no worries about getting the rising time just right and baking is simply a question of leaving them in the oven until they dry out. They look pretty authentic and go well with spreads and dips of all kinds. Broken up into small pieces, they make a tasty, grease-free alternative to potato crisps. They will keep in an airtight bag for several weeks.
The use of a sponge and the presence of oil in this dough give the crispbreads a crunchy, melt-in-the-mouth quality that they would not have if they were baked from flattened unleavened dough. You can vary the herbs and spices to your heart’s content. Try substituting 15g fennel seeds for the chilli powder and poppy seeds.
Makes 5 crispbreads
150g Sponge from Basic Savoury Bread Dough (page 212)
100g Strong white flour
50g Stoneground wholemeal flour
25g Semolina flour
5g Sea salt
20g Olive oil
75g Water
5g Chilli powder
15g Poppy seeds
445g Total
Semolina flour for dusting
Prepare the sponge according to the instructions on page 212 and ferment it for 16 hours or so. Add all the other ingredients except the chilli powder and poppy seeds and knead until the dough is well developed. Cover and leave to rise for at least an hour.
Once the dough has puffed up a little, fold in the chilli and poppy seeds, leaving the dough slightly streaky but dispersing the seeds fairly evenly. Divide the dough into 5 pieces of approximately 85g. Mould them into loose rounds without knocking all the air out of the dough. Rest the dough for a couple of minutes, then, using semolina flour for dusting, roll each piece out until it is a very thin rectangle about 30 x 8cm. Place the pieces on baking trays lined with baking parchment and lightly dusted with semolina flour. Prick the dough well to prevent it ballooning up like pitta bread when it is baked. After about 45 minutes, when the gluten is fully relaxed and the dough pieces slightly aerated, pick each one up in turn and stretch it lengthways to put the gluten under tension. Put the stretched pieces back on their tray and immediately place in a gentle oven (160°C or less). Bake for about 20-30 minutes or until the dough is completely dried out and crisp. The crispbreads should not take much colour while baking but they ought to ruck up into slightly contorted shapes. If they go a bit limp after baking, put them back in a very low oven to dry them out completely.
As soon as the crispbreads are cold, store them in airtight bags (cellophane is good) to prevent them absorbing moisture from the atmosphere and softening up. They can always be crisped up in the oven again if necessary.
Putting on the style
I make no apology for going on a bit about nutrition. After all, if bread is the staff of life, it does matter what we put in it and how we make it. But that doesn’t mean that the way it looks isn’t important. One of the joys of good food is surely in the variety of shapes, colours and textures that can be conjured by skilful preparation. Once the basic nutritional quality is right, good looks can only enhance the experience of eating.
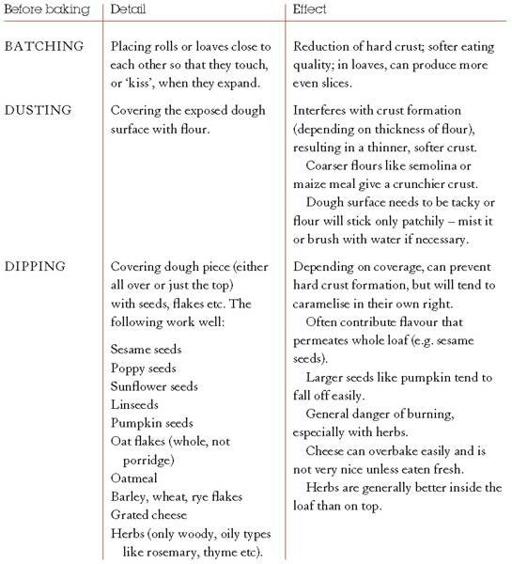
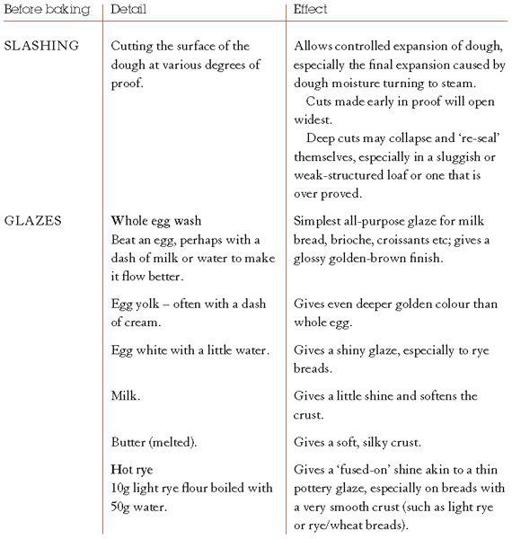
It is easy to vary the appearance of bread and rolls by applying some sort of glaze or covering to the crust before, during or after baking. Whether it’s a film of egg to create a shiny glaze or a sprinkling of seeds for a textured topping, simple treatments can transform the look and flavour of the plainest dough.
Here are a few principles and ideas for smartening up your act
before
baking, see pages 247-248, and
after
baking, page 249.