Build Your Own ASP.NET 3.5 Website Using C# & VB (87 page)
Read Build Your Own ASP.NET 3.5 Website Using C# & VB Online
Authors: Cristian Darie,Zak Ruvalcaba,Wyatt Barnett
Tags: #C♯ (Computer program language), #Active server pages, #Programming Languages, #C#, #Web Page Design, #Computers, #Web site development, #internet programming, #General, #C? (Computer program language), #Internet, #Visual BASIC, #Microsoft Visual BASIC, #Application Development, #Microsoft .NET Framework

Figure 12.14. Testing the query generated for our data source
the DetailsView to behave. Locate the DetailsView control and set the properties
as outlined in
Table 12.2.
Licensed to [email protected]
502
Build Your Own ASP.NET 3.5 Web Site Using C# & VB
Table 12.2. Properties to Set for the DetailsView Control
Property
Value
AutoGenerateDeleteButton
True
AutoGenerateEditButton
True
AutoGenerateInsertButton
True
AllowPaging
False
DataSourceID
employeeDataSource
DataKeyNames
EmployeeID
If you’re using
Design
view, make sure you choose
Yes
when you’re asked about recreating the DetailsView rows and data keys. If you’re not using
Design
view, set the columns as shown here:
Dorknozzle\VB\07_AddressBook.aspx
(excerpt)
InsertVisible="False" ReadOnly="True"
SortExpression="EmployeeID" />
HeaderText="DepartmentID" SortExpression="DepartmentID" />
SortExpression="Name" />
SortExpression="Username" />
SortExpression="Password" />
SortExpression="Address" />
SortExpression="City" />
SortExpression="MobilePhone" />
SortExpression="State" />
SortExpression="Zip" />
SortExpression="HomePhone" />
Licensed to [email protected]

Advanced Data Access
503
SortExpression="Extension" />
You’re ready! Execute the project, and enjoy the new functionality that you implemented without writing a single line of code. Take it for a quick spin to ensure that the features for editing and deleting users are perfectly functional.
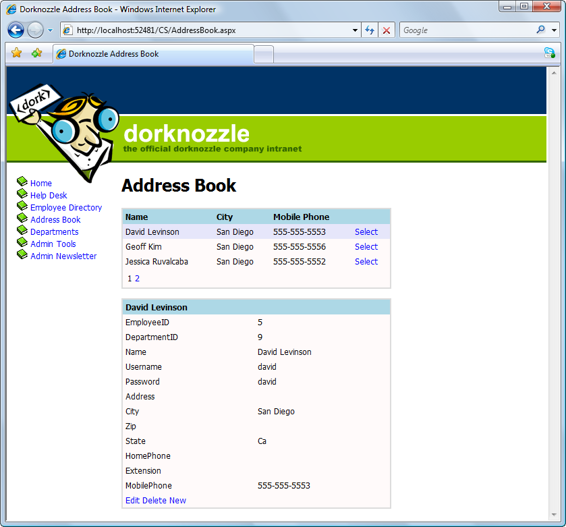
Right now, if you select an employee from the list, you’ll see the page shown in
Figure 12.15. Adding a new employee
Licensed to [email protected]


504
Build Your Own ASP.NET 3.5 Web Site Using C# & VB
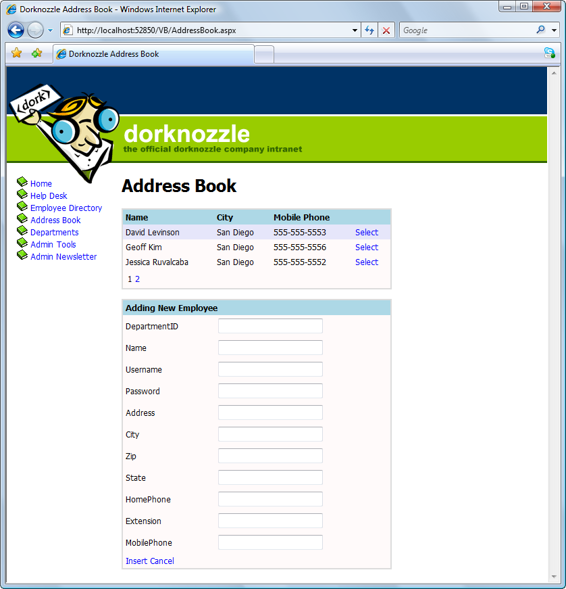
When you click on
New
to add a new employee, the form becomes editable, allowing
you to create a new employee record.
Adding Users the Easy Way
If you want to be able to use this form to add new employees to the database, the
easiest way to do so is to leave in all the required columns; otherwise, you’ll get
an error when you try to add a new employee without specifying values for the
NOT NULL columns. If you don’t want to give intranet administrators the ability
to add new employee records to the database with this form, and you want to keep
the list of details short, you can simply remove the unwanted columns from the
list.
Before we discuss exactly what’s happening here, and how the functionality works,
let’s implement a few small improvements.
If you agreed to let Visual Web Developer generate the DetailsView columns for
you, it will automatically have rewritten the templates we developed in the last
chapter, and added BoundField controls for each of the columns you’re reading
from the data source.
The HeaderTemplate is still intact, but we want to update it to show a different
display when we’re inserting details for a new employee. Currently, the header is
set to display the Name field of the selected employee, which means it will be empty
when we insert a new employee (as we saw in
Figure 12.15). T
o change this, modify the HeaderTemplate of your DetailsView as follows:
Visual Basic
Dorknozzle\VB\08_AddressBook.aspx
(excerpt)
<%#IIf(Eval("Name") = Nothing, "Adding New Employee", _
Eval("Name"))%>
C#
Dorknozzle\CS\08_AddressBook.aspx
(excerpt)
<%#Eval("Name") == null ? "Adding New Employee" :
Eval("Name")%>
Licensed to [email protected]

Advanced Data Access
505
Now, when we insert a new employee record, DetailsView will display the words
Adding New Employee
in its header; when we’re editing or displaying an existing
employee’s details, it will display the name of that employee, as
Figure 12.16 shows.
Figure 12.16. Adding a new employee, and displaying the new header
Licensed to [email protected]


506
Build Your Own ASP.NET 3.5 Web Site Using C# & VB
IIf and the Ternary Operator
IIf (in VB) and the ternary operator (in C#) receive as parameters one conditional
expression (which returns True or False), and two values. If the condition is
True, the first value is returned, and if the condition is False, the second value
is returned.
In our case, the conditional expression verifies whether the Name field is empty,
which will be the case if we’re inserting a new row. So, when we’re inserting a
new row, we display
Adding New Employee
in the DetailsView’s header; otherwise, we display the name of the employee whose details are being edited. One minor hitch with this solution is that the GridView isn’t instantly updated
when we make a change using the DetailsView control. Try modifying the name
of a user; even after you click the
Update
link in the DetailsView, the GridView
will show the old value. Only after you reload the page will the data be displayed
correctly by the GridView.
This issue occurs because the GridView is populated before the DetailsView updates
the database. To avoid this problem, we could use a simple workaround that forces
the GridView to update itself in response to the occurrence of certain events raised
by the DetailsView control. These events are ItemUpdated, ItemDeleted, and
ItemInserted. Use Visual Web Developer to generate the event handlers for these
events, and update the code like this:
Visual Basic
Dorknozzle\VB\09_AddressBook.aspx.vb
(excerpt)
Protected Sub employeeDetails_ItemUpdated(
➥ ByVal sender As Object, ByVal e As
➥ System.Web.UI.WebControls.DetailsViewUpdatedEventArgs)
➥ Handles employeeDetails.ItemUpdated
grid.DataBind()
End Sub
Protected Sub employeeDetails_ItemDeleted(
➥ ByVal sender As Object, ByVal e As
➥ System.Web.UI.WebControls.DetailsViewDeletedEventArgs)
➥ Handles employeeDetails.ItemDeleted
grid.DataBind()
End Sub
Protected Sub employeeDetails_ItemInserted(
➥ ByVal sender As Object, ByVal e As
Licensed to [email protected]
Advanced Data Access
507
➥ System.Web.UI.WebControls.DetailsViewInsertedEventArgs)
➥ Handles employeeDetails.ItemInserted
grid.DataBind()
End Sub
C#
Dorknozzle\CS\09_AddressBook.aspx.cs
(excerpt)
