Building Web Sites All-in-One For Dummies® (68 page)
Read Building Web Sites All-in-One For Dummies® Online
Authors: Claudia Snell

10.
Choose the desired unit of measure from the Ruler Units drop-down menu.
The default unit of measure is Pixels, which works well in most instances. Your alternatives are Inches, Inches (decimal), Points, Centimeters, and Millimeters.
11.
Click the Make Default button if you want these parameters to be the defaults for future Flash documents you create.
This option applies all parameters.
12.
Click OK.
Flash creates a new document.
Now that you have a new document, you're ready to create something very cool (or not so cool depending on the needs of your client). The next section points you in the right direction.
Creating an object
After you create a document, you can add objects to it. Objects can be plain old ho-hum static objects, or they can be symbols. When you create a
symbol,
you create something that can be used over and over and over again. Just drag the object from the document Library and drop it in the desired place on the Timeline. When you use a symbol instead of creating a new object, you don't increase the file size of the published movie because Flash re-creates an instance of the symbol using the information stored in the document Library. Symbols come in three flavors: Button, Graphic, and Movie Clip. These steps show you how to create a Graphic symbol:
1.
In the Tools panel, set the Stroke and Fill colors.
To set Stroke and Fill colors, click the applicable swatch to open the Swatches palette. The colors you select are applied to all objects until you change the colors.
2.
Select the Oval tool.
3.
Click and drag an oval on the Stage.
When you release the mouse button, the oval appears on the Stage.
 Hold down the Shift key to create a circle.
4.
Use the Selection tool to select the object.
If you created an object with a stroke, double-click the object to select both the fill and the stroke.
5.
If desired, open the Property inspector and change the parameters for the circle.
In the Property inspector, you can change the Width, Height, and x and y coordinates.
6.
Press F8.
The Convert to Symbol dialog box appears.
7.
Type a name for the symbol and choose the Graphic option.
Flash gives the symbol a default name. However, it's not very descriptive. A better idea is to give each symbol a unique name, which makes it easier for you to select the proper object from the Library. This is a distinct advantage when you're creating complex Flash movies with hundreds of symbols.
8.
Click the desired registration point.
This determines the center of rotation for the symbol. The upper-left point works well in most instances.
9.
Click OK.
The symbol is added to the Library.
Creating your first animation
After you add a symbol to the Library, you have the bare bones needed for a Flash animation. In this case, we show you how to make an oval go from Point A to Point B. It's not the jiffiest of animations, but it's a start. To create an animation, follow these steps:
1.
Create a Graphic symbol, using the Oval tool.
Creating a symbol is easy if you know Flash or if you read the last section. If neither is the case, please rewind and read the previous section.
2.
Use the Selection tool to move the symbol to the desired starting point.
To move an object with the Selection tool, click and drag the object to the desired location.
3.
Right-click (Windows) or Control-click (Mac) and choose Create Motion Tween from the context menu.
Flash creates 25 frames and positions your cursor in the 25th frame.
 If you don't create a symbol as outlined in Step 1, Flash displays a dialog box telling you the object cannot be used in a motion tween animation, but Flash will convert the option if you click OK.
4.
Move the oval to the point where you want to end the animation.
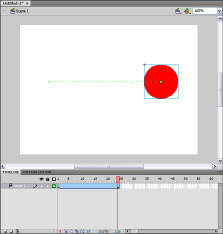
Flash creates a motion path and converts the 25th frame to a keyframe (see Figure 1-10).
5.
Press Ctrl+Enter (Windows) or
Ã
+Enter (Mac).
Flash displays the animation in another window. You're probably thinking that the animation is pretty ho-hum. You're right. So kick it up a notch. After you get tired of looking at the animation, close the window.
6.
Click a frame between the beginning and ending keyframes. Using the Selection tool, move the object to another position.
Flash creates another keyframe when you move the object to another position.
7.
With the Selection tool, move your cursor toward the first half of the motion path.
When you see a curve appear under the arrow cursor, you can bend the motion path.
8.
Click and drag the motion path to curve it.
Figure 1-10:
Creating a motion tween animation.

9.
Repeat Step 8 for the other half of the motion path.
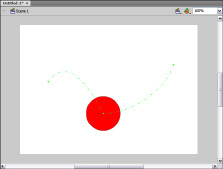
Your motion path should resemble Figure 1-11.
10.
Press Ctrl+Enter (Windows) or
Ã
+Enter (Mac).
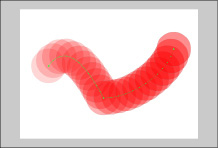
Now you're cooking. To give you an idea of what you should be seeing, Figure 1-12 was created using the Onion Skin option, which displays multiple frames at a lower opacity. Close the window when you're done patting yourself on the back.
Figure 1-11:
A motion path that's been folded, spindled, and mutilated.

Figure 1-12:
A motion tween animation with multiple keyframes.

Setting up your workspace
If you're like most designers, you have a set way of doing things. The designers of Flash set up the workspace to suit the needs of most Flash users. However, you can customize the Flash workspace to suit your own working preferences. In this section, we show you a few things you can do to set up the workspace just the way you like it.
Setting Flash preferences
Everybody's got preferences. Doug prefers blondes, but that's a whole different kettle of fish. You can modify the default Flash Preferences for the way you work. We don't go through each and every Flash Preference, but we show you a few that we think are important:
1.
Choose Edit
â
Preferences.
Alternatively, you can press Ctrl+U (Windows) or
Ã
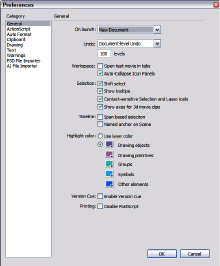
+U (Mac) to open the Preferences dialog box. By default, the dialog box opens to the General section. (See Figure 1-13.)
2.
Modify the default preferences to suit your working style.
Most of the preferences are self explanatory. However, we do recommend that you choose New Document from the On Launch drop-down menu. This option creates a blank document with the default document size, frame rate, background color, and ActionScript 3.0 when you launch Flash, enabling you to cut to the chase instead of dealing with the pesky welcome screen. Another option you might consider changing is the number of Undo levels, which by default is a whopping 100 steps. If you have an older computer or limited memory, lowering the number of Undo levels cuts down on the overhead that Flash places on your system.
Figure 1-13:
Prefer-ences, and General ones at that.

3.
Change the remaining preference categories to suit your working style.
The only other change we recommend you make depends on whether you use ActionScript and whether you have a large desktop size. If both conditions apply, change the font size from 10 to 11 or 12, but keep the default Courier New font, which has code geek written all over it.
4.
Click OK to apply the new preferences.
