Canning and Preserving For Dummies (38 page)
Read Canning and Preserving For Dummies Online
Authors: Amelia Jeanroy

Checking your freezer’s temperature:
Adjust your freezer thermostat, as needed, to maintain a temperature of 0 degrees or colder. Purchase a freezer thermometer to monitor the internal temperature of your freezer.
 Add no more food to your freezer than can freeze solid in 24 hours, about 2 to 3 pounds of food for each cubic foot of freezer space. Adding a large quantity of food to your freezer at one time may raise the temperature in the freezer above 0 degrees. This stops the quick-freezing process and may affect the quality of your frozen food.
Types of freezers
Select a freezer based on your needs, the size of your family, the space available to you, your budget, and the cost required for running the freezer.
Refrigerators with freezer compartments
are the most common units in homes today. The preferred model has a separate door for the refrigerator and the freezer. This allows you to regulate the temperature in each compartment with individual built-in thermostats.
Upright freezers and chest freezers
are made for freezing only. Upright freezers have a door on the front with shelves inside, while a chest freezer opens from the top and you reach into it. Sizes vary from 6 cubic feet of storage to 32 cubic feet of storage.
Packaging Your Food and Filling Your Freezer
Proper packaging is important for preserving the quality of your frozen food both during the freezing process and after it’s thawed. Any excess air in your container may compromise the quality of your thawed food. Remove as much air as possible in bags and wraps, and allow the recommended headspace in rigid freezer containers.
Similarly, how you fill your freezer is also important. Put too much unfrozen food in at once and the temperature may rise above 0 degrees. Fail to rotate your food and you’re more likely to use newer food before older food. The following sections explain how to package your food, pack your freezer, and keep everything organized.
It’s a wrap! Choosing a container
Protecting foods during the storage period requires containers that are easy to seal, suitable for low temperatures, and, most importantly, moisture and vapor proof. Three types of packaging materials meet the criteria for properly freezing food: rigid containers, freezer bags, and freezer paper and wrap.
Rigid containers
Rigid containers are the perfect solution for freezing any soft or liquid food, such as casseroles and soups, and they’re reusable. The most desirable material for rigid containers is plastic, although some glass jars are made for freezing. Container sizes range from 1/4 of a cup to 1 quart with a variety of sizes in between. Purchase container sizes that fit your freezing needs.
 Choose square- or rectangular-shaped containers. They save space and fit better in your freezer than round containers.
Rigid containers approved for freezing prevent the spoilers from attacking your food as well as stopping moisture and vapors from penetrating your food. When you use them, be sure to allow the proper headspace so that your food or liquid can expand without forcing the top off (you can find a table listing headspace guidelines in Chapter 15). A good rule: Allow 1/2 inch of headspace for shallow containers and 1 inch for tall containers. For freezing in freezer bags, always press all the air possible out of the bag.
Freezer bags
Freezer bags are readily available, reasonably inexpensive, require a minimum amount of storage space, and come in a variety of sizes. When using freezer bags (we prefer the locking zipper variety), purchase bags labeled for freezing, because the thickness is moisture proof and protects the flavor of your food.
After placing your food in the bag, force out as much air as possible by folding the filled part of the bag against the nonfilled portion of the bag, pressing the air out while sealing the bag.
Freezer paper and wraps
Freezer paper comes coated or laminated and protects your wrapped food from air and freezer burn. Other freezer papers include heavy-duty foil, clear plastic wrap, waxed paper, and polyethylene (plastic) sheets.
Vacuum sealing machines
A vacuum sealing machine is a handy appliance that’s great for packaging foods for the freezer. Air is almost completely removed from the package through a suction process, the trademark of this appliance. Most vacuum sealing machines use materials that are freezersafe or even microwavable and boil-proof. (This is handy for single-serving meals for home or at work.)
Consider these additional items when you’re purchasing a vacuum sealing machine:
Cost:
Electric plug-in types range from a low of $50 to upward of $300. There are new battery or hand-powered vacuum sealers that are available for as little as $10. Although relatively new to the market, the reviews look promising.
Replacement bags:
Most machines include bags to get you started. Consider the cost of replacement bags and the reputation of the manufacturer. Investing in a vacuum sealer that is limited by a certain make of bags may limit use of your machine in years to come.
Storage requirements:
Depending on the size of your kitchen, storing a vacuum sealing machine may or may not be an issue. The ideal location for a vacuum sealer is usually on a counter, where you can use it at a moment’s notice.
To extend the life of your vacuum sealing bags, cut them larger than necessary and reseal them each time you remove some of the food inside. This works well for dry products. You can also refill and reseal the bags if the item inside was dry and fresh. This technique is not recommended for juicy foods or meats.
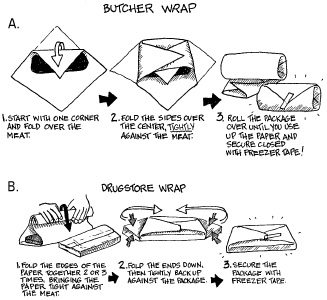
These papers and wraps are especially useful when packaging irregularly shaped foods, such as steaks and roasts. Freezer paper is primarily used for meat, because tight wrapping forces out excess air. To freezer-wrap something, follow these steps (see Figure 13-1):
1. Tear off a piece of freezer paper about double the size of your food (to ensure there are no exposed areas).
2. Place the food on the paper as close to a corner as you can get it without overlapping the paper.
3. Fold the corner tightly over the meat.
4. Fold the sides tightly over the center, one at a time.
5. Roll the package over until you reach the end of your freezer paper.
6. Securely tape the ends with
freezer tape,
a tape suited for cold temperatures.
Alternatively, you can use drugstore wrap, also shown in Figure 13-1.
Figure 13-1:
Freezer-paper wrapping techniques.
Tracking your frozen food trail
How many times have you looked in your freezer in astonishment that it’s full and yet you have no idea what’s taking up so much space? Have you ever defrosted what you thought was soup, only to discover you’re now having stewed tomatoes for dinner? Solve the dilemma of freezer mystery food by following these simple tips:
Label each package with the item and the date before placing your food in the freezer.
Also include the weight of a roast, the quantity of cut-up tomatoes, your preparation method, or the number of servings. Use an indelible marker or a waterproof pen, which won’t rub off.
Keep an up-to-date written record of food in your freezer to help with your meal planning.
Any sheet of paper works well. Make columns with the following headings: date, item (roast, spaghetti sauce, and so on), quantity or weight (1 cup or 3 pounds, for example), and any recipe or preparation ideas. Keep the list on your freezer door, crossing off items as you use them.
Packing your freezer
How you pack your freezer has an impact on the quality of your frozen foods. Follow these guidelines:
Cool your food to room temperature or chill it slightly before putting it in the freezer.
Doing this speeds up the freezing process (the freezer doesn’t have to work so hard to get the prechilled food down to 0 or lower) and it uses less energy.
When you first place your foods in the freezer, pack them loosely.
Once they’re frozen solid, you can pack them tightly. The extra space initially lets the cold air circulate and freeze the foods more quickly.
Rotate your food.
To rotate your food, simply add new frozen foods to the back of the freezer and bring the older foods up front. That way you can reach for the front of the group and get the oldest frozen food. Remember this acronym: FIFO (First In, First Out).
Use your frozen food within one year of freezing.
Table 13-1 lists approximately how long you can keep food in the freezer.
Table 13-1 Recommended Length of Time in the Freezer | |
Food | Length of Storage at 0°F (–18C) |
Fruits and vegetables, excluding citrus | 12 months |
Citrus fruits | 3 to 4 months |
Poultry | 12 months |
Fish | 2 to 3 months |
Ground meat | 3 to 4 months |
Cured or processed meat | 1 to 2 months |