Canning and Preserving For Dummies (42 page)
Read Canning and Preserving For Dummies Online
Authors: Amelia Jeanroy

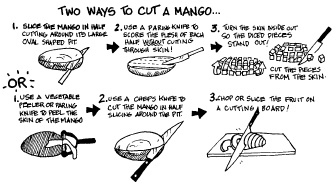
Figure 15-1:
Peeling and cutting a mango.
Frozen Pineapple Packed in Syrup
Selecting a ripe pineapple can be challenging because of the thick peel. Start by smelling the skin. A strong sweet pineapple aroma, with no alcohol undertones, means the fruit is ripe. Here’s a little tip: The stem end develops sugar first, so check for yellow eyes around the base. Although it might seem tricky, getting the ripest pineapple is essential for a sweet juicy flavor.
Preparation time:
20 minutes
Yield:
1 pint
1 pound pineapple
1 cup cold light syrup
1
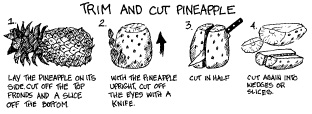
Peel and core the pineapple (see Figure 15-2), cutting it into wedges or cubes.
2
Pack your fruit into a rigid freezer container. Fill the container with the cold light syrup (refer to Table 15-1), allowing the proper headspace (refer to Table 15-2). Then seal and freeze.
Per 1/2-cup serving:
Calories 96 (From fat 0); Fat 0g (Saturated 0g); Cholesterol 0mg; Sodium 1mg; Carbohydrates 25g (Dietary fiber 1g); Protein 0g.

Figure 15-2:
Removing the rind and the core from a pineapple.
Frozen Strawberries Packed in Sugar
Strawberries are put in a category of their own for freezing. Cut them and treat them with sugar or pack them in syrup.
Preparation time:
20 minutes
Yield:
1 pint
3/4 to 1 1/2 pounds fresh strawberries
1/2 cup sugar
1
Wash your strawberries in water, being careful to not bruise them. Remove the hulls (stems).
2
Slice the strawberries lengthwise into a bowl. Add 3/4 cup granulated sugar for each quart of strawberries, stirring the berries to dissolve the sugar. Let the strawberries and sugar sit for 30 minutes for the juice to develop.
3
Transfer your strawberries to rigid freezer containers, allowing the proper headspace (refer to Table 15-2).
Vary It!
To pack your strawberries in syrup,
place the sliced strawberries into rigid freezer containers. Fill the containers with a cold medium syrup (refer to Table 15-1), allowing the proper headspace (refer to Table 15-2).
Per 1/2-cup serving:
Calories 121 (From fat 3); Fat 0g (Saturated 0g); Cholesterol 0mg; Sodium 1mg; Carbohydrates 31g (Dietary fiber 2g); Protein 1g.
Thawing and using frozen fruits
For retaining the best quality of your fruit after freezing, refer to Chapter 13 and follow these guidelines:
Open your container when a few ice crystals remain in your fruit.
Use your fruit immediately after thawing.
When cooking with sweetened, thawed fruits, you may need to reduce the amount of sugar your recipe calls for.
Use your frozen fruit within one year.
Freezing Vegetables Like a Pro
Like fresh fruit, fresh vegetables are quick and easy to freeze. The key to great frozen vegetables is a process called blanching.
Blanching
scalds the vegetables in boiling water, slows down the enzymes and the spoiling process, and preserves the color, flavor, texture, and nutritive value.
 Blanching isn’t necessary if you’re using your frozen vegetables, like onions, in foods when you’re only concerned with flavor and not color.
Blanching perfect vegetables
Blanching requires 100 percent of your attention. Vegetables blanched for too short of a time won’t stop the enzymes in the vegetables, and microorganisms start where they were stopped after the vegetables thaw. Vegetables left in the boiling water too long start cooking and may become limp.
Follow these steps for successful blanching:
1. Wash and drain your vegetables; then remove any peel or skin, if needed. If you’re not freezing your vegetables whole, cut them now.
2. Bring a 5- to 6-quart pot of water to a boil and fill a large mixing bowl with ice water.
Add ice cubes to the mixing bowl because the hot vegetables increase the temperature of the ice bath. Cold stops the cooking process.
3. Add your prepared vegetables to the boiling water for the amount of time specified in the recipe.
Begin timing your vegetables as soon as they’re in the boiling water; don’t wait for the water to return to a boil.
Blanch your vegetables in batches, no more than 1 pound of vegetables in 1 gallon of water.
4. Remove your vegetables from the boiling water and plunge them into the ice-water bath, stirring the vegetables and circulating the ice water to stop the cooking process as quickly as possible.
Don’t leave your vegetables in the ice-water bath longer than they were in the boiling water.
5. After the vegetables are chilled all the way through, remove them from the ice-water bath and drain them in a colander. If you’re dry- packing them, roll them in or lay them on clean, dry kitchen towels to remove excess moisture.
Packing your vegetables
Pack your vegetables immediately after preparing them. Moisture-proof, vapor-proof freezer bags are the best choice for your vegetables. Don’t season them before freezing them.
Removing all excess air is important to avoid the spoilers, such as freezer burn (refer to Chapter 13). To remove air from your containers, follow these guidelines:
Freezer bags:
Package your vegetable pieces as close together as possible at the bottom of the bag, without bruising or squashing the vegetables. Fold the unfilled upper portion of the bag over the vegetables, gently pushing any air out of the bag. Seal the bag.
Rigid containers:
Use reusable containers when you’re adding liquid to the vegetables. Allowing the proper headspace exhausts the air because the liquid in the container expands when it freezes. For headspace allowances, refer to Table 15-2.
After filling your bags, place them in a single layer in your freezer. Quick freezing is important to the thawed quality of your vegetables. After the packages are frozen solid, you may stack them on top of each other.
Step-by-step instructions for freezing vegetables
Follow these steps for freezing vegetables:
1. Choose only perfect vegetables, free of bruises and imperfections, not overly ripe.
2. Work with small, manageable quantities, about 2 pounds at a time.
3. Wash and drain your vegetables and prepare them according to your recipe (which usually specifies blanching the vegetables).
Be sure to allow the vegetables to dry thoroughly before freezing to prevent them from sticking together when frozen.
4. Chill your vegetables before packing them for freezing.
5. Fill your container, allowing the proper headspace if you’re using rigid containers (refer to Table 15-2), or removing all of the excess air from freezer bags.
6. Label your package, adding it to your freezer.
Frozen Asparagus
Asparagus is one of those vegetables that mean spring has arrived. If you are lucky enough to grow it yourself, you know that you can sometimes feel overwhelmed with what to do with the abundance. Try freezing it!
Preparation time:
20 minutes
Yield:
1 pint
1 to 1 1/2 pounds fresh asparagus
1
Wash and drain the asparagus spears. Leave the spears whole or cut them into 1-inch pieces.
2
Blanch the spears or pieces for 1 to 4 minutes, depending on the size (thinner spears take less time). Take the time to test your spears after each minute to check for a slightly crisp texture. Cool the asparagus immediately in an ice bath. (See the earlier section “Blanching perfect vegetables” for complete blanching instructions.)
3
Place the cooled asparagus in quart-sized freezer bags — 1 pound of asparagus fits nicely into a quart bag — removing all excess air before sealing the bag and placing it in the freezer.
Per 1/2-cup serving:
Calories 25 (From fat 3); Fat 0g (Saturated 0g); Cholesterol 0mg; Sodium 12mg; Carbohydrates 5g (Dietary fiber 2g); Protein 3g.