DIY Projects for the Self-Sufficient Homeowner: 25 Ways to Build a Self-Reliant Lifestyle (13 page)
Authors: Betsy Matheson
Tags: #Non-Fiction

7 Finish and install
the bottom. Cut the bottom panel to size from 3/4"-thick exterior-rated plywood. Drill several 1"-dia. drainage holes in the panel and set it onto the cleats. The bottom panel does not need to be fastened in place, but for extra strength, nail it to the cleats and box sides with galvanized finish nails.

8 Finish the box
or boxes with wood sealer-preservative. When the finish has dried, line the planter box with landscape fabric, stapling it at the top of the box. Trim off fabric at least a couple of inches below the top of the box. Add a 2"-layer of gravel or stones, then fill with a 50/50 mix of potting soil and compost.
TIP:
Add wheels or casters to your planter boxes before filling them with soil. Be sure to use locking wheels or casters with brass or plastic housings.
 Building an Old-fashioned Strawberry Barrel
Container gardens aren’t just for vegetables—fruit trees and berry bushes also thrive in a potted garden environment and can produce enough fruit for a family to enjoy throughout the summer. Strawberries, which typically grow in long rows or patches in the ground, can also be grown in a converted barrel. Two can be enough space to grow the equivalent of 25 feet of strawberry plants. For this project, make sure you choose everbearing strawberry varieties, and cut off runners for transplanting when they appear. Insulate your barrels with hay or straw during the winter, and you can enjoy a strawberry crop for several years. To keep your barrel going, start fresh every four or five years with new plants and new soil.
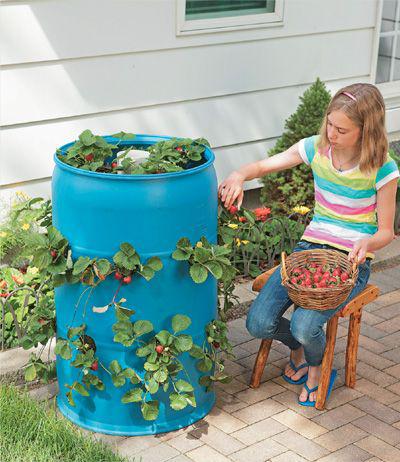
A strawberry barrel
planter can grow the equivalent of 25 ft. of strawberry plants; choose everbearing varieties for best results.
TOOLS & MATERIALS
Large, clean barrel (55-gallon plastic or wood)
Pry bar or jigsaw
3"-dia. hole saw
Drill
4"-dia. PVC Pipe
Window screen or hardware cloth
Gravel
Potting soil mix
Strawberry plants
How to Build a Strawberry Barrel
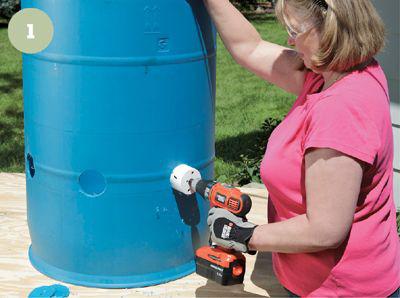
1 Prepare the barrel.
If your barrel has a lid or closed top, remove it with a pry bar. If your barrel does not have a lid, cut a large opening in the top with a jigsaw. Beginning about 1 ft. above the ground, use a hole saw to cut 3"-dia. planting holes around the barrel, about 10" apart. Stagger the holes diagonally in each row and space the rows about 10" apart. Leave at least 12" above the top row of holes. Flip the barrel over and drill about a half dozen 1/2"-dia. drainage holes in the bottom.

2 Prepare the watering pipe.
Cut a section of 4"-dia. PVC pipe to fit inside the barrel from top to bottom. Punch or drill 3/4"-dia. holes in the pipe every 4 to 6", all the way around. Cut a section of window screen or hardware cloth to fit inside the bottom of the barrel and place it inside. Cover the screen with 2" of gravel or small rocks.
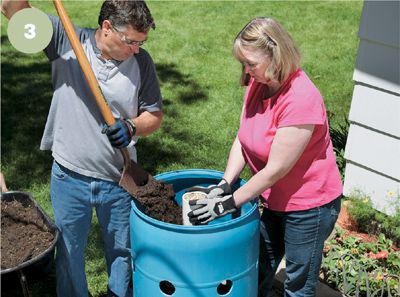
3 Begin to fill
the barrel with soil. Have a friend hold the watering pipe in the center of the barrel and fill the pipe with coarse gravel. Then, begin to add soil to the bottom of the barrel, packing it firmly around the watering pipe in the bottom with a piece of scrap lumber. Add water to help the soil settle. Continuing adding soil until you reach the bottom of your first row of planting holes.
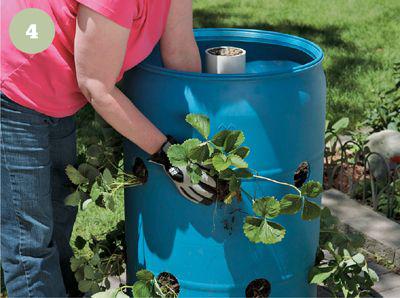
4 Add soil and plants.
Carefully insert your strawberry plants into the holes, spreading the roots into a fan shape. Add soil on top of the roots and lightly water. Continue to add soil and plants, packing soil gently and watering after each planting, until you reach the top of the barrel. Do not cover the watering pipe. Plant additional strawberries on top of the barrel. Insert a hose into the watering pipe and run water for several minutes to give the barrel a good soaking.

An inexpensive foray into greenhouse gardening, a cold frame
is practical for starting plants six to eight weeks earlier in the growing season and for hardening off seedlings. Basically, a cold frame is a box set on the ground and topped with glass or plastic. Although mechanized models with thermostatically controlled atmospheres and sash that automatically open and close are available, you can easily build a basic cold frame yourself from materials you probably already have around the house.
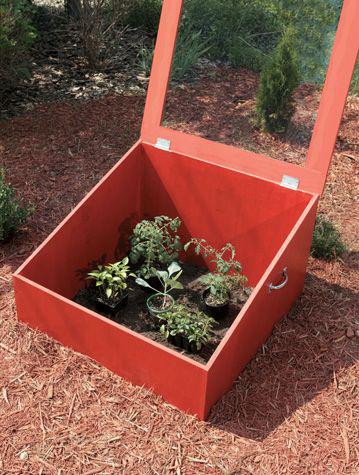
Starting plants early
in a cold frame is a great way to get a head start on the growing season. A cold frame is also a great place for hardening off delicate seedlings to prepare them for transplanting.
The back of the frame should be about twice as tall as the front so the lid slopes to a favorable angle for capturing sunrays. Build the frame tall enough to accommodate the maximum height of the plants before they are removed. The frame can be made of brick, block, plastic, wood, or just about any material you have on hand. It should be built to keep drafts out and soil in.