DIY Projects for the Self-Sufficient Homeowner: 25 Ways to Build a Self-Reliant Lifestyle (9 page)
Authors: Betsy Matheson
Tags: #Non-Fiction

8 Frame the grids
with 1 × 2 strips cut to the correct length so each frame fits neatly inside a panel or door opening. Install the grid frames in the openings, making sure all front edges are flush.
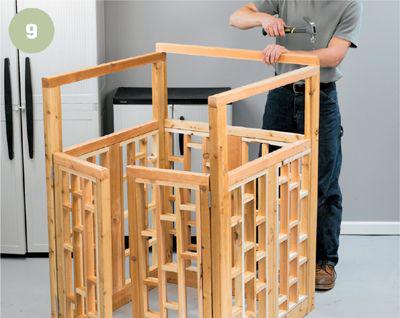
9 Attach the top rails
that conceal the post tops and help tie the panels together. Attach the sides first using exterior glue and galvanized finish nails. Then, install the back rail on top of the side rails. Leave the front of the project open on top so you can load, unload, and turn over compost more easily.
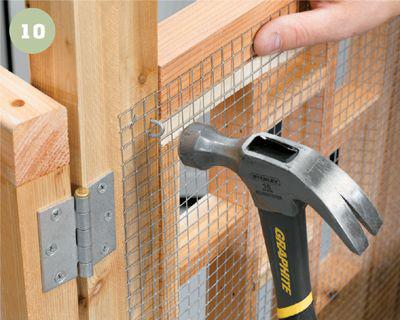
10 Line the interior surfaces of
the compost bin with 1/2" galvanized hardware cloth. Cut the hardware cloth to fit and fasten it with fence staples, galvanized U-nails, or narrow-crown pneumatic staples (5/8" minimum) driven every 6" or so. Make sure you don’t leave any sharp edges protruding. Grind them down with a rotary tool or a file.

11 Set up the bin
in your location. It should not be in direct contact with any structure. If you wish, apply a coat of exterior wood sealant to all wood surfaces—use a product that contains a UV inhibitor.
TIP:
Before setting up your compost bin, dig a hole just inside the area where the bin will be placed. This will increase you bin’s capacity.
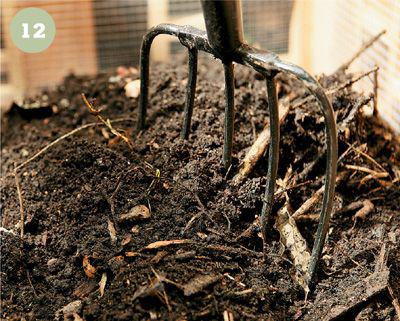
12 Add suitable organic matter
to the bin and turn with a pitchfork occasionally to speed up the rate of aerobic decomposition. With a little nurturing and good conditions, a compost bin can yield several batches of usable compost in a growing season.
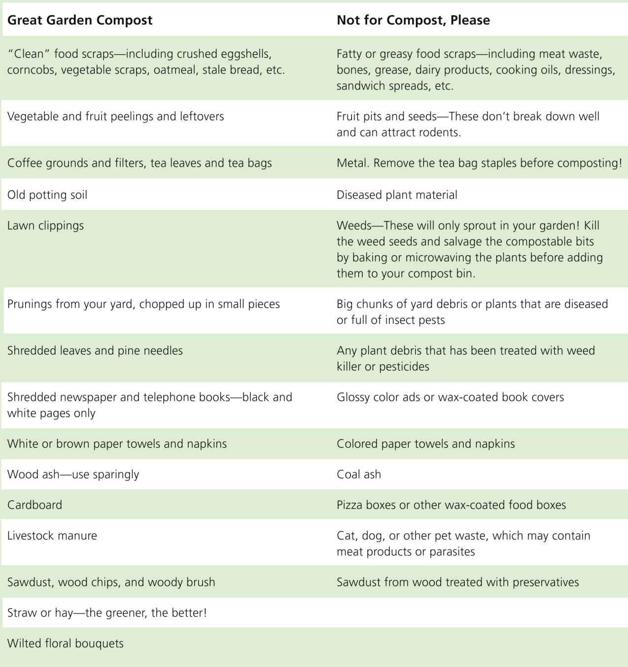
What to Compost, What Not to Compost
Vegetable plants soak up the materials that make up your compost, and these materials will play a vital role in the development of the vegetables that will grace your dinner table! When in doubt as to what should or shouldn’t go into your compost pile for your garden, follow these general guidelines:

Raised garden beds offer several advantages over planting at
ground level. When segregated, soil can be amended in a more targeted way to support high density plantings. Also, in raised garden beds, soil doesn’t suffer compaction from foot traffic or machinery, so plant roots are free to spread and breathe more easily. Vegetables planted at high densities in raised beds are placed far enough apart to avoid overcrowding, but close enough to shade and choke out weeds. In raised beds, you can also water plants easily with soaker hoses, which deliver water to soil and roots rather than spraying leaves and inviting disease. And if your plants develop a fungus or another disorder, it is easier to treat and less likely to migrate to other plants in a raised bed situation.
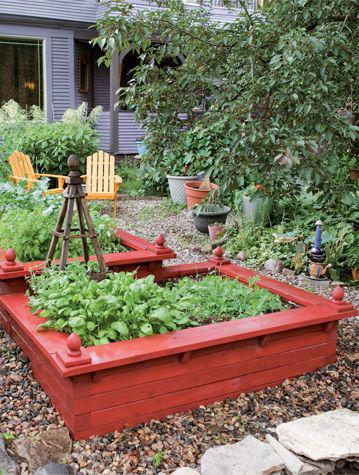
Raised garden beds
make great vegetable gardens—they’re easy to weed, simple to water, and the soil quality is easier to control, ensuring that your vegetable plants yield bountiful fresh produce. Your garden beds can be built at any height up to waist-level. It’s best not to build them much taller than that, however, to make sure you can reach the center of your bed.
Bed Positions
If you’re planting low-growing crops, position the bed with a north-south orientation, so both sides of the bed will be exposed to direct sunlight. For taller crops, position the bed east-west.
Raised garden beds can be built in a wide variety of shapes and sizes, and can easily be customized to fit the space you have available on your property. Just make sure you can reach the center easily. If you can only access your raised bed from one side, it’s best to build it no wider than 3 ft. Beds that you can access from both sides can be as wide as 6 ft., as long as you can reach the center. You can build your raised bed as long as you’d like.
Raised garden beds can be built from a wide variety of materials: 2× lumber, 4 × 4 posts, salvaged timbers, even scrap metals and other recycled goods. Make sure any lumber you choose (either new or salvaged) hasn’t been treated with creosote, pentachlorophenol, or chromated copper arsenic (CCA). Lumber treated with newer, non-arsenate chemicals at higher saturation levels is rated for ground contact and is also a safe choice for bed frames. Rot-resistant redwood and cedar are good choices that will stand the test of time. Other softwoods, including pine, tamarack, and cypress, will also work, but can be subject to rot and may need to be replaced after a few years.
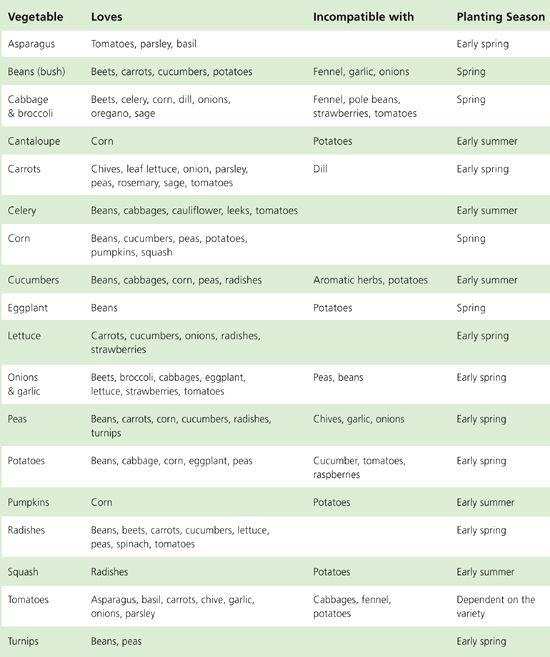
Vegetable Plant Compatibility Chart
When the soil inside the planting bed pulls away from the edges of the bed, it’s time to water. The best time of day to water is in the late afternoon or early- to mid-morning. Avoid watering in midday, when the sun is hottest and water will quickly evaporate, or near sundown or at night, when too much moisture in the soil can cause mold and fungus to grow.