Equine Massage: A Practical Guide (26 page)
Read Equine Massage: A Practical Guide Online
Authors: Jean-Pierre Hourdebaigt

Massage Routines
129
At this point, move yourself to the rear of the horse and using only your body weight, pull on his tail very gently. Hold this stretch for approximately 1 or 2 minutes unless the horse shows discomfort. Usually the horse responds positively by pulling against you. Stretching the tail will contribute to and increase the horse’s relaxation tremendously.
While stretching the tail, gently work each vertebra with a few muscle squeezings, between the thumb and fingers, from the base of the tail downward; keep stretching the tail with the other hand.
Switch hands if you prefer.
Take note of the tail’s flexibility and if there are any tender spots or points of possible inflammation. Release the tail-stretch progressively and then stroke the hindquarters and sacrum area for a few seconds.
Warning:
If when you start stretching the tail feels “loose” at its attachment site (with half an inch give before the actual stretch starts), stop at once.You could be hurting the horse.The looseness means the horse has a not-uncommon joint problem. If you continue to pull the tail, you could produce a strain. If the horse shows discomfort, inflammation, or other abnormal symptoms on palpation of this area, skip the stretching and check with your veterinarian.
6.14 Stretching the Tail Out:
Carefully and gently working each vertebra with soft muscle
squeezing moves, relaxation routine.

130
Equine Massage
Working the Legs
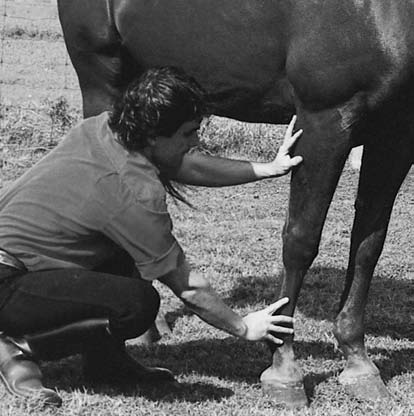
After the tail work, proceed to a gentle stroking-down of the legs (point 9; figure 6.1).Always maintain hand contact with the horse.
Use 5 to 8 strokings on the way down the leg, and 2 or 3 on the way up, and a few more over the upper body as you move from leg to leg. Since you are already at the rear, start with the hind legs; then do the front ones.
Pick up each leg as you would to clean hooves. Safely position yourself relative to the horse.When the leg is flexed, move it gently in a small circle, moving inwards, then forwards, then to the outside, then back. Start again, repeating the movement 2 or 3
times.This action will further the relaxation and the “letting-go”
feeling over the legs, the shoulder girdle, and indirectly over the spine. Be gentle.
This relaxation routine should take you from 10 to 15 minutes.
You can take longer if you want, but the point of this routine is to initiate the relaxation reflex in a short period. Ten minutes is ideal.
When you use the relaxation routine to start another routine, a shorter version can be used, skipping the muscle squeezings over the crest of the neck, the neck rocking, the withers work, and the leg work at the end. After you complete the muscle squeezing right behind the poll, use strokings down the neck,
6.15 Stroking the Legs Down:
End of relaxation
routine.
Massage Routines
131
over the withers and the back all the way to the sacrum. Then resume the regular routine.
Another variation of this routine is to start by working the withers and using stroking moves to the back and sacrum area, where you apply the sacral work. Then go back up toward the neck using strokings. Then work the neck crest and base of the skull behind the poll. Finish with the tail work and leg grounding.This version is useful when working on a head-shy horse.
We know from experience that the first routine outline works best. It won’t take long before the horse associates his relaxation with your work. So with practice, you will be surprised at how quickly your horse will relax.
The Head Massage Routine
The massage of the face, head, and upper neck areas indirectly affects the whole body; it is another great way to relax your horse and is also very soothing if he has sinus problems caused by aller-gies or a cold. This massage will also tell you about the horse’s well-being, whether he is more auditory in orientation, reacting well to your voice, or is visually oriented, responding more to your movements (see chapter 2).
There are several areas on the face and head that will trigger very strong responses. For example:
❖ Massaging the upper lip and gums will elicit the same reflex response as a nose twitch, releasing endorphins into the body.
❖ Massaging the whole lower jaw, cheek, throatlatch, and upper neck will relax the animal tremendously, with a reflex effect on the neck and on through the whole spine.
❖ Massaging around the eyes and over the forehead will relieve tension from around the eye sockets.
❖ Massaging the ears, which are sensitive and always working, is very relaxing to most horses. However, horses are very protective of their ears and some do not like them touched at all; if you find your horse has this reaction, leave the ears until he has become accustomed to the massage routines.
The head massage routine is divided into three phases, each bringing the horse progressively into deeper relaxation and accepting of more detailed work. The sequencing of these routines is important; observe it from the beginning of your practice.
Later, you can adjust the sequence to your liking as you develop

132
Equine Massage
a feel for your horse and his needs. But before you start, keep these facts in mind to improve your massage routine:
❖ When massaging the face and head, you should spend 15 to 20 minutes. Always use a very light touch since you will be massaging over many bones, nerve endings, reflex points, and facial muscles.
❖ Massage both sides at the same time to relax the horse gradually.
❖ When only using one hand in your massage, maintain constant contact with the horse by putting your other hand over the ridge of the nose.
❖ Always assess your horse’s feedback signs as well as the feedback given by your fingertips (the four T’s listed in chapter 3).
❖ Once your horse is used to your work, it is better not to have a halter on him while giving a head massage. Instead, use a very light nose band or put the halter around his neck.
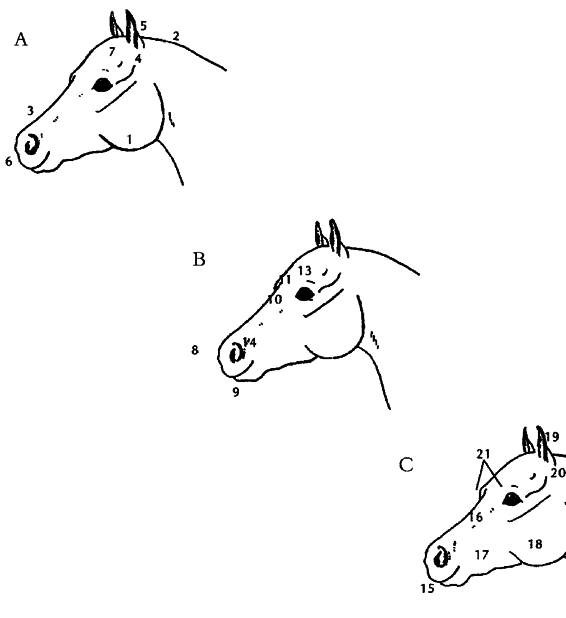
6.16 Head Massage Routine
(A) first phase
(B) second phase
(C) third phase

Massage Routines
133
First Phase
Start on the horse’s left side. While quietly talking to the animal, hold the halter with your left hand and start a gentle circular effleurage with the right hand over the left cheek (point 1; figure 6.16), going slowly upwards toward the neck.
Then put your right hand on the neck crest (point 2; figure 6.16) in the area of the first and second cervical vertebrae and hold it there. Place the palm of your left hand on the ridge of the horse’s nose (point 3; figure 6.16). Take a couple of minutes to breathe with your horse.Then talk in a soft voice. Since the horse is very protective, this initial contact will help him accept your touch. Keep in mind that the horse’s face is a very sensitive area.
Keep your left hand either on the nose ridge or on the halter.
Start massaging the upper neck area and the whole poll (point 4; figure 6.16) with your right hand. Do 20 to 30 gentle muscle squeezing movements for about a minute. Then move your right hand to the back of the ears and use light effleurages and gentle petrissage moves, such as light kneadings, around the base of the ears, and gentle muscle squeezing of the ear (point 5; figure 6.16) between your thumb and index finger. Most horses love this, and yours should lower his head in response. If he does not like his ears touched, skip this part.
Then bring both hands to the muzzle (point 6; figure 6.16) and start some light, gentle circular effleurages going from the nose ridge to the sides and all the way up to the ears.Work both sides
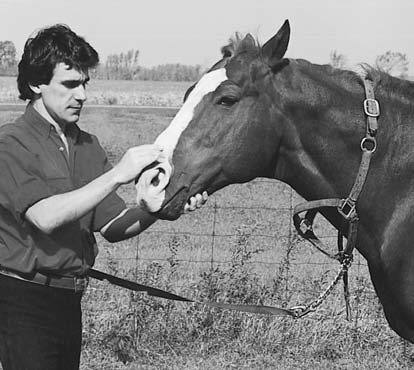
6.17 Working the Muzzle:
First pass, head massage routine.

134
Equine Massage
6.18 Working the Base of Ears:
First pass, head
massage routine.
simultaneously. Observe all reactions. At the base of the ears apply light finger pressure on the temples (point 7; figure 6.16) on each side. Use a light circular motion clockwise to start and counterclockwise afterward, each 3 to 5 circles minimum, more if your horse likes it. This is very soothing; you will notice his eyes will change expression and become “sleepy-looking.”
Second Phase
Put the palm of one hand on the muzzle (point 8; figure 6.16) and apply gentle effleurages in a circular motion. Follow with gentle muscle squeezings, working both the lips and the chin thoroughly (point 9; figure 6.16).
Follow with small thumb kneadings from the nose to the forehead (point 10; figure 6.16). Then apply the palm of the hand on the forehead (point 11; figure 6.16) with a light pressure (2 pounds) and gently apply a circular motion, starting clockwise, then counterclockwise, each 2 or 3 circles minimum (more if the horse likes it) while maintaining full hand contact with the forehead.
The position of the eyes and the whorl form a triangle, which is the center of the horse’s conscious world. Massaging this triangle will relax the animal greatly.
With your fingertips, apply some very light and small kneadings all around the eyes, draining them with small effleurages away from the eyes laterally. Then, very gently, apply a light pressure point (3 pounds of pressure maximum) half an inch from the corner of the eye for 10 seconds (point 12; figure 6.16), and drain

