Everyday Paleo (51 page)
Authors: Sarah Fragoso
Tags: #Diets, #Healthy Living, #Health & Fitness, #General

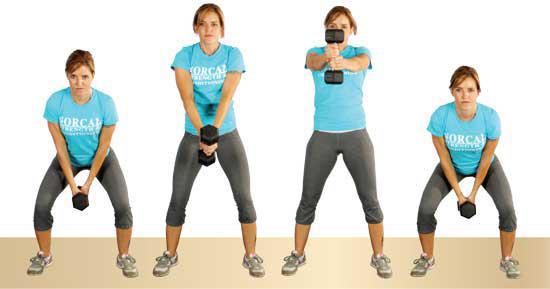
Dumbbell Swing
The dumbbell swing is a dynamic movement that is great for building up the muscles in the glutes, legs, and core. And when performing several reps, it will dramatically raise the intensity level of your workout. As always, make sure you start out with a lighter weight in order to learn the technique before you load yourself with a more challenging weight.
MUSCLES USED: Gluteals, Hamstrings, Erector Spinae, and Deltoids
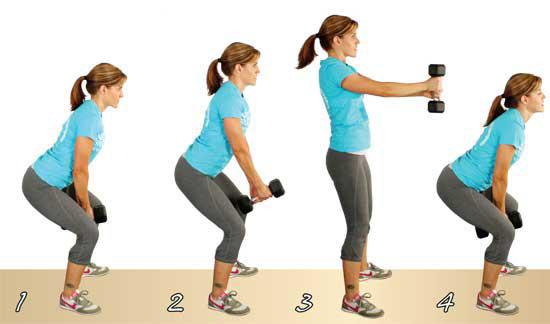
1)
Begin with your feet approximately shoulder width apart and grip the handle of the dumbbell with both hands. If gripping the dumbbell in this manner proves difficult, you can also hold the head of the dumbbell. Next, push your bottom back, keep your chest up, and make your back strong and straight. It is important to note that during the entirety of this movement, you want your weight in your heels and your gaze directed forward.
2)
To generate the power needed to swing the dumbbell upward, quickly move your hips forward. You do not want to move the weight with your arm muscles, but rather with the force generated by your fanny and leg muscles.
3)
Swing the dumbbell up to chest level.
4)
As gravity brings the dumbbell back down, drop your hips back. This allows you to “catch” the dumbbell as it falls. Once accomplished, repeat the movement and get ready to feel your fanny get put to work!
Advanced Body Weight
and Bar Movements
I
will now demonstrate for you a few body weight movements that are appropriate for the advanced beginner and for those with a higher level of fitness. These movements can be incorporated into your workouts if you are already in good health or you have been following the beginner’s workouts for at least thirty days and feel healthy and strong. However, if you are unable to squat to full depth or lack the ability to perform modified knee push-ups off the floor, it’s best to continue with the beginner’s workout for a while. As long as you stick with it, your core strength will improve, and soon you will be astonished by what your body can achieve. And when you are finally ready to add some of the upcoming workouts to your regimen, you will only advance your already improved strength. At the end of this section, I will offer several more workout options that include all of the movements that you have learned thus far.
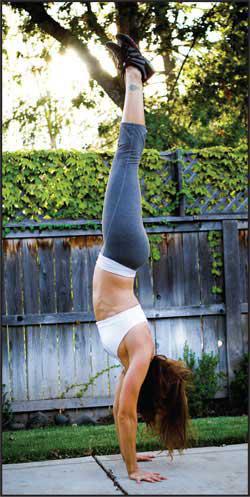
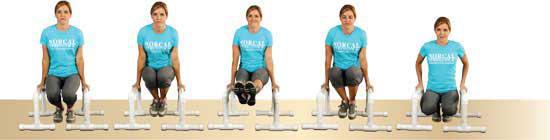
L-Sit Progression
The L-sit is an excellent core strengthener. In addition to focusing on the abdominal muscles, it works the arms and legs as well. Achieving an actual L-sit is quite challenging, but it is certainly worth the effort. Personally, I thought I would never get there when I first started practicing, but each training session I progressed a little more, until the movement was easily attainable. If you look at the photos below, you’ll notice that I perform the movement on a pair of “parallettes” constructed out of PVC pipe. Instructions on how to build a set of parallettes can be found at
www.parallettestraining.com
.
MUSCLES USED: Abdominals, Iliopsoas, Quadriceps, and Triceps
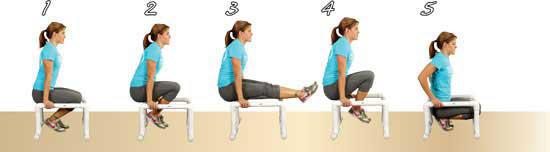
1)
Before beginning this movement, it is important to set the parallettes the proper distance apart. The distance between the two should be the same as the distance between your elbow and fingertips. Once properly set, position yourself between the parallettes, knees down, and place your hands near the back or middle of the bars. Make sure your body is not leaning forward or backward—you want your hands positioned directly under your shoulders.
2)
Press down on the parallettes, moving your body away from the ground. Your shoulders should not be shrugged up, but rather strong and flat. Keep your tummy tight, arms strong, and rest your toes on the ground for support. If you are a beginner, this might be a good place for you to start. Try holding yourself here for 10-second increments, using your toes on the ground as support.
3)
If the first movement feels easy, try lifting your feet off the ground and holding a tuck position. Make sure not to rock forward or back—keep your center of gravity in between your hands. Try holding this position for 10- to 30-second time increments.
4)
If you feel ready, try the actual L-sit. From the tuck position, slowly straighten your legs out in front of you. Try not to bend at the knees and keep your legs above the height of the parallettes. If you have limited hamstring flexibility or tight hips, this advanced movement might take a while to achieve, but that is OK—remember, anything worth achieving is always hard work! Another variation is to balance in the tuck position, place one foot on the ground for some support, and straighten the other leg and hold for 10- to 30-second increments. Switch legs and repeat.
5)
After achieving the L-sit or after performing the tuck position, place your feet back on the ground underneath your body to support your weight and relax your arms. Rest and repeat.
Jump Rope
Do you remember jumping rope as a child? Maybe it wasn’t your thing, but I remember jumping rope for what seemed like hours when I was a kid, and I do not remember it being challenging, only fun! Wow, it’s a heck of a lot different as an adult, and every time I jump rope I wonder why it was so easy as a child. The good news is that jumping rope, especially with your kids, can still be a lot of fun! Oh, and be ready to be reintroduced to your calf muscles after your first jump rope experience. A jump rope is about the least expensive, easiest to store, and most portable workout tool one can have. However, it is important to purchase a jump rope where the rope rotates within the handle. This makes the rope turn easier and faster, resulting in less mishaps when performing the movement. Most fitness stores have a variety of jump ropes available, but you can also find them online at
www.roguefitness.com
.
MUSCLES USED: Full body exercise with emphasis on calves
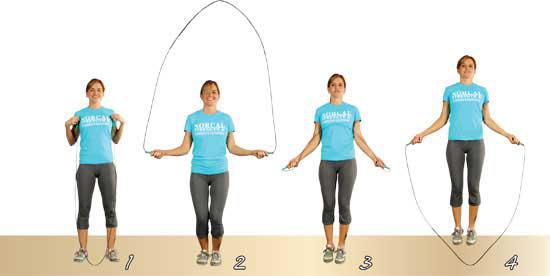
1)
This movement can be a nightmare if your rope is not the correct length. When purchasing a jump rope, hold both handles at the top of your armpits. If the rope just touches the ground, you are good to go.
2)
Start with the jump rope behind you. Next, rotate your wrists so that the rope moves over your head in a fluid arc. At the same time, bend your knees in preparation for your first jump.
3)
As the rope swings toward the front of your body, leap off the ground so that the rope can move underneath of your feet. The goal is to jump just high enough to allow the rope to move underneath you, but this requires timing. When first starting out, it might take a rather high jump in order to accomplish this goal. Just remember to take things slow to find your rhythm, look straight ahead, and keep your torso tight.
4)
Allow the rope to pass underneath your feet while you are in the air. Make sure you are jumping on your toes, and make sure not to “donkey kick” your legs behind you. Remember, straight up and down, keeping your body tight. As you begin to get the hang of this movement, you can try what is known as the “double-under.” This is when you quickly spin the rope, allowing it to move twice underneath your feet with each jump. Jumping rope is an excellent exercise for getting your heart rate up, as well as for working a few of those undiscovered muscles. Have the tops of your feet and ankles ever been sore? They will be after a good session of jumping rope!
Broad Jump
The broad jump is a dynamic movement that should only be performed if you do not have any orthopedic knee or spine issues. This movement is powerful, explosive, and something your kids will most likely love! You can turn broad jumps into a fun game with your family, while at the same time strengthening your legs and fanny.
MUSCLES USED: Abdominals, Gluteals, Quadriceps, Hamstrings, and Calves
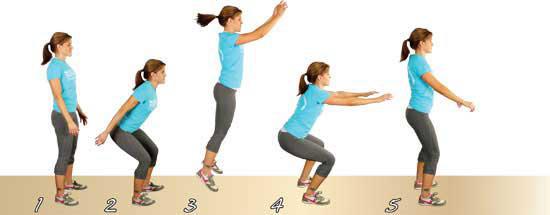
1)
Start with your feet positioned under your hips in the “jump position.”
2)
Reach your hips and arms back behind you, keeping your chest up, back straight, and gaze straight ahead.
3)
Jump up and forward, using the power generated from your legs and fanny. At the same time, propel your arms forward to give you more momentum.
4)
Land with bent knees. Your weight should be in your heels and your arms out in front for balance. Try to land gently, and not on your toes. In order to keep your spine and knees safe, let your fanny absorb the impact of your landing.
5)
Return back to a standing position and be ready to again reach your hips back and repeat the move.

Box Step-Up
Do you have an old aerobics step-up that you purchased along with that Jane Fonda workout video years ago? Well, you can toss the video if you like, but keep the step-up. By using this piece of equipment in conjunction with a few of the movements from this section, you can add an interesting piece of intensity to your routine. We’ll start with the box step-up, which is great for working the quads, glutes, and hamstrings.