Everyday Paleo (52 page)
Authors: Sarah Fragoso
Tags: #Diets, #Healthy Living, #Health & Fitness, #General

MUSCLES USED: Gluteals, Hamstrings, and Quadriceps

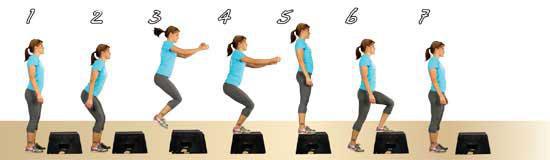
1)
Stand directly in front of the box or step-up. Your feet should only be a couple of inches away from the box.
2)
Step your right foot on top of the box.
3)
Push off your left leg and then place your left foot next to your right foot on top of the box. Make sure your posture is straight and your body is tight.
4)
Step your left foot back to the ground.
5)
Step your right foot off the box and return to the start position. From here, alternate legs by stepping your left foot up to the box first. If you are a beginner, it is important to start out slowly. Once you begin to feel balanced and safe with this movement, you can increase repetitions and speed.

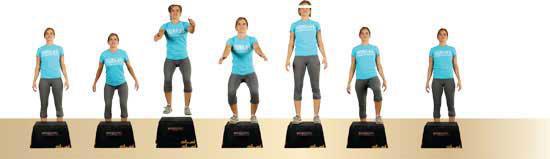
Box Jump
The box jump is the dynamic cousin to the box step-up and adds a new level of intensity. It works a number of muscles, including your calves, glutes, quads, and hamstrings. When performed in repetition, expect hard breathing and some sweating. However, you only want to utilize this movement if you can easily step up and down onto a small box, squat to full depth, and if you do not have any orthopedic problems with your knees or spine. I recommend starting with a 12-inch box, and slowly progressing higher as your strength and agility improves.
MUSCLES USED: Abdominals, Quadriceps, Hamstrings, Gluteals, and Calves
1)
Stand in front of the box as described in the box step-up.
2)
Reach your fanny and arms back slightly, bending at the knees and keeping your chest up and your gaze forward.
3)
Swing both arms forward as you jump up and onto the box, using the power from your fanny and your legs to propel yourself up. Explode up off of the ground and do not be timid!
4)
Land with bent knees and with both feet on the box. Your weight should be in your heels and both of your arms out in front of your body for balance. Try to land gently by letting your fanny absorb the impact of the jump rather than your knees.
5)
Once on the box, stand completely upright.
6)
Carefully step one foot back down to the ground.
7)
Return the opposite leg to the ground and get ready to repeat the movement. At some point, you might feel confident enough to jump back down from the box, allowing you to quickly repeat this movement, but do not attempt this option until you feel extremely confident with stepping down and repeating the jump several times in a row.
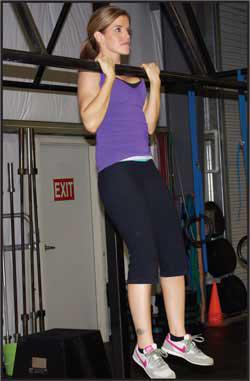
Jumping Pull-Up
The jumping pull-up can be performed in your gym or at your local playground, or you can install a pull-up bar in your garage by purchasing one online at www.studpullupbar.com. In addition to strengthening your upper body, this movement is great for the fanny, calf muscles, and quads. However, the jumping pull-up is an incredibly dynamic movement, so I recommend only trying a few at a time during your first attempt.
MUSCLES USED: Latissimus Dorsi, Trapezius, Deltoids, Hamstrings, Gluteals, Quadriceps, and Calves

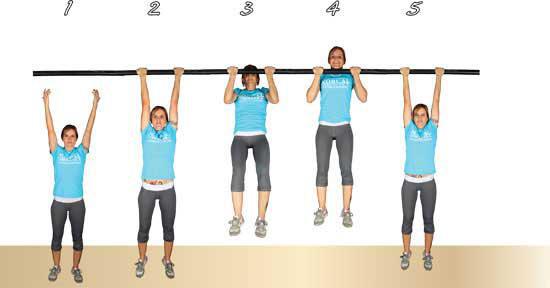
1)
Stand directly under the bar, reach your arms up, and grab the bar slightly wider than shoulder width. For this particular movement, you want your palms facing away from your body.
2)
Bend your knees and reach your fanny back, putting you into the squat position. If the bar is too high, you may need to stand on a box in order to achieve the correct position. If the box still does not give you adequate height, you can always place a single rubber weight plate on top of the box as I do in the photos above—just make sure both the box and the plate are secure.
3)
Keeping your chin tucked and your gaze straight in front of you, jump up, making sure that your chin makes it over the bar. You should not be pulling yourself up as much as you should be using the power from your legs to help jump your chin over the bar.
4)
After your chin passes the bar, let gravity quickly pull you back down. Do not slowly lower your body back to the start position. Instead, continue to hold the bar and allow gravity to quickly pull your feet downward. You want to land on your heels in the squat position, which allows your fanny to absorb the impact rather than your arms. Repeat immediately. Try a set of 5 and see how you feel. I guarantee your heart will be pounding and you will be breathing hard! Start out with a low rep count with this exercise.
Working
Toward That Pull-Up
T
he pull-up can be achieved! I remember clearly when I first started working out at NorCal Strength and Conditioning and thinking, “There is no way this body of mine will ever be able to do a pull-up.” Fast-forward a few hardworking months later and there I was, stringing multiple pull-ups together! As I have mentioned before, I highly recommend working with a trainer in order to achieve your maximum potential and to make sure you are performing these movement correctly. However, if finding a trainer simply is not a possibility, here is a guideline to go by to know if you are ready to begin doing the exercises that will eventually lead to a full pull-up: Grab your set of hanging rings, walk your feet all the way forward, and then try to perform the body row demonstrated earlier. Walking your feet all the way forward increases the difficulty of the body row to the highest degree. If you can easily and safely pull your own body weight this way, you are ready to move on to working for the pull-up.
The first pull-up we’ll focus on is the negative pull-up, which starts much like the jumping pull-up. However, once you get your chin above the bar, instead of immediately dropping down, you hold the position for five seconds. After those five seconds are complete, you slowly lower yourself back down to a full arm extension. When starting out, I recommend doing just one or two reps of this movement, as they can make you very soar. I also recommend alternating your grip. First do it with your palms facing away from you (pronated), and then practicing it with your palms facing toward you (supinated). Both versions are demonstrated in this section. Continue incorporating repetitions of the negative pull-up, both pronated and supinated, into your workouts at least two times a week. Start with only two repetitions at a time for the first two weeks, and then start performing three sets of two repetitions for the third and fourth weeks. If these workouts prove easy, increase to three sets of three repetitions. When done in this progressive manner, you’ll soon discover that you can hold your chin over the bar for a much longer time than the five-second duration, and you will be able to lower yourself down to full extension slowly and without losing tension. Once you get to this level, you might be ready to attempt that first pull-up! There is no way to know for sure until you grab the bar and pull, so just go for it when you feel ready. You might surprise yourself with how easy you accomplish your first pull-up. Even if you can only get halfway there, you’ll still be able to tell that your hard work is paying off and soon you will be strong enough.
Pull-Up (Pronated)
In this sequence I demonstrate how to do a pull-up with your hands facing away from you, which is known as a pronated grip. Doing a pull-up in this fashion focuses more on the muscles in your back and chest. In the next sequence, I demonstrate how to do a pull-up with your hands facing toward you.
MUSCLES USED: Latissimus Dorsi, Trapezius, Deltoids, and Rhomboids

1)
Stand directly under the bar, reach your arms up, and grab the bar slightly wider than shoulder width. For this particular movement, you want your palms facing away from your body.
2)
As you pull your elbows down and back, reach your chest up toward the bar.
3)
Keep your chin tucked down until it passes the bar.
4)
Lower yourself down to the start position. Your descent shouldn’t be as slow as when performing a negative pull-up, but it should be slower than when performing a jumping pull-up. With this movement, it is very important that your descent is controlled. Once you are back to the start position, rest if necessary and repeat.
Chin-Up (Supinated)
In this sequence I demonstrate how to perform a pull-up with your hands facing toward you, which is known as a supinated grip. Assuming this grip places a greater emphasis on your biceps muscles. To get the most well-rounded pull-up workout, I recommend performing pull-ups with both a pronated and supinated grip.
MUSCLES USED: Latissimus Dorsi, Trapezius, Deltoids, Rhomboids, and Biceps
1)
Stand underneath the bar with your palms facing toward your body.
2)
Reach your arms up and grab the bar slightly narrower than shoulder width. For this particular movement, you want your palms facing toward your body.
3)
As you pull your elbows down and back, reach your chest up toward the bar.
4)
Keep your chin tucked down until your chin passes the bar.
5)
Lower yourself down to the start position. Your descent shouldn’t be as slow as when performing a negative pull-up, but it should be slower than when performing a jumping pull-up. With this movement, it is very important that your descent is controlled. Once you are back to the start position, rest if necessary and repeat.
Knee-to-Elbow
The knee-to-elbow movement can be done in the gym, at the playground, or in your home with the stud pull-up bar previously mentioned. In addition to being an excellent movement to work your abdominal muscles, it’s also a great workout for your lats and pectoral muscles. One of the best things about this movement is that it is suitable for most people—as long as you feel comfortable holding your own body weight while hanging from a bar, you should be able to perform some variant of this movement.
MUSCLES USED: Abdominals, Iliopsoas, Latissimus Dorsi, and Pectoralis

1)
Stand directly under the bar, reach your arms up, and grab the bar slightly wider than shoulder width. For this particular movement, you want your palms facing away from your body.
2)
Keeping your chin down, raise your knees up slightly toward your waist. If you feel like this is as far as you can go, stop here, lower your legs back to the floor, and repeat.
3)
If you feel like you can raise your knees farther, continue bringing your knees up higher toward your chest using those tummy muscles!
4)
If you are able to bring your knees all the way up to touch your elbows, do so by pushing away from the bar using your lats and squeezing those knees up as high as possible using your abdominals.
5)
Return to the start position and repeat.