Food in Jars (23 page)
Authors: Marisa McClellan


W
HEN I FIRST BEGAN TO MOVE BEYOND BASIC
cucumber pickles, my friend Val made a plaintive request for pickled cauliflower. These crunchy, lemon-infused cauliflower florets are so, so satisfying in salads or with fruity oil, bread, and cheese.
2 cups/480 ml distilled white vinegar
3 tablespoons pickling salt
1 lemon, sliced
1½ teaspoons mustard seed, divided
1½ teaspoons cumin seed, divided
¾ teaspoon red pepper flakes, divided
¾ teaspoon black peppercorns, divided
1 head cauliflower, cut into small florets (1½ to 2 pounds/455 to 680 g)
Prepare a boiling water bath and 4 regular-mouth 1-pint/500 ml jars according to the process on page 10. Place the lids in a small saucepan, cover them with water, and simmer over very low heat.
Combine the vinegar, 1½ cups/360 ml water, and pickling salt and bring the brine to a boil. Meanwhile, place a lemon slice at the bottom of each sterilized jar. Add ½ teaspoon mustard seed, ½ teaspoon cumin seed, ¼ teaspoon red pepper flakes, and ¼ teaspoon peppercorns to each jar.
Pack the florets into the jars tightly, but without mangling them. Slowly pour the hot brine over the cauliflower in each jar, leaving ½ inch/12 mm headspace. Gently tap the jars on a towel-lined countertop to help loosen any bubbles before using a wooden chopstick to dislodge any remaining bubbles. Check the headspace again and add more brine if necessary. Top each jar with another slice of lemon.
Wipe the rims, apply the lids and rings, and process in a boiling water bath for 10 minutes (see
page 11
).
Let these pickles cure for at least 1 week before eating.

I
THINK PEARS WERE MEANT FOR PICKLING. WHILE
they have a perfectly nice taste on their own, they are also mellow enough to happily absorb a world of flavors. I like these pickled pears cut into thin slices and heaped atop a salad of baby lettuces. They play well with goat cheese. And should you be able to manage it, save a jar for the holidays. I don't peel my pears before pickling, and don't find it necessary. However, if you're partial to a peeled pear, feel free to do so.
2 cups/480 ml distilled white vinegar
1 cup/200 g granulated sugar
½ cup/120 ml honey
1 (2-inch/5 cm) piece fresh ginger, sliced into thin coins
4 thin lemon slices
4 cinnamon sticks
1 teaspoon whole cloves, divided
2 pounds/910 g firm pears (like Bartlett or Anjou)
Prepare a boiling water bath and 4 regular-mouth 1-pint/500 ml jars according to the process on page 10. Place the lids in a small saucepan, cover them with water, and simmer over very low heat.
Combine the vinegar, 2 cups/480 ml water, the sugar, and honey in a pot and bring to a boil. Meanwhile, cut the pears in half and use a melon baller to remove the cores.
Divide the ginger among the jars. Add 1 lemon slice, 1 cinnamon stick, and ¼ teaspoon cloves to each jar. Pack the pear halves into the jars tightly without squashing them.
Slowly pour the hot brine over the pears in each jar, leaving ½ inch/12 mm of headspace. Gently tap the jars on a towel-lined countertop to help loosen any bubbles before using a wooden chopstick to dislodge any remaining bubbles. Check the headspace again and add more brine if necessary.
Wipe the rims, apply the lids and rings, and process in a hot water bath for 10 minutes (see
page 11
).
Allow at least 1 week of curing time before opening these pickles to taste them.

W
HEN MY FRIEND SHAY FIRST TASTED THESE
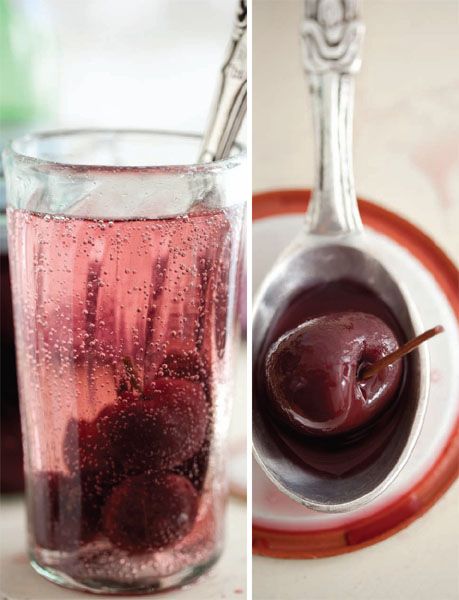
pickled cherries, she looked at me in disbelief and said, “Cherry pie!” And she was right. The sweet brine performs some sort of miracle on your taste buds so that your brain receives the flavors of a perfectly balanced pie. They pair up nicely with a creamy cheese and also make for a delicious snack straight out of the jar.
2½ cups/600 ml distilled white vinegar
2 cups/400 g granulated sugar
2 tablespoons pickling salt
4 bay leaves
32 black peppercorns
2½ pounds/1.2 kg sweet cherries, washed with stems trimmed (see
note
)
Prepare a boiling water bath and 4 regular-mouth (1-pint/500 ml) jars according to the process on page 10. Place the lids in a small saucepan, cover them with water, and simmer over very low heat.
Combine the vinegar, 2 cups/480 ml water, the sugar, and pickling salt in a pot and bring the brine to a boil.
Meanwhile, place 1 bay leaf and 8 peppercorns in each sterilized jar. Pack the cherries into the jars as tightly as you can manage, while trying not to squash them.
Slowly pour the hot brine over the cherries in each jar, leaving ½ inch/12 mm of headspace. Gently tap the jars on a towel-lined countertop to help loosen any bubbles before using a wooden chopstick to dislodge any remaining bubbles. Check the headspace again and add more brine if necessary.
Wipe the rims, apply the lids and rings, and process in a boiling water bath for 10 minutes (see
page 11
).
Let pickles cure for at least 48 hours before eating.
Note:
I like to leave the stems on the cherries when pickling them because they help them better retain their shape. I do suggest you trim all the stems to a uniform length of about 1 inch, as it makes for a nicer presentation.


I
WAS A TEENAGER WHEN I FIRST LEARNED THAT SALSA
was something one could make at home. Up until that point, I functioned under the belief that salsa was the product of some mysterious alchemy, something that could only be purchased at Safeway or Trader Joe's. This culinary revelation came when my parents went on a trip to Europe leaving my sister and me with a family friend.
Deliah had a completely different approach to food than the three balanced meals a day routine that Raina and I were familiar with. She used lots of bright, vivid flavors and believed that dinner could consist of fresh salsa, tortilla chips, and a dollop of sour cream. Needless to say, we adored her.
One afternoon, I watched as she made the salsa. She dragged a colander of tomatoes out to the living room coffee table, along with onions, garlic, cilantro, a single hot pepper, a cutting board, mixing bowl, sharp knife, and salt shaker. She set up her tools in front of the TV and chopped while watching Oprah. When everything was combined, she set the bowl aside for an hour, to let the flavors mingle. Later, we feasted until our lips blistered from the acids.
Later, I taught my mom how to make salsa and we would make batch after batch from the tomatoes that grew in the backyard, using it to top scrambled eggs or digging into with chips. The first year I was living in Philadelphia, my dad and sister came to visit me for Thanksgiving. My mom couldn't fly that year, so in her place, she sent a quart jar of homemade salsa in her place, triple wrapped and tucked into my dad's checked luggage. It wasn't quite as good as seeing her, but nearly.
These days, fresh salsa is one of my summertime refrigerator staples. However, because its time is so fleeting, I also make up at least a dozen jars of various, shelf-stable salsas and relishes, to tide me over until the summer season returns.
One thing to note about these recipes is that they read like a ton of work. However, it's really just all chopping. Once the knife work is done, it's just a matter of simmering, filling the jars, and processing. I recommend inviting a friend over to help make the work go faster.

