Foundation Game Design with ActionScript 3.0, Second Edition (46 page)
Read Foundation Game Design with ActionScript 3.0, Second Edition Online
Authors: Rex van der Spuy

Figure 4-21.
From useless to useful: using Math.random and Math.floor to generate random whole numbers within a specific range.
If you need a random number between 1 and 100, you can create it by using code that looks like this:
Math.ceil(Math.random() * 100);
Math.ceilrounds the random number up, so the lowest it can be is 1, and the highest it can be is 100.
You can use this same format for any range of numbers simply by changing the number that you multiply the random number by. Here are some examples:
Math.ceil(Math.random() * 10)generates a random number between 1 and 10.Math.ceil(Math.random() * 27)generates a random number between 1 and 27.Math.ceil(Math.random() * 5)generates a random number between 1 and 5.
The reason why usingMath.ceilstarts the range of random numbers with 1 is that any number less than 1, such as 0.23, will be rounded up to 1 That saves you from having to deal with values of 0, which are often not useful for the ranges of numbers you'll be looking for in your games. If you do want 0 to be part of the range, however, useMath.roundinstead.Math.round(Math.random() * 100)will give you a random number between 0 and 100.
What if you want to generate a random number within a range of numbers that starts at something other than 1 or zero?
Let's say you need a number between 10 and 25. That means that you have 15 possible numbers that could be chosen: 10, 11, 12 . . . up to 25. All you need to do is generate a random number between 0 and 15, and then add 10 to it push it up to within the range you need. This is what the code will look like:
Math.round(Math.random() * 15) + 10
Think about it this way. The random number is between 0 and 15. Let's say it's 8. Then you add 10 to it. You end up with 18. You've got a range of possible random numbers between 10 and 25.
Now use what you've learned about random numbers and apply it to the game.
- Modify the
startGamemethod with the new code in bold. In addition to randomizing themysteryNumbervariable, you'll add atracedirective for testing purposes so that you can check that the number really is random. (Notice that string concatenation was used in thetracedirective so that the message it displays is more readable.)public function startGame():void
{
//Initialize variables
startMessage = "I am thinking of a number between 0 and 99";
mysteryNumber = Math.floor(Math.random() * 100);
//Initialize text fields
output.text = startMessage
input.text = "";
guessesRemaining = 10;
guessesMade = 0;
gameStatus = "";
gameWon = false;
//Trace the mystery numbertrace("The mystery number: " + mysteryNumber);
//Add an event listener for key presses
stage.addEventListener(KeyboardEvent.KEY_DOWN, keyPressHandler);
} - Compile the program and play the game. The mystery number is now a random number between 0 and 99. You'll also see the text, “The mystery number: ??” displayed as a trace message so that you can make sure everything is working as you expect it to.
Figure 4-22
shows an example of what your game might now look like.

Figure 4-22.
Randomizing the mystery number
One quirky bug in the game so far is that if the player wins the game but continues pressing the Enter key, the game still continues to count the guesses. You can see this in the output text field, as shown in
Figure 4-23
.
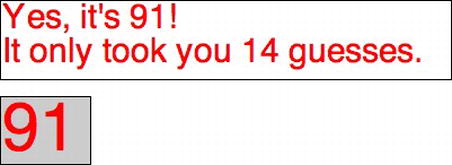
Figure 4-23.
Randomizing the mystery number
If you think about how the program is working, this makes perfect sense because the Enter key itself has no way of knowing whether or not the game is over; it just keeps on dutifully doing the job you assigned to it.
To fix this, you need to do three things when the game ends.
- Remove the
keyPressHandlerevent listener from the stage object. - Disable the
inputtext field so that you can't enter any text into it. - Dim the
inputtext field so that it's obvious it's been disabled. This is optional, but it's a good visual cue for the player that the game is finished.
Two very straightforward lines of code are all you need.
- Add the following code in bold to the
endGamemethod:public function endGame():void
{
if (gameWon)
{
output.text
= "Yes, it's " + mysteryNumber + "!" + "\n"
+ "It only took you " + guessesMade + " guesses.";
}
else
{
output.text
= "No more guesses left!" + "\n"
+ "The number was: " + mysteryNumber + ".";
}
stage.removeEventListener
(KeyboardEvent.KEY_DOWN, keyPressHandler);
input.type = "dynamic";
input.alpha = 0.5;
} - Compile the program and play through the game. When it's finished, you won't be able to enter any more text into the
inputfield and theinputfield will be dimmed, as you can see in
Figure 4-24
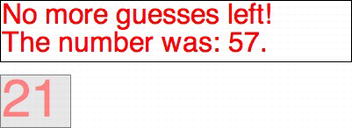
Figure 4-24.
Disable and dim the input text field when the game is finished.
All the new code was added inside theendGamemethod's function definition because its directives run only when the game is finished.
The first new directive removes the event listener from theStageobject:
stage.removeEventListener(KeyboardEvent.KEY_DOWN, keyPressHandler);
After you add this line of code, nothing will happen when the Enter key is pressed, but you'll still be able to enter text into theinputfield. To prevent this, you need to specifically disable theinputtext field using this line of code:
input.type = "dynamic";
TextField objects can be of two types: "input" or "dynamic". (These values are Strings, so you have to surround them with quotes.) Theoutputtext field that displays the game status is "dynamic", which means that it can display text but won't allow users to type into it. All TextField objects are "dynamic" by default when you first create them. You'll recall that when you created theinputfield, you set its type to "input". What this new line of code does is switch it back to "dynamic", which prevents you from typing text into it.
The last new directive dims the button on the stage. Use theinputtext field's alpha property and set it to 0.5, which makes it semitransparent:
input.alpha = 0.5;
To help you keep things a bit more modular, you could actually move all these directives related to disabling the game into their own method, perhaps calleddisableGame. In such a small program as the number guessing game, however, it would probably be more trouble than it's worth. Modularize your code wherever you can, but also use your judgment about when it's appropriate or practical.
You'll find all the code for this game that you've written up till now in the folder NumberGuessingGameFinished in the chapter's source files.
In
Chapter 3
you created buttons to control your interactive game character. The buttons worked, but they were a little limited. They didn't react or give you any feedback when you clicked on them. When you interact with buttons in most games or software, you'll notice that they behave in three important ways.
- When your mouse moves over them, there's a highlighting effect.
- When you click or hold the mouse button down, the button often darkens or changes position slightly to look as though it's being pressed.
- The button returns to normal when the mouse leaves it.
These three basic button states are called
up
,
over,
and
down
.
Figure 4-25
shows a typical example of a button from the tool bar in Adobe Illustrator.

Figure 4-25.
Typical example of up, over, and down buttons states
You'll see these three button states everywhere once you start looking for them. Exactly what these three different button states look like will always vary depending on the personal style of the illustrator or the
design fashion of the moment, so there's no rule as to what they should look like. There are hundreds of variations on these three states.
Interactive buttons like this are easy to make but involve a bit of planning. First, you need three PNG images of each button state. The three images need to be exactly the same size. The only differences between them should be the slight change of effect for each button state.
In
Chapter 2
you learned how to make many buttons of the same size, with only one change to it: the text. Instead of just changing the text, you can change the highlighting effect on the button to indicate each state. For every single button, you'll need three separate images.
To get you started, I've got a little mini-project for you to do before you get back to the number guessing game.
- Create three PNG images, each representing one of the three button states. Name these images buttonUp.png, buttonOver.png, and buttonDown.png.
Figure 4-26
shows what the sample buttons look like. (I made these quickly in Adobe Illustrator using its built-in Symbol library. I'll be introducing Adobe Illustrator in
Chapter 7
.) Your button states don't need to look anything like this. My button image dimensions are 50 by 57 pixels, but you can make your button any size you like. The main thing is that all three images need to be exactly the same size; otherwise the button states won't align properly when you program them.
Figure 4-26.
The up, over, and down buttons states - In the chapter's source files you'll find a project folder called Buttons. It has a subfolder called images. You'll find my three sample PNG files there. Copy your three button PNG files into the images folder, replacing mine with yours, as shown in
Figure 4-27
.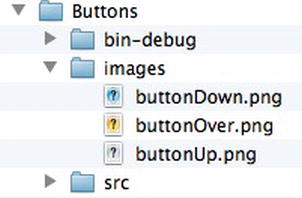
Figure 4-27.
Copy your PNG button state to the Buttons project's images folder. - Import the Buttons project and compile the Buttons.as file. Your button will appear on the stage, roughly centered. Click on it and watch what happens. A hand icon appears over the button, and all the button states work as expected. Trace messages tell you which state is being triggered by the mouse.
Figure 4-28
shows what you'll see.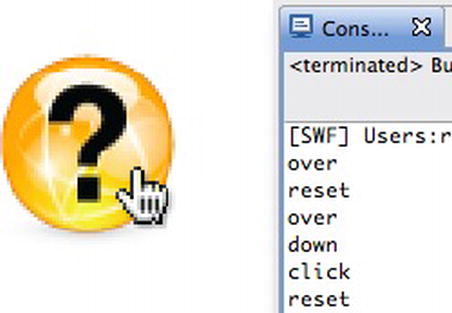
Figure 4-28.
Test your button.