Foundation Game Design with ActionScript 3.0, Second Edition (88 page)
Read Foundation Game Design with ActionScript 3.0, Second Edition Online
Authors: Rex van der Spuy

Despite the length of the code, it's nothing more than a slight modification of the run-of-the mill code you've been using since
Chapter 5
. I'm sure you recognize most of it. Let's look at what's new and see how acceleration works.
The_characterobject has three properties to store the new acceleration data. They're given their initial values in theCharacterclass definition.
public var accelerationX:Number = 0;
public var accelerationY:Number = 0;
public var speedLimit:Number = 5;
The accelerationX and accelerationY properties store the values that determine by how much the object accelerates. Because you don't want the object to move when it first appears on the stage, accelerationX and accelerationY are initialized to zero. Lastly, speedLimit is the maximum speed that you want the object to travel. A value of 5 means that the object will travel a maximum of no more than 5 pixels per frame.
The work of assigning a value to the character's accelerationX and accelerationY properties is done by thekeyDownHandler.
public function keyDownHandler(event:KeyboardEvent):void
{
  if (event.keyCode == Keyboard.LEFT)
  {
    _character.accelerationX = -0.2;
  }
  else if (event.keyCode == Keyboard.RIGHT)
  {
    _character.accelerationX = 0.2;
  }
  else if (event.keyCode == Keyboard.UP)
  {
    _character.accelerationY = -0.2;
  }
  else if (event.keyCode == Keyboard.DOWN)
  {
    _character.accelerationY = 0.2;
  }
}
If accelerationX has a positive value, the object moves to the right. A negative value makes it move left. A positive accelerationY value makes the object move down, and a negative value makes it move up. When any of the arrow keys are pressed, these new values are assigned. All you need to do to make the character move is to assign these values to its vx and vy properties. You can do this easily enough with two lines of code.
_character.vx += _character.accelerationX;
_character.vy += _character.accelerationY;
However, if you leave things as is, the acceleration values are added to the object's velocity on every frame—without any limit on how fast the object can go. This means that the object eventually moves so fast that it will be nothing more than a blur on the stage. This won't be of much use in most games, so it's usually a good idea to assign a speed limit, which is what this section of code does:
if (_character.vx > _character.speedLimit)
{
  _character.vx = _character.speedLimit;
}
if (_character.vx < -_character.speedLimit)
{
  _character.vx = -_character.speedLimit;
}
if (_character.vy > _character.speedLimit)
{
  _character.vy = _character.speedLimit;
}
if (_character.vy < -_character.speedLimit)
{
  _character.vy = -_character.speedLimit;
}
The acceleration values are added to the character's velocity only if the vx and vx properties are within its speed limit, which is 5 in this case. This means that the character will accelerate up to 5 pixels per frame and then travel at a constant rate. The logic behind this is exactly the same logic used to set stage boundaries.
The next step is to add these new velocity values to the object's x and y positions. This is done with some venerable old friends'essentially the same directives you've been using since
Chapter 5
.
_character.x += _character.vx;
_character.y += _character.vy;
In fact, these two directives are all you will
ever
need to move the character, even though the physics involved in making them move become quite complex. All the physics calculations are applied to the vx and vy properties; they are then simply assigned to the character's x and y properties to make it move.
So how does this actually work to accelerate the object? The trace output at the end of theenterFrameHandlergives you a clue.
trace("_character.vx: " + _character.vx);
trace("_character.x: " + _character.x);
trace("----------");
Compile the project, press the right arrow key, and watch the trace output. When the character starts moving, you'll see output that looks like this:
----------
_character.vx:  0
_character.x:  250
----------
_character.vx:  0.2
_character.x:  250.2
----------
_character.vx:  0.4
_character.x:  250.6
----------
_character.vx:  0.6000000000000001
_character.x:  251.2
----------
_character.vx:  0.8
_character.x:  252
----------
_character.vx:  1
_character.x:  253
----------
_character.vx:  1.2
_character.x:  254.2
----------
These are the first seven frames of movement, but this pattern continues until vx reaches a maximum value of 5, which is what the speedLimit property is set to. The numbers with the large number of decimal places are a byproduct of the way the CPU's binary number system stores fractions.0.6000000000000001
For all practical purposes, you can ignore the strings of zeros and round off to two decimal places.
The smallest unit into which AS3.0 can divide a pixel is 0.05. This unit is known by the whimsical name
twip
(20 twips equal 1 pixel). That's why all the x and y values you see in the trace output are multiples of 0.05.
On the second frame, accelerationX has an initial value of 0.2, which is added to the character's current x position. This results in a new x value of 250.2. Because the right arrow key is still being held down, this code is then run:
else if (event.keyCode == Keyboard.RIGHT)
{
  _character.accelerationX = 0.2;
}
It adds an
additional
0.2 to the vx value, giving it a new value of 0.4. You can see this new value reflected in the third trace.
_character.vx:  0.4
_character.x:  250.6
Then 0.4 is added to the object's x position, resulting in a new position of 250.6. You can see from the trace output that the accelerationX value continues to compound by adding 0.2 to its value each frame until it finally reaches 5, and the object is clipping along at quite a quick pace. All this adds up to a very neat illusion that the object is accelerating.
The last thing that the code does is stop the object, which is handled by thekeyUpHandler.
public function keyUpHandler(event:KeyboardEvent):void
{
  if (event.keyCode == Keyboard.LEFT
    || event.keyCode == Keyboard.RIGHT)
  {
    _character.accelerationX = 0;
    _character.vx = 0;
  }
  else if (event.keyCode == Keyboard.DOWN
    || event.keyCode == Keyboard.UP)
  {
    _character.accelerationY = 0;
    _character.vy = 0;
  }
}
This sets the object's acceleration and velocity to zero when the appropriate keys are released.
Friction is the exact opposite of acceleration: it causes the object to gradually slow down.
Figure 9-3
illustrates this.
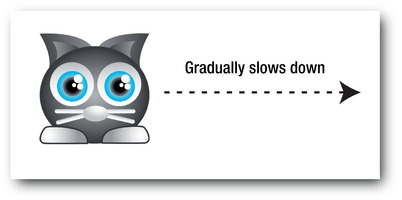
Figure 9-3.
Friction makes an object gradually slow down.
Let's see how friction works with the cat character. You'll find theFrictionproject folder in the chapter's source files. Run the SWF and move the character around the stage with the arrow keys. You'll notice that the cat gradually speeds up and then gradually slows down when you release the keys. It appears to float around the stage.
The code in theFrictionapplication class is almost identical to the code you just looked at in theAccelerationclass, except for a few small additions. Open it in your code editor and take a look. The biggest change is in theenterFrameHandler. Two new lines of code multiply the character's vx and vy properties by itsfrictionvalue. This happens just below the lines that add acceleration, and I've highlighted them here:
//Apply acceleration
_character.vx += _character.accelerationX;
_character.vy += _character.accelerationY;
//Apply friction
_character.vx *= _character.friction;
_character.vy *= _character.friction;
Remember that the value of the character's friction value is 0.96. A friction value of 1 amounts to no friction, so anything less than 1 gradually slows the object down. Values from 0.94 to 0.98 apply friction very gradually for very fluid movement. Values such as 0.7 or 0.6 slow the object very quickly.
The two lines of code that apply friction multiply the character's velocities by a number less than 1, which gradually reduces them. It's very simple and very effective.
There's one technical detail you have to fix, however. Here's the scenario: imagine that the object's velocity is 5. Its friction is 0.6. The object needs a velocity of zero to stop completely. You apply some friction every frame, multiplying the velocity by 0.6, hoping to finally reach zero. Here's what the first five frames might look like:
5 * 0.6 = 3
3 * 0.6 = 1.8
1.8 * 0.6 = 1.08
1.08 * 0.6 = 0.648
0.648 * 0.6 = 0.3888
But you're not at zero yet. How long do you think it will take before you get there? Well, you can keep going all day—you never will!
This is an effect known as
Xeno's paradox
. It goes something like this: let's say you have a slice of cake, which you cut in half. You cut one of those slices in half once more. Then you do the same to the third slice. The pieces of cake keep getting thinner and thinner. How many times can you slice them until there's nothing left to slice? Xeno's paradox is that you never reach an end—the pieces of cake just become infinitely thin, and you can go on slicing them forever. Crazy as it sounds, the math actually backs this up, and even more crazily, you have to deal with this in AS3.0!
This means that when you apply friction, vx and vy never reach zero. The object will never stop completely. What you need to do then is
force a value of zero
when vx and vy fall below a certain threshold. This is what this next bit of new code in theenterFrameHandlerdoes:
if (Math.abs(_character.vx) < 0.1)
{
  _character.vx = 0;
}
if (Math.abs(_character.vy) < 0.1)
{
  _character.vy = 0;
}
If vx and vy fall below an absolute value of 0.1, it forces them to a value of 0, thus halting Xeno in his tracks. 0.1 is low enough that it won't have any observable effect on the motion of the object and the object appears to stop very naturally, even at low friction values such as 0.99. Without this code, your objects will creep slightly up and to the left on the stage—and never actually stop.
This bit of code is in theenterFrameHandler, just below the block of code that checks the character's speed limit.
As a quick refresher, Math.abs forces the value in its argument to be positive (“absolute”). It simplifies the code because you don't have to check for negative values.
One final small change to the code is that thekeyUpHandlernow no longer sets the character's vx and vy properties to zero. That job is left for the friction calculation to do. All thekeyUpHandlerneeds to do is stop the object's acceleration.
public function keyUpHandler(event:KeyboardEvent):void
{
  if (event.keyCode == Keyboard.LEFT
    || event.keyCode == Keyboard.RIGHT)
  {
    _character.accelerationX = 0;
  }
  else if (event.keyCode == Keyboard.DOWN
    || event.keyCode == Keyboard.UP)
  {
    _character.accelerationY = 0;
  }
}
And that's it for friction!
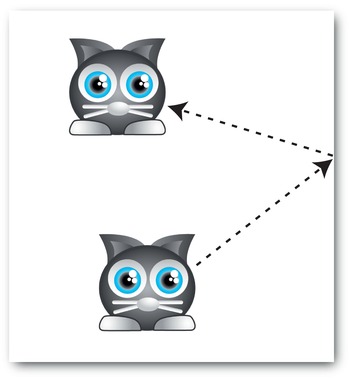
After acceleration and friction, bouncing is a piece of cake (the un-infinite kind!). Open the Bounce project folder in the chapter's source files and run the SWF. Move the cat around the stage with the arrow keys and you'll notice that you can bounce it off the stage edges, as shown in
Figure 9-4
.