Go Organize: Conquer Clutter in 3 Simple Steps (15 page)
Read Go Organize: Conquer Clutter in 3 Simple Steps Online
Authors: Marilyn Bohn
Tags: #epub, #ebook

Desk
As your child gets older, a desk may be a nice addition to his or her room. It can hold school papers, and homework can be done there. For girls, it could double as a vanity where they can keep their fingernail polish, cosmetics, hair supplies, and makeup if the bathroom is too small to hold these things. Keeping these things in baskets makes it easy to carry them to the bathroom to use.
Under the Bed
It is hand-and-knees time. You may even need a broom to reach the far corner for that last lost sock or runaway toy. Sort everything you find here and put the items in their proper homes. If you store things under here, I recommend using the plastic containers with rollers; they are easy to pull out and they make the things in the containers easily accessible. Plastic bed risers or bed lifters will raise the bed about six to eight inches (15–20cm) off the floor and make more room for under-bed storage. The risers are sturdy and last for years.
You will probably be the only one accessing things stored under the bed, so don't keep frequently used items here. Encourage your children to clean under the bed as far as they can reach every time they clean their rooms so it doesn't become a clutter haven.
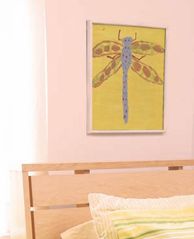
Here are some options for using and displaying the art your child creates. Rotate what's on display frequently and archive items or dispose of them if you find you no longer want to keep them.
The refrigerator: As a professional organizer and mother this is my least favorite place for artwork as it creates clutter in the kitchen. However, if you like that look, then do it. But there are other wonderful options.
Pin the art to a cork board or bulletin board.
String a clothesline along one big wall in the child's bedroom and use clothespins to display the “collection” so it's like a gallery.
Display it in an inexpensive poster-sized picture frame. A frame can hold one large piece or several smaller works.
Attach strips of felt to a dowel rod and allow kids to pin their artwork directly to the felt.
Use laminated artwork as placemats. You can give these to relatives or use them during meals or messy arts-and-crafts projects at home.
Send artwork to relatives and let the child use the back to write letters on it.
Use it for wrapping paper. If you intend to use it this way, put it with the wrapping paper, not just in a pile somewhere.
Artwork
Let me just say at the beginning, do not keep all of your children's art/school work! Just think, if you save everything your child brings home, by the time he or she is in college you will have a two-car garage over flowing with just the paperwork, and it will be spilling into your home. (I actually read about a woman who had saved every piece of paper, and this was the result.)
Tip:
Encourage your children to play with or use their clay creations (after you have photographed them). Clay creations tend to break, and when that happens, you can dispose of the item and avoid the dilemma of what to do with it. These items will also become less important to the child as time goes on.
A very wise preschool teacher passed on this little gem: Young children are into process, not product. Children live in the moment; they enjoy the moment of making the art but are quite casual about disposing of it. I have daughters, and as I have experienced this with them, I know this is true. So don't worry about hurting your child's feelings when you dispose of his or her latest creation. Unless he or she is very attached to the project, your child won't care.
Teaching your children what to keep and what to let go of now will help them when they are adults and dealing with their own paperwork. It's not just about their art or schoolwork — it's about how they (and you) approach organization.
When your child brings home artwork, graded papers and tests, and mementos, look at it and discuss it with him or her right away. Decide immediately what you will keep and what you will get rid of. Set reasonable limits, not just for your child but also for yourself. Then create a home for the “keepers” and place them there right away.
One option for saving paperwork is to use a large envelope — 10½″ × 15″ (27cm × 38cm) is a good size. Write the child's name and age, the name of the school, the year in school (e.g., fifth grade), the school year (e.g., 2010–2011), and the teacher's name on the outside. (You can also do this for home-schooled children.) When they have school pictures taken, if you have extras tape one with clear packing tape to the front of the envelope. Have one envelope for each year your child is in school. Each child has his or her own envelope and own box. I recommend saving a sampling of school work, not just the best, but some that is “average.” By saving a range of papers, it gives the child a view of what his or her school years were like. It is a truer look at what he or she did in school. As long as you follow the one-envelope limit, you can keep whatever sort of papers you want. At the end of the summer of that year (assuming he or she does some projects you want to keep from summer programs), place the envelope in storage by putting it in a container with a lid on it, such as an apple box, a copy paper box, or a purchased plastic bin. A good place to keep this box is on the top shelf of the child's closet. Decorate the box and label it with the child's name. I prefer using a plastic container with a lid.
If the artwork that comes into the house is bigger than your designated storage space, or it begins to pile up quicker than you can process it, take a picture of it with your child holding it. What a fun memory to look back on. Buy a photo album and create an “art album” for each child.
Tip:
Paper deteriorates over time. Storing paper in acid-and lignin-free containers will slow down the deterioration process, but you don't need this level of archive storage for your children's artwork and school papers. These materials are made of low-quality acidic paper so what does it matter if they are surrounded by acid-free covers. If you're concerned about the longevity of the pieces you've saved, you can photocopy them on acid-and lignin-free paper or photograph them for posterity.
Treasures
All children from a young age have treasures they want to keep: rocks, buttons, things they find or make, etc. Give your child a shoebox or a small plastic container and let him or her decorate it. Then let the child fill it up with his or her treasures. If the box gets too full, the child will need to get rid of some of the items to make room for new items. The child only get one “treasures” box each. Children's interests change quickly, so it shouldn't be hard for them to part with old things to make room for new. This keeps the child's treasures (what we see as junk) contained, and he or she is in charge of deciding what to keep without it being scattered all over the floor.
Get the Child Involved
To maintain the organization you and your child have done, each night before bed take five minutes and have the child put away anything he or she got out or wore that day. When the child is young, make a game of it by counting the items as he or she picks them up. Or set the timer for five minutes and play “beat the clock.”
If your child doesn't know how to change sheets and make a bed and he or she is old enough to do this, schedule a time when you will teach him or her this skill. Place a responsibility chart in the room and put a star by each job completed: making the bed, picking up toys, hanging up clothes, picking up paperwork, etc. Reward your child with a new book or toy once he or she has a certain amount of stickers on the job chart — something small that will help encourage your child to continue keeping the room clean and organized.
WRAP UP
You did a great job! By working with your children, you have encouraged and taught them the fundamentals of organizing. Praise them for the efforts they make in keeping their rooms organized. Praise your children when they can find their things without searching all over the house for them or constantly asking you where something is.
Congratulations on:
Following the goals you set.
Teaching/encouraging your child to make his or her bed every day.
Installing rods and shelves at the child's level.
Assigning places for toys, artwork, books and craft supplies and making it easy to maintain by having containers for everything.
Establishing a bedtime routine of tidying the room every night.
Donating toys, clothes and books that your child no longer needs or uses, creating space and ending clutter, making it easier for your child to keep his or her room organized.
Taking care of your child's artwork and involving him or her in this process and providing envelopes and a storage box.
Creating a happy, cozy place for the child to sleep and to play.
These steps will keep your children's bedrooms organized. (Or at least give them a better chance at staying organized!)
Linen Closets
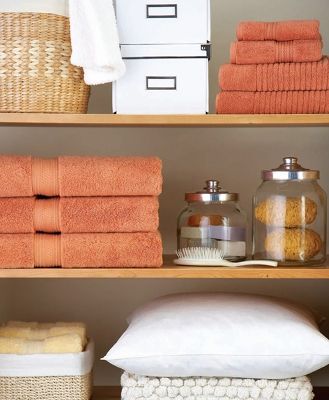
It is a good feeling to open your linen closet and see at a glance what is in there. Sheets are folded and placed on their own shelf. The shelves are labeled as to the size of sheets so they are easy to find without undoing them to determine which bed they will fit. The towels are divided and stacked by size.
If other things, such as personal items, are stored in this closet, they are kept in separate containers with lids. The containers can be stacked and labeled making it easy to find anything you are looking for. First aid supplies and medicines can be kept in separate containers and stored in this closet as well.
When your linen closet is organized, you will want your guests to help themselves to the towels just so they can see how nice it looks.
 SEARCHLIGHT
This is not meant to be a catchall closet. Stand back and look at what your closet looks like. Take a photo of the interior of the closet. In your notebook write down what is working for you and what is not working. What problems are keeping you from the wattage you want when you use this closet?
What do you like about this space?
What don't you like about this space? Identify needs by asking the following questions:
Are the sheets and towels jumbled together?
Are the different sizes of sheets easy to identify?
If you store more than linens here, are the other items in containers?
Are there items that don't belong here?
Can you see everything at a glance and find exactly what you need?
You have assessed what needs to be changed. Now rate the wattage you feel when you look in the closet by using the wattage scale (see page 15). Is this closet a 7 or higher to you?
 SPOTLIGHT
You identified the problem areas in your linen closet, and now with the Spotlight you can focus on setting goals to make this closet more functional for you and your family. Here are examples of goals you could set for this closet:
Sheets will be folded and identified by size.
The closet will only be used for linens and extra personal items.
Excluding linens, all other things will be in containers.
Shelves and containers will be labeled.
Towels will be folded neatly by size and placed in stacks by type (e.g., bath, hand, washcloth).
Have you ever felt like Paula did when she opened the door to her linen closet? She liked the color of her towels and that they were large and soft. She didn't like other things she saw. The sheets were rolled up haphazardly and shoved on the shelf with the towels. The towels were wadded up and stuffed on several different shelves and often fell out on the floor.
She kept extra personal items like toothpaste, toothbrushes, hair clips, lip gloss, and nail polishes here, and they were hard to find underneath everything else in the closet. She also kept medicines on a turntable but she had no idea if they were expired and didn't know what medicines she had.
Paula didn't like what she saw; she groaned and felt discouraged every time she needed to use things in this closet. She resolved to make changes and make this closet a 10.
 GREEN LIGHT
This is the exciting part. With your goals in mind, use the Green Light
and go organize. Getting this closet in order is just this simple — sort, fold, and stack.
Get your feet planted in the Green Light, put on your comfortable clothes, and round up your tool kit (see page 22) and your four containers (see page 35).
Schedule a time to whip this closet into shape. Set your timer for one hour. If it is a small closet, this will probably be enough time to organize every shelf.
Get your drink and a snack. You may not need a snack this time because this will go fast, but what a great excuse to have some chocolate.
Take everything out of the closet, clear off every shelf, and sort everything into categories: sheets (by size), towels (by size), dinner napkins, tablecloths, table runners, pillows, blankets, and off-season items. I lay down a sheet to place these items on so they won't get dirty being on the floor. In another area, put all the other “stuff.”
Wipe every shelf clean. When putting things back, keep in mind premium, secondary, and semi-storage areas to determine where to put the items in the closet (see page 24). Put items you use daily, such as towels, in the premium space — at eye level and towards the front of the shelf. Make small stacks — you don't want the Leaning Tower of Pisa in your closet — or use closet organizers that allow you to make taller stacks if there is room. Separate piles by type — bath towels, hand towels, washcloths, etc. Label the edge of the shelves so everyone who uses this closet will know where things are stored.
Consider limiting the amount of sheets and towels you keep. Three sets of sheets per bed and three sets of bath towels, hand towels, and washcloths per person (remember guests will need towels, too) may be enough.
Tip:
Teach your family how to fold the towels so this task is done the same way by everyone and the towels will fit on the shelves. There is no right or wrong way to fold, but one common way to fold a towel is to fold it in half lengthwise, then in half again; then fold in thirds starting at one end.
Look at everything before you put it back in the closet. Either toss old, thin, worn out towels or cut them up to make rags. If you don't have enough space in your closet, consider storing extra sheet sets under a bed in a container on wheels.
For your guest bedroom, keep a pair of sheets and a set of towels in an under the-bed container. It saves space, and the added bonus is you will always have clean towels and sheets when guests come. Also tuck in a few convenience items in this container that you can put out in a basket for guests to make them feel welcome: bath gel, lotion, a toothbrush, and toothpaste.
I am often asked about the vacuum-seal bags that are on the market. They are the bags that you use with your vacuum to suck out all the air so more things can be stored in smaller spaces. The bags are pretty pricey.
I have asked many women who have used them if they have worked for them and less than a handful said they liked them. The bags may be useful for bulky items that have a lot of air in them — pillows and comforters — but the bags don't stack well, and they are heavy when they are stuffed full. Full bags also have a greater chance of leaking. They are hard to reuse because they won't stay sealed. They seem to work at first but often leak, which is why I personally do not recommend them.
To store sheets, sort them into sets for each bed size. To save space and to keep them folded neatly together, place them inside the matching pillowcase. Seasonal sheets can be stored with other seasonal linens, stacked behind your everyday sheets or stored on the top shelf. Label the shelves with the size of the sheets. Or, using a fine-tipped permanent marking pen, you can write the size on the bottom of the sheets for easy identification.
The top shelf can be dedicated to infrequently used items, such as pillows, quilts, or seasonal towels and sheets. You may want to cover these with an old sheet to help keep dust off of them.
Place table linens on another shelf; a basket can hold napkins if needed. Label this shelf also. If there is limited room in the closet, or for convenience, store linens in the rooms where they are used (i.e., table linens in a dining room sideboard, sheets in the bedrooms).
For the sundry items stored here, separate by type and store them in appropriate-sized containers. Label them to help family members know where to find things and where to put them back.
If you are storing medicines in this closet, keep them secure from children. Be sure to check expiration dates and take those that have expired to your pharmacist for proper disposal. Expired medicine is considered hazardous waste; it stands to reason it should be disposed of as such. If your pharmacist won't take it, call other pharmacies or contact your local hazardous waste facility to see what disposal method they recommend. It is no longer considered safe to throw expired medicine down the toilet or to put it in the trash. Do not leave the Green Light as you sort medications. Put expired medicines in the BE basket; if there are little children keep it away from them.
I recommend separating first aid supplies from medicines. Keep them handy in a basket or plastic container with a lid. Separate items by placing them in sandwich bags or small containers.
WRAP UP
You will love getting linens out of your closet without having to search. Give yourself a cheer and a pat on the back. You deserve a reward. You did it! Wasn't that easy and fun? And doesn't it feel good?
Your linen closet will stay organized because:
Frequently used items are kept in convenient places. Seldom-used items are kept on higher or lower shelves.
The towels, sheets, and table linens are neatly folded and stacked separately.
Family members can fold towels and sheets and put them where they belong.
Labeled containers hold extra personal items stored here.
Only current medicines are kept here, and they are contained and secure.
Labeling has made it easy for things to be put away where they belong.
Everything has a designated place, and everything will be in its place.
Congratulations on a job well done!