Read Happy Endings: Finishing the Edges of Your Quilt Online
Authors: Mimi Dietrich
Tags: #Crafts & Hobbies, #Quilts & Quilting
Happy Endings: Finishing the Edges of Your Quilt (23 page)

Diagonal Connections
When joining the ends of the binding, use a diagonal connection to distribute the layers of fabric.
Folded Connection
1.
Approximately 4" from your starting point, stop sewing the binding to the quilt. Leaving a 2" overlap with the beginning of the binding, unfold the end and trim it diagonally so that when refolded, the shorter end will be on top as shown.

2.
Turn the diagonal edge under ¼", and insert the beginning “tail” into the diagonal fold.
3.
Continue sewing the binding to the quilt. You can leave this diagonal seam unstitched, but it is more commonly hand stitched closed after the binding has been stitched to the back of the quilt.

M
IMI
’
S
F
AVORITE
What a neat way to join the ends of the binding! When the quilt is finished, this diagonal seam will look exactly like any other binding seam. It’s fun to do, too!
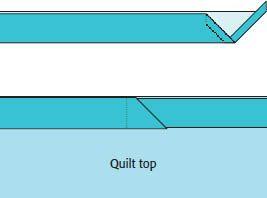
Diagonal Seam
1.
Stop sewing the binding approximately 6" away from the starting point. Cut the end of your binding with a perpendicular cut so that it overlaps the beginning end of your binding. The length of the overlap must equal the width of your binding strip. (For example, use a 2" overlap for 2"-wide binding and a 2½" overlap for 2½"-wide binding.)

2.
Open the folds of the two strips and overlap them at right angles with right sides together as shown. Pin them together. Draw a diagonal line between the two points where the binding strips intersect as shown. (Remember the
A
on
page 35
?)
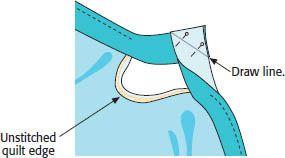
3.
Sew the ends together on the marked line and then trim the seam allowance to ¼". Press the seam allowance open.

4.
Refold the seamed section of the strip, return it to the edge of the quilt, and finish sewing the binding in place. A perfect fit!

Binding Special Edges
Sometimes quilts don’t have four straight sides and square corners. With a little extra effort, you can bind quilts with any of the special edge treatments to perfection.
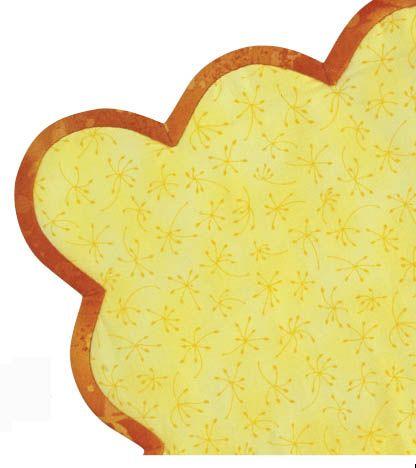
Scalloped Edges
Scalloped edges create a beautiful finish, especially on romantic appliqué quilts. Scallops allow quilters to reflect elements of the interior quilt design in the border, as in Double Wedding Ring or Dresden Plate patterns. Binding for scalloped edges—or any type of curve—should always be cut on the true bias so that it will flex smoothly around the curves while remaining flat. You can use either single- or double-fold binding.
Sewing binding on scalloped edges is a combination of two processes: applying the binding around a curve and turning an inside corner. If you have ever rounded off the corners of a quilt to apply binding, you are halfway there!
1.
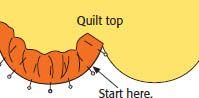
Carefully baste the three quilt layers together ⅛" inside the cut scalloped edges. Basting is especially important because the bias curves can stretch under the presser foot as you sew on the machine. If your scallops are simply marked on straight borders but have not been cut, you can apply the binding to the marked fabric and trim excess fabric from the curves later.
2.
Apply the binding, starting along one side of a curve. Starting on the outer edge of the curve may be noticeable when you finish. Starting at the inside corner may cause problems when you are ending your binding.
Be careful not to stretch the binding as you place it around the curve. Position the binding so that the cut edge of the binding matches the cut edge of the curve. As you pin the binding around the curve, ease the fullness in the binding so that it matches the seam line of the quilt. You can pin the binding around one curve at a time before you sew.
3.
As you sew around the curve, use a long straight pin to help you guide the fabric under the presser foot on your sewing machine. Easing the fullness of the binding around the curves allows the binding to turn over the curve of the scallop and lie flat when it is finished. Stop sewing when you reach the inside corner. Mark the inside corner point with a pin so that you’ll know where to stop.

