Happy Endings: Finishing the Edges of Your Quilt (22 page)
Read Happy Endings: Finishing the Edges of Your Quilt Online
Authors: Mimi Dietrich
Tags: #Crafts & Hobbies, #Quilts & Quilting

6.
Sew from B to D, pivot, and then stitch from D to C. Trim the seam allowance to ¼" and finger-press it open.

7.
Fold the binding over the edge of the quilt, forming miters on the front and back. Hand stitch the folded edge of the binding to the back of the quilt, using a blind stitch or slip stitch.

Overlapped Corners
Binding can be applied to each side of the quilt separately and overlapped at the corners instead of mitering the corners. This type of binding is common on Amish quilts. You can make overlapped corners with straight-grain or bias binding. Use this technique only with single-fold (traditional) binding; double-fold binding may be too thick. Cut binding strips 4" longer than the quilt sides to allow extra fabric for overlapping at the corners.
1.
Sew binding strips to two opposite sides of the quilt, stitching from one cut edge to the other.

2.
Fold the binding over the edge and hand sew the binding to the back of your quilt. Trim off the excess fabric at each end.

3.
Sew binding onto the other two sides of the quilt, overlapping the first two binding strips as shown. Trim the ends of the binding, leaving ¼" of binding beyond each end of the quilt.

4.
Fold the cut ends of the binding to the wrong side so that the fold is even with the first binding strips. Then fold the binding to the back of the quilt, enclosing all the cut edges.

5.
Using a blind stitch, sew the folded edge of the binding to the back of the quilt and stitch the corners closed.

Connecting the Binding Ends
When you have stitched the binding to the back of the quilt and returned to the starting place, you have a few options to connect the starting and finishing ends of the binding. You can sew the binding pieces together with a straight seam, but that method creates unsightly bulk. This method is probably the best choice only if you’ve made scrappy binding with straight seams (see
page 40
). Making a diagonal connection is a better choice if you’ve used diagonal seams for all the other joins in your binding strips. A lot of quilters simply fold under one end of the binding and tuck the other end inside to make a diagonal connection. If that’s how you currently finish your binding, try Mimi’s Favorite quick-and-easy method on
page 52
to make a smoother finish.
Straight Connections
Use this method only if the other seams in your binding strips are sewn perpendicular to the length of binding and you want the connection to look just like all the other seams.
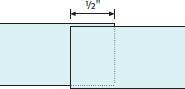
1.
Stop sewing the binding approximately 4" away from the starting point. Cut the end of your binding with a straight cut so that it overlaps the beginning end of the binding by ½".
2.
Unfold the two ends of the binding and place them right sides together. Sew the ends together with a ¼" seam allowance. Press the seam open to distribute the thickness.

3.
Refold the seamed section of the strip, return it to the edge of the quilt, and finish sewing the binding to the quilt.