iOS Programming: The Big Nerd Ranch Guide, 3/e (Big Nerd Ranch Guides) (35 page)
Read iOS Programming: The Big Nerd Ranch Guide, 3/e (Big Nerd Ranch Guides) Online
Authors: Aaron Hillegass,Joe Conway
Tags: #COM051370, #Big Nerd Ranch Guides, #iPhone / iPad Programming

If your application only makes sense in landscape mode, you can force it to run that way. First, in your view controller implement
shouldAutorotateToInterfaceOrientation:
to only return
YES
for landscape orientations.
{
return UIInterfaceOrientationIsLandscape(x);
}
An application’s
Info.plist
contains a key-value pair that specifies the valid initial orientations of the application. Select the project from the project navigator, then the
HeavyRotation
target from the editor area, and finally the
Summary
pane.
Figure 8.12 Choosing the initial orientations
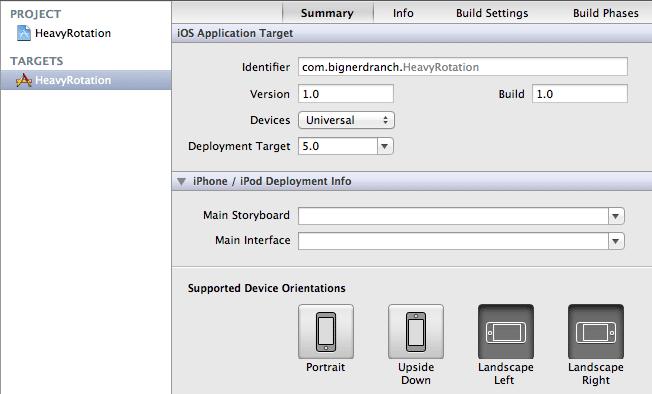
Find a section in the target’s summary called
Supported Device Orientations
. This section contains four toggle buttons that specify which orientations are allowed. Buttons that are pushed in are valid.
Note that selecting orientations here only applies to orientation when the application launches; it does not control orientation once the application is running. You still have to tell your view controller to allow autorotation only to landscape orientations in
shouldAutorotateToInterfaceOrientation:
.
Register for proximity notifications. Proximity refers to the nearness of the device to the user. It is typically used to tell whether the iPhone is next to the user’s face (as in talking on the phone). When this notification is posted, change the background color of
HeavyViewController
’s
view
to dark gray. You will need to turn on proximity monitoring, which is only available on the iPhone:
For every subview of
HeavyViewController
’s
view
, set the autoresizing mask programmatically. The behavior of the application should remain the same. (Hint: to programmatically change the autoresizing mask of a view, you must have a pointer to it in
HeavyViewController
.)
After reading
the section called “For the More Curious: Overriding Autorotation”
, place another
UIButton
on the lefthand side of the
HeavyViewController
’s
view
. When the device rotates to landscape, this button should appear centered on the righthand side of the view. (And when the device rotates back to portrait, the button should appear on the lefthand side again.)
In most cases, autorotation does the right thing if the autoresizing masks are properly set. However, you might want to take additional action on an autorotation or override the autorotation process altogether to change the way the view looks when it rotates. You can do this by overriding
willAnimateRotationToInterfaceOrientation:duration:
in a view controller subclass.
When a view controller is about to autorotate its view, it checks to see if you have implemented this method. If you have, then this method is invoked during the animation block of the rotation code. Therefore, all changes to subviews in this method will be animated as well. You can also perform some custom code within this method. Here is an example that will reposition a button and change the background color on autorotation:
duration:(NSTimeInterval)duration
{
// Assume "button" is a subview of this view controller's view
UIColor *color = nil;
CGRect bounds = [[self view] bounds];
// If the orientation is rotating to Portrait mode...
if (UIInterfaceOrientationIsPortrait(x)) {
// Put the button in the top right corner
[button setCenter:CGPointMake(bounds.size.width - 30,
20)];
// the background color of the view will be red
color = [UIColor redColor];
} else { // If the orientation is rotating to Landscape mode
// Put the button in the bottom right corner
[button setCenter:CGPointMake(bounds.size.width - 30,
bounds.size.height - 20)];
// the background color of the view will be blue
color = [UIColor blueColor];
}
[[self view] setBackgroundColor:color];
}
Overriding this method is useful when you want to update your user interface for a different orientation. For example, you could change the zoom or position of a scroll view or even swap in an entirely different view. Make sure, however, that you do not replace the
view
of the view controller in this method. If you wish to swap in another view, you must swap a subview of the view controller’s
view
.
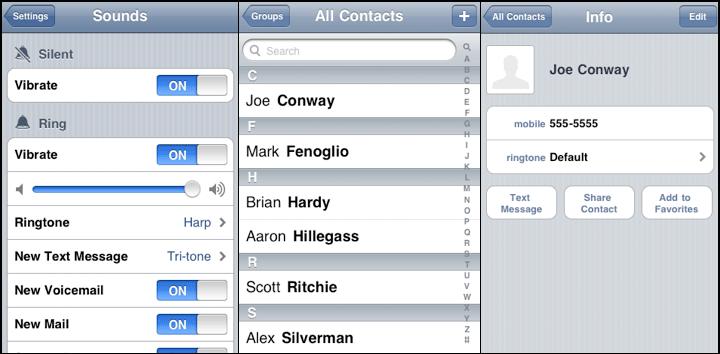
UITableView and UITableViewController
Many iOS applications show the user a list of items and allow the user to select, delete, or reorder items on the list. Whether an application displays a list of people in the user’s address book or a list of items on the App Store, it’s a
UITableView
doing the work.
A
UITableView
displays a single column of data with a variable number of rows.
Figure 9.1
shows some examples of
UITableView
.
Figure 9.1 Examples of UITableView
In this chapter, you are going to start an application called
Homepwner
that keeps an inventory of all your possessions. In the case of a fire or other catastrophe, you’ll have a record for your insurance company. (
“
Homepwner,
”
by the way, is not a typo. If you need a definition for the word
“
pwn,
”
please visit
www.urbandictionary.com
.)
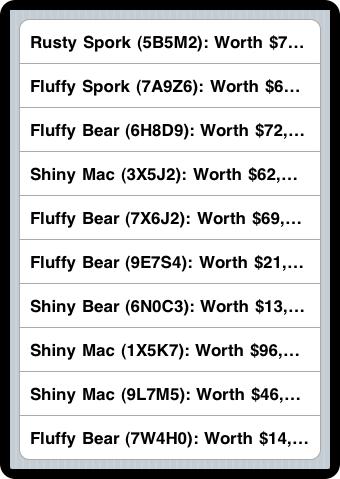
So far, your iOS projects have been small, but
Homepwner
will grow into a realistically complex application over the course of nine chapters. By the end of this chapter,
Homepwner
will present a list of
BNRItem
objects in a
UITableView
, as shown in
Figure 9.2
.
Figure 9.2 Homepwner: phase 1
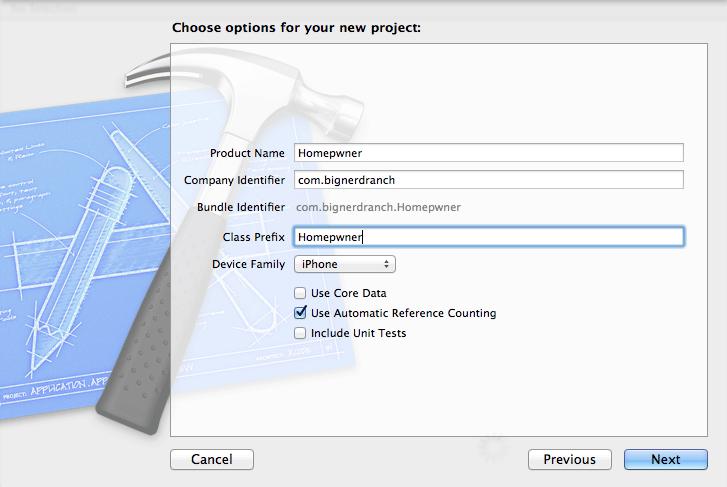
Create a new iOS
Empty Application
project and configure it as shown in
Figure 9.3
.
Figure 9.3 Configuring Homepwner
UITableView
is a view object, so, according to Model-View-Controller, it knows how to draw itself, but that’s it. It doesn’t handle application logic or data. Thus, when using a
UITableView
, you must consider what else is necessary to get the table working in your application
- A
UITableView
typically needs a view controller to handle its appearance on the screen.
- A
UITableView
needs a
data source
. A
UITableView
asks its data source for the number of rows to display, the data to be shown in those rows, and other tidbits that make a
UITableView
a useful user interface. Without a data source, a table view is just an empty container. The
dataSource
for a
UITableView
can be any type of Objective-C object as long as it conforms to the
UITableViewDataSource
protocol.
- A
UITableView
typically needs a
delegate
that can inform other objects of events involving the
UITableView
. The delegate can be any object as long as (you guessed it!) it conforms to the
UITableViewDelegate
protocol.
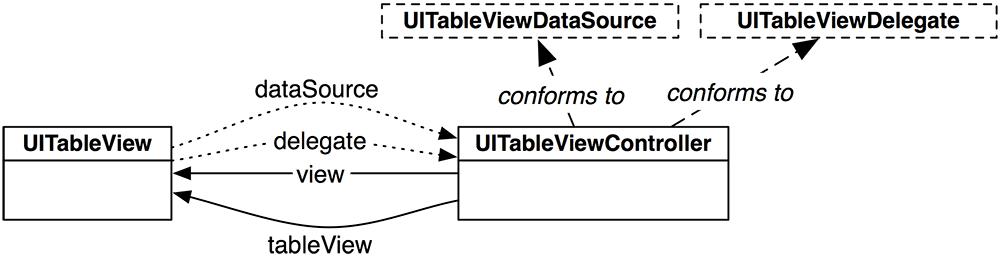
An instance of the class
UITableViewController
can fill all three roles: view controller, data source, and delegate.
UITableViewController
is a subclass of
UIViewController
, so a
UITableViewController
has a
view
. A
UITableViewController
’s
view
is always an instance of
UITableView
, and the
UITableViewController
handles the preparation and presentation of the
UITableView
. When a
UITableViewController
creates its view, the
dataSource
and
delegate
instance variables of the
UITableView
are automatically set to point at the
UITableViewController
(
Figure 9.4
).
Figure 9.4 UITableViewController-UITableView relationship
Now you’re going to write a subclass of
UITableViewController
for
Homepwner
. For this view controller, we’ll use the
NSObject
template. From the
File
menu, select
New
and then
New File...
. From the
iOS
section, select
Cocoa Touch
, choose
Objective-C class
, and hit
Next
. Then, select
NSObject
from the pop-up menu and enter
ItemsViewController
as the name of the new class. Click
Next
and then click
Create
on the next sheet to save your class.
Open
ItemsViewController.h
and change its superclass:
The designated initializer of
UITableViewController
is
initWithStyle:
, which takes a constant that determines the style of the table view. There are two options:
UITableViewStylePlain
, where each row is a rectangle, and
UITableViewStyleGrouped
, where the top and bottom rows have rounded corners. In
ItemsViewController.m
, implement the following initializers.
@implementation ItemsViewController
- (id)init
{
// Call the superclass's designated initializer
self = [super initWithStyle:UITableViewStyleGrouped];
if (self) {
}
return self;
}
- (id)initWithStyle:(UITableViewStyle)style
{
return [self init];
}
This will ensure that all instances of
ItemsViewController
use the
UITableViewStyleGrouped
style, no matter what initialization message is sent to it.
Open
HomepwnerAppDelegate.m
. In
application:didFinishLaunchingWithOptions:
, create an instance of
ItemsViewController
and set it as the
rootViewController
of the window. Make sure to import the header file for
ItemsViewController
at the top of this file.
@implementation HomepwnerAppDelegate
- (BOOL)application:(UIApplication *)application
didFinishLaunchingWithOptions:(NSDictionary *)launchOptions
{
self.window = [[UIWindow alloc] initWithFrame:[[UIScreen mainScreen] bounds]];
// Override point for customization after application launch.
// Create a ItemsViewController
ItemsViewController *itemsViewController = [[ItemsViewController alloc] init];
// Place ItemsViewController's table view in the window hierarchy
[[self window] setRootViewController:itemsViewController];
self.window.backgroundColor = [UIColor whiteColor];
[self.window makeKeyAndVisible];
return YES;
}
Build and run your application. You will see the default appearance of a plain
UITableView
with no content, as shown in
Figure 9.5
. How did you get a table view? As a subclass of
UIViewController
, a
UITableViewController
inherits the
view
method. This method calls
loadView
, which creates and loads an empty view object if none exists. A
UITableViewController
’s
view
is always an instance of
UITableView
, so sending
view
to the
UITableViewController
gets you a bright, shiny, and empty table view.
Figure 9.5 Empty UITableView
An empty table view is a sad table view. You should give it some rows to display. Remember the
BNRItem
class you wrote in
Chapter 3
? Now you’re going to use that class again: each row of the table view will display an instance of
BNRItem
. Locate the header and implementation files for
BNRItem
(
BNRItem.h
and
BNRItem.m
) in
Finder
and drag them onto
Homepwner
’s project navigator. Make sure you use the files from
Chapter 3
, not the unfinished files from
Chapter 2
.
When dragging these files onto your project window, select the checkbox labeled
Copy items into destination group’s folder
when prompted. This will copy the files from their current directory to your project’s directory on the filesystem and add them to your project.