Read iOS Programming: The Big Nerd Ranch Guide, 3/e (Big Nerd Ranch Guides) Online
Authors: Aaron Hillegass,Joe Conway
Tags: #COM051370, #Big Nerd Ranch Guides, #iPhone / iPad Programming
iOS Programming: The Big Nerd Ranch Guide, 3/e (Big Nerd Ranch Guides) (32 page)

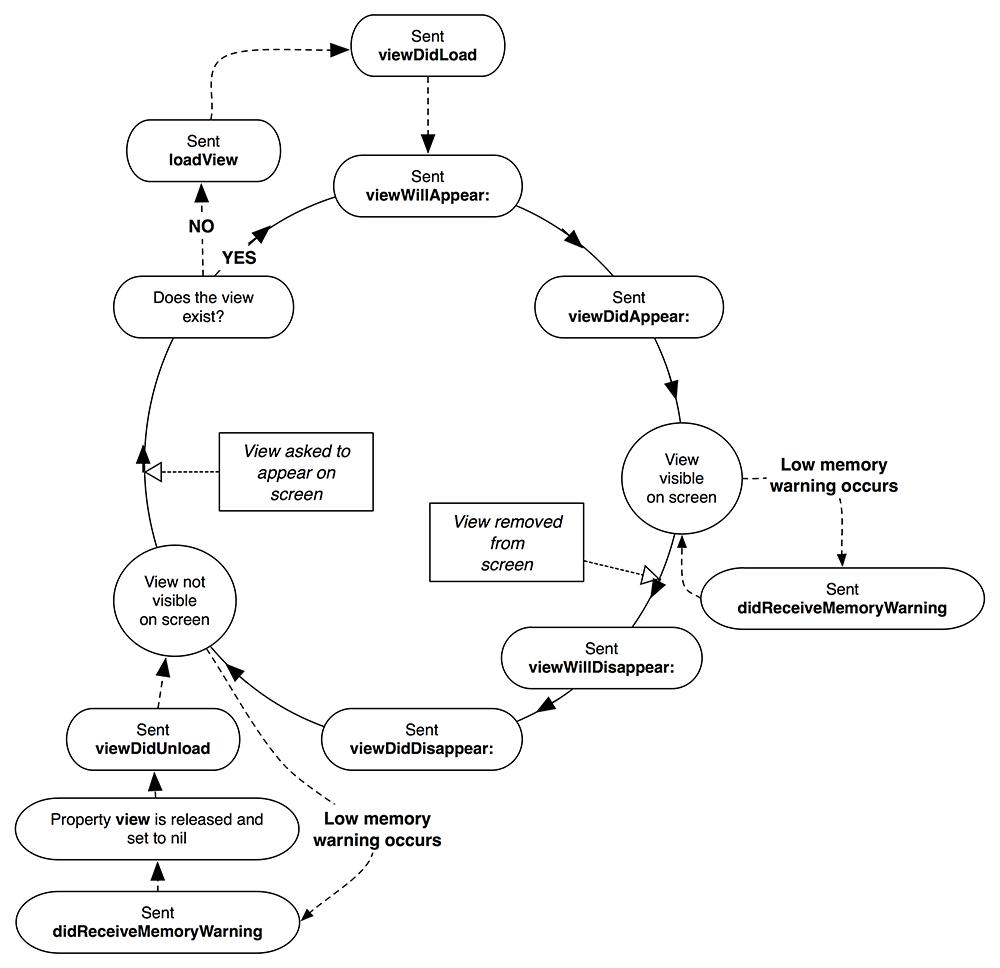
In addition to loading and unloading, the
view
of a view controller also appears and disappears at certain times.
UIViewController
has several methods that get called at these points in the lifecycle:
viewWillAppear:
when its view is about to be added to the window
viewDidAppear:
when its view has been added to the window
viewWillDisappear:
when its view is about to be dismissed, covered, or otherwise hidden from view
viewDidDisappear:
when its view has been dismissed, covered, or otherwise hidden from view
These methods are useful because a view controller is only created once, but its view usually gets displayed (and dismissed or hidden) several times. You often need a way to override the default behavior at these times in the life of view controller. For example, you may want to do some sort of initialization each time the view is moved on screen, like displaying the most current time in
TimeViewController
’s view. Here you would use
viewWillAppear:
or
viewDidAppear:
.
Similarly, if you had a large data structure that you only needed while the view controller was being displayed, you might want to do some clean-up each time the view controller was moved off screen. Then you would use
viewWillDisappear:
or
viewDidDisappear:
. Note that these methods, as defined in
UIViewController
, do nothing. They are there so that your subclasses can override them.
viewWillAppear:
(BOOL)animated;
- (void)
viewDidAppear:
(BOOL)animated;
- (void)
viewWillDisappear:
(BOOL)animated;
- (void)
viewDidDisappear:
(BOOL)animated;
Now let’s override
viewWillAppear:
to initialize the time label of the
TimeViewController
to the current time and to log to the console. While we’re at it, let’s override
viewWillDisappear:
to log to the console, too. In
TimeViewController.m
, make the following changes:
{
NSLog(@"CurrentTimeViewController will appear");
[super viewWillAppear:animated];
[self showCurrentTime:nil];
}
- (void)viewWillDisappear:(BOOL)animated
{
NSLog(@"CurrentTimeViewController will DISappear");
[super viewWillDisappear:animated];
}
Build and run the application. Note that each time you return to the
Time
tab, the time label is updated and a log statement appears in the console. And each time you leave that screen, you see another log statement in the console.
The most important thing to keep in mind is that the view and its view controller are separate objects. You can think of the view as a renewable resource that the view controller uses to communicate with the user.
Figure 7.20
shows the life cycle of a view controller’s view in full.
Figure 7.20 Lifecycle of a view controller’s view
In this exercise, you created a
UIViewController
subclass using the
NSObject
template and an empty XIB file. This is useful for learning how the XIB file works. However, in practice, you typically let
Xcode
do the grunt work and use the
UIViewController
subclass template.
Over the course of this book, you will create a lot of view controllers. To save on time and potential errors, you’ll use the
UIViewController
template when a view controller will have a XIB file. When you create a view controller subclass with a XIB template, the XIB’s
File's Owner
is already set to the class of that view controller. It also has an instance of
UIView
already hooked up to the
File's Owner
’s
view
outlet.
There is a drawback, however, to using the view controller template: there is a lot of code written in the implementation file. It becomes difficult to see what’s going on with all of this extra junk in the file. Therefore, whenever you create a view controller using this template, the first thing we’ll ask you to do is delete all of the code in the implementation file between the
@implementation
and
@end
directives.
Create a new
UIViewController
subclass. Its
view
should be an instance of
MKMapView
. Make this view controller the third view controller in the
UITabBarController
.
Add a
UISegmentedControl
to
HypnosisViewController
’s
view
with segments for
Red
,
Green
, and
Blue
. When the user taps the segmented control, change the color of the circles in
HypnosisView
. Be sure to create a copy of the project and work from that copy while attempting this challenge.
A C application begins by executing a
main
function. An Objective-C application is no different, but we haven’t seen
main
in any of our iOS applications. Let’s take a look now.
Open
main.m
in the
HypnoTime
project navigator. It looks like this:
{
@autoreleasepool {
return UIApplicationMain(argc, argv,
nil, NSStringFromClass([HypnoAppDelegate class]));
}
}
The function
UIApplicationMain
creates an instance of a class called
UIApplication
. For every application, there is a single
UIApplication
instance. This object is responsible for maintaining the run loop. Once the application object is created, its run loop essentially becomes an infinite loop: the executing thread will never return to
main
.
Another thing the function
UIApplicationMain
does is create an instance of the class that will serve as the
UIApplication
’s
delegate
. Notice that the final argument to the
UIApplicationMain
function is an
NSString
that is the name of the delegate’s class. So, this function will create an instance of
HypnoAppDelegate
and set it as the
delegate
of the
UIApplication
object. (Where does the
Hypno
in
HypnoAppDelegate
come from? It’s what you entered for the class prefix when creating this project.)
Right before the run loop begins accepting events, the application sends a message to its
delegate
saying,
“
Get ready because here we go!
”
This message is
application:didFinishLaunchingWithOptions:
. You implemented this method in
HypnoAppDelegate.m
to create the window and the controller objects used in this application.
Every iOS application follows this pattern. If you’re still curious, go back and check the
main.m
files in the
Quiz
and
Whereami
applications you wrote earlier.
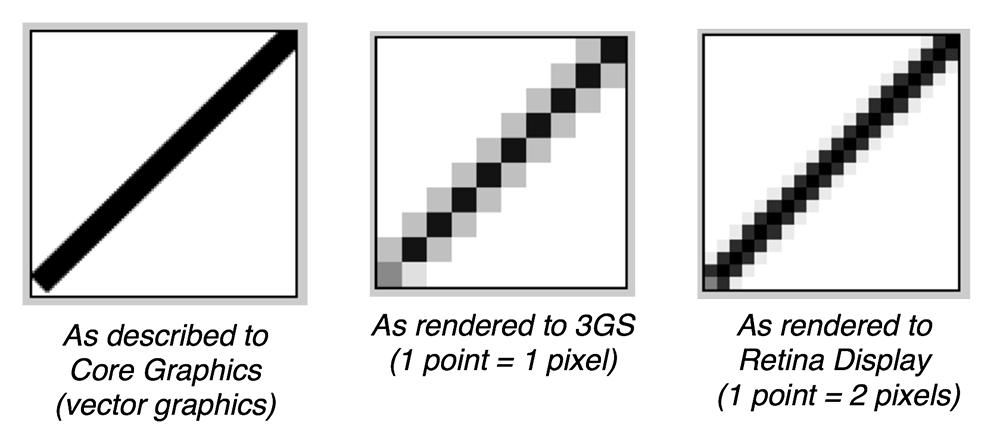
With the release of iPhone 4, Apple introduced the Retina display for the iPhone and iPod touch. The Retina display has much higher resolution – 640x960 pixels compared to 320x480 pixels on earlier devices. Let’s look at what you should do to make graphics look their best on both displays.
For vector graphics, like
HypnosisView
’s
drawRect:
method and drawn text, you don’t need to do anything; the same code will render as crisply as the device allows. However, if you draw using Core Graphics functions, these graphics will appear differently on different devices. In Core Graphics, also called Quartz, we describe lines, curves, text, etc. in terms of
points
. On a non-Retina display, a point is 1x1 pixel. On a Retina display, a point is 2x2 pixels (
Figure 7.21
).
Figure 7.21 Rendering to different resolutions
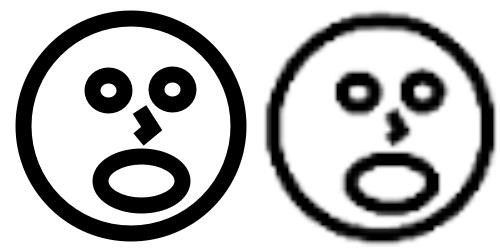
Given these differences, bitmap images (like JPEG or PNG files) will be unattractive if the image isn’t tailored to the device’s screen type. Say your application includes a small image of 25x25 pixels. If this image is displayed on a Retina display, then the image must be stretched to cover an area of 50x50 pixels. At this point, the system does a type of averaging called anti-aliasing to keep the image from looking jagged. The result is an image that isn’t jagged – but it is fuzzy (
Figure 7.22
).
Figure 7.22 Fuzziness from stretching an image
You could use a larger file instead, but the averaging would then cause problems in the other direction when the image is shrunk for a non-Retina display. The only solution is to bundle two image files with your application: one at a pixel resolution equal to the number of points on the screen for non-Retina displays and one twice that size in pixels for Retina displays.
Fortunately, you do not have to write any extra code to handle which image gets loaded on which device. All you have to do is suffix the higher-resolution image with
@2x
. Then, when you use
UIImage
’s
imageNamed:
method to load the image, this method looks in the bundle and gets the file that is appropriate for the particular device.
Once the simulator application is running, you can change which display is being simulated. To see
HypnoTime
in a Retina display, go to the
Hardware
menu, select
Device
, and then choose
iPhone (Retina)
. Notice that the tab bar items are crisp on both types of displays. (If you’re even more curious, you can remove the
@2x
files from your project and build and run again to see the difference.)
