iOS Programming: The Big Nerd Ranch Guide, 3/e (Big Nerd Ranch Guides) (28 page)
Read iOS Programming: The Big Nerd Ranch Guide, 3/e (Big Nerd Ranch Guides) Online
Authors: Aaron Hillegass,Joe Conway
Tags: #COM051370, #Big Nerd Ranch Guides, #iPhone / iPad Programming

In
Chapter 5
, we briefly talked about
UIView
’s superclass,
UIResponder
. Instances of
UIResponder
can become the first responder of the window and will receive events when the device is shaken or a key is pressed on the keyboard. You will make the instance of
HypnosisView
the first responder of
Hypnosister
’s window. Shaking the device will send a message to the
HypnosisView
, and that method will change its
circleColor
.
To give a
UIResponder
first responder status, you send it the message
becomeFirstResponder
. In
HypnosisterAppDelegate.m
, tell the
HypnosisView
instance to become the first responder. The
becomeFirstResponder
method returns a Boolean value indicating whether the receiving object successfully became the first responder of the window.
BOOL success = [view becomeFirstResponder];
if (success) {
NSLog(@"HypnosisView became the first responder");
} else {
NSLog(@"Could not become first responder");
}
self.window.backgroundColor = [UIColor whiteColor];
Build and run the application. Notice that the console tells you that the
HypnosisView
failed to become the first responder. Most
UIResponder
objects return
NO
in
becomeFirstResponder
. This is because most views, by default, only care about events connected with themselves, and they (almost) always get a chance to handle these events. For example, a tapped
UIButton
gets sent a message regardless of who the first responder is. So, a responder object must explicitly state that it is willing to become the first responder. In
HypnosisView.m
, override the
UIResponder
method
canBecomeFirstResponder
to return
YES
.
{
return YES;
}
Build and run the application again. The console will report that the
HypnosisView
is now the first responder.
The methods for receiving events are also implemented in
UIResponder
, and they must be overridden in subclasses of
UIResponder
for instances to respond to events. For handling shakes, the methods you override in a
UIResponder
subclass are known as the motion event methods. They are declared like so:
- (void)motionBegan:(UIEventSubtype)motion withEvent:(UIEvent *)event;
// Sent to the first responder when the user stops shaking the device
- (void)motionEnded:(UIEventSubtype)motion withEvent:(UIEvent *)event;
// Sent to the first responder if the motion event is interrupted, like when
// a phone call or SMS message occurs while shaking
- (void)motionCancelled:(UIEventSubtype)motion withEvent:(UIEvent *)event;
Thus, for
HypnosisView
to know and take action when a shake starts, it must implement the method
motionBegan:withEvent:
. Override this method in
HypnosisView.m
so that the start of a shake changes the
circleColor
.
{
NSLog(@"Device started shaking!");
[self setCircleColor:[UIColor redColor]];
}
Build and run the application. Give the device a shake. (If you are using the simulator, simulate a shake by selecting
Shake Gesture
from the
Hardware
menu in the simulator application.) The console reports that the device has started shaking. But no matter how vigorously you shake the device, the circle color will not change. What gives?
When the
circleColor
of a
HypnosisView
changes, the instance variable
circleColor
is set to point at a new
UIColor
instance. However, we didn’t tell the
HypnosisView
that it needs to redraw its image when this happens. We have to send the message
setNeedsDisplay
to the
HypnosisView
after it changes its
circleColor
.
In
HypnosisView.m
, implement
setCircleColor:
to send this message after it changes its
circleColor
instance variable.
{
circleColor = clr;
[self setNeedsDisplay];
}
Build and run the application again. Shake the device, and the circles will change to red.
Notice that
motionBegan:withEvent:
has a
UIEventSubtype
argument. This argument holds the type of motion event that triggered this method. Right now, there is only one type of motion event: a shake. In the future, there may be more. You should maintain future compatibility by making sure that only shake events change the color of the
HypnosisView
. In
HypnosisView.m
, add the following code to
motionBegan:withEvent:
.
{
if (motion == UIEventSubtypeMotionShake) {
NSLog(@"Device started shaking!")
[self setCircleColor:[UIColor redColor]];
}
}
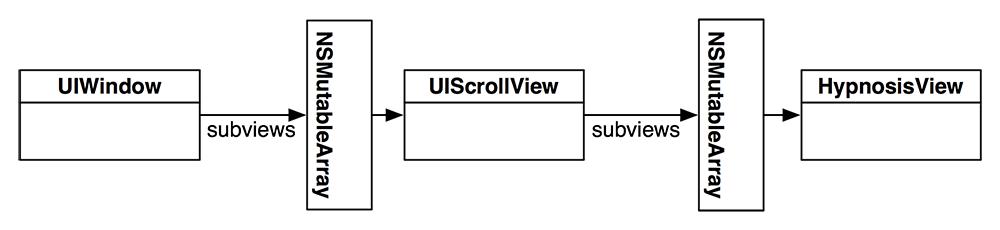
When you want to let the user scroll around your view, you typically make your view the subview of a
UIScrollView
, as shown in
Figure 6.11
.
Figure 6.11 Object diagram
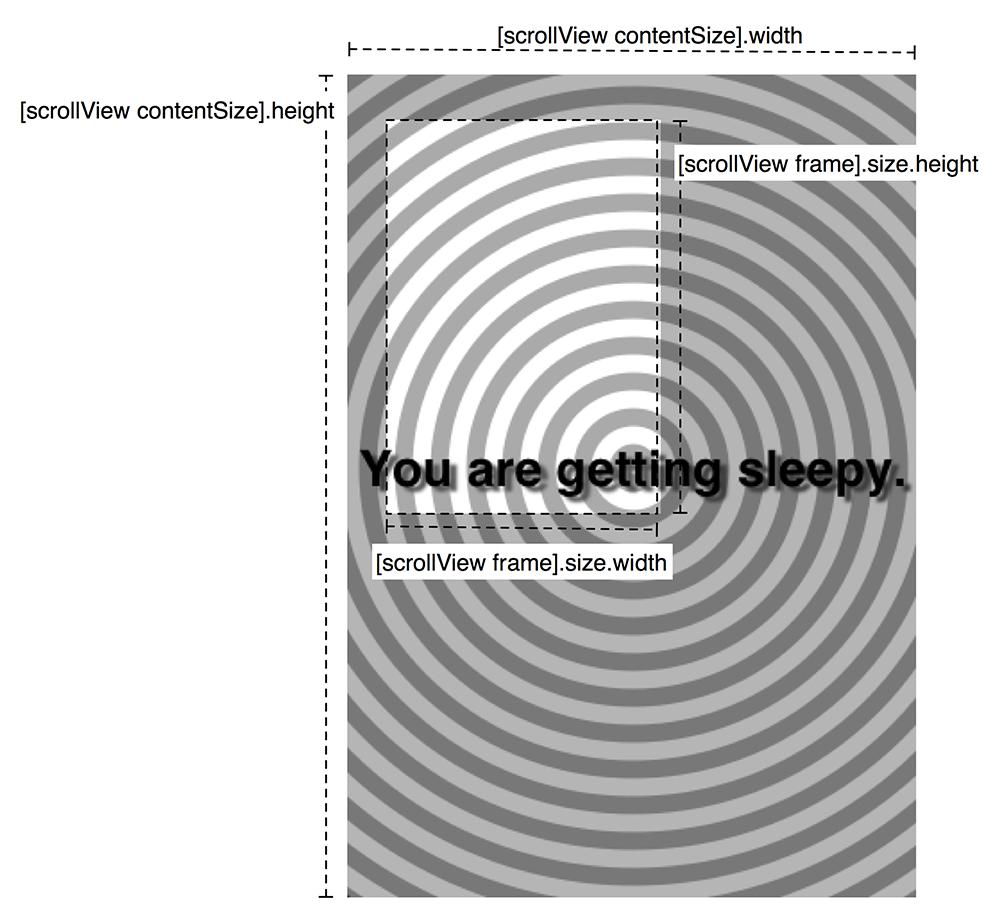
Scroll views are typically used for views that are larger than the screen. A scroll view draws a rectangular portion of its subview, and moving your finger, or
panning
, on the scroll view changes the position of that rectangle on the subview. Thus, you can think of the scroll view as a viewing port that you move around a virtual world (
Figure 6.12
). The size of the scroll view is the size of this viewing port. The size of the area it can view is the
UIScrollView
’s
contentSize
, which is typically the size of the
UIScrollView
’s subview.
Figure 6.12 UIScrollView and its content area
In
HypnosisterAppDelegate.m
, put a super-sized version of
HypnosisView
inside a scroll view and add that scroll view to the window:
didFinishLaunchingWithOptions:(NSDictionary *)launchOptions
{
self.window = [[UIWindow alloc] initWithFrame:[[UIScreen mainScreen] bounds]];
// Override point for customization after application launch.
CGRect screenRect = [[self window] bounds];
// Create the UIScrollView to have the size of the window, matching its size
UIScrollView *scrollView = [[UIScrollView alloc] initWithFrame:screenRect];
[[self window] addSubview:scrollView];
// Create the HypnosisView with a frame that is twice the size of the screen
CGRect bigRect = screenRect;
bigRect.size.width *= 2.0;
bigRect.size.height *= 2.0;
HypnosisView *view = [[HypnosisView alloc] initWithFrame:bigRect];
// Add the HypnosisView as a subview of the scrollView instead of the window
[scrollView addSubview:view];
// Tell the scrollView how big its virtual world is
[scrollView setContentSize:bigRect.size];
BOOL success = [view becomeFirstResponder];
Build and run your application. You can pan your view up and down, left and right.
In the last example, a scroll view was used to move around a much larger view. A scroll view can pan between a number of different view instances. For example, if there are two screen-sized views, a user could pan between them. In
HypnosisterAppDelegate.m
, shrink the
HypnosisView
back to the size of the screen and add another screen-sized
HypnosisView
as a subview of the
UIScrollView
. Also, make the
contentSize
twice as wide as the screen, but the same height.
bigRect.size.width *= 2.0;
[scrollView addSubview:view];
// Move the rectangle for the other HypnosisView to the right, just off
// the screen
screenRect.origin.x = screenRect.size.width;
HypnosisView *anotherView = [[HypnosisView alloc] initWithFrame:screenRect];
[scrollView addSubview:anotherView];
// Tell the scrollView how big its virtual world is
[scrollView setContentSize:bigRect.size];
Build and run the application. Pan from left to right to see each instance of
HypnosisView
.
Notice that you can stop in between the two
HypnosisView
s. Sometimes you want this, but other times, you do not. To force the scroll view to snap its viewing port to one of the views, turn on paging for the scroll view in
HypnosisterAppDelegate.m
.
[scrollView setPagingEnabled:YES];
[[self window] addSubview:scrollView];
Build and run the application. Pan to the middle of two
HypnosisView
s and see how it automatically scrolls to one of the views. Paging works by taking the size of the scroll view’s
bounds
and dividing up the
contentSize
it displays into sections of the same size. After the user pans, the view port will scroll to show only one of these sections.
A
UIScrollView
can also zoom in and out on its content. To zoom, a scroll view needs to know the minimum and maximum zoom levels, and it needs to know the view to zoom in on.
A
UIScrollView
can technically only zoom in on one view. So remove the code that creates another
HypnosisView
in
HypnosisterAppDelegate.m
and change the
contentSize
of the
UIScrollView
back to the size of the screen.
[scrollView addSubview:view];
HypnosisView *anotherView = [[HypnosisView alloc] initWithFrame:screenRect];
[scrollView addSubview:anotherView];
Then, in
HypnosisterAppDelegate.m
, disable paging and set the zoom properties and delegate of the
UIScrollView
.
[scrollView setMaximumZoomScale:5.0];
// You will get a warning here, ignore it for now
[scrollView setDelegate:self];
[[self window] addSubview:scrollView];
Build and run the application. You should see one
HypnosisView
, which you cannot pan or zoom.
To zoom, you must implement the method
viewForZoomingInScrollView:
in the
UIScrollView
’s
delegate
. This method returns the instance of the view to zoom in on. The view will be the instance of
HypnosisView
, and the
UIScrollView
’s
delegate
will be the
HypnosisterAppDelegate
.
Currently,
HypnosisterAppDelegate
has a pointer to
HypnosisView
in a local variable in
application:didFinishLaunchingWithOptions:
. However, to zoom,
HypnosisterAppDelegate
will need access to that view in another method –
viewForZoomingInScrollView:
. This means
HypnosisterAppDelegate
needs an instance variable that points to a
HypnosisView
instead of a local variable. In
HypnosisterAppDelegate.h
, declare that
HypnosisterAppDelegate
conforms to
UIScrollViewDelegate
and declare an instance variable to hold the
HypnosisView
.
// Don't forget this import statement!
#import "HypnosisView.h"
@interface HypnosisterAppDelegate : UIResponder
>
{
HypnosisView *view;
}
@property (strong, nonatomic) UIWindow *window;
@end
Now, in
HypnosisterAppDelegate.m
, put the
HypnosisView
into the instance variable instead of a local variable.
[scrollView addSubview:view];
Finally, implement
viewForZoomingInScrollView:
in
HypnosisterAppDelegate.m
to return this view.
{
return view;
}
Build and run the application. Pinch and pull with two fingers to zoom in and out. (On the simulator, you can simulate two fingers by holding down the Option key, clicking, and then moving the mouse.) Pan with one finger to scroll once you have zoomed in.