iOS Programming: The Big Nerd Ranch Guide, 3/e (Big Nerd Ranch Guides) (26 page)
Read iOS Programming: The Big Nerd Ranch Guide, 3/e (Big Nerd Ranch Guides) Online
Authors: Aaron Hillegass,Joe Conway
Tags: #COM051370, #Big Nerd Ranch Guides, #iPhone / iPad Programming

To create a custom view, you subclass
UIView
and customize that subclass’s image. Create a new iOS Objective-C class (
Figure 6.5
).
Figure 6.5 Creating a new class
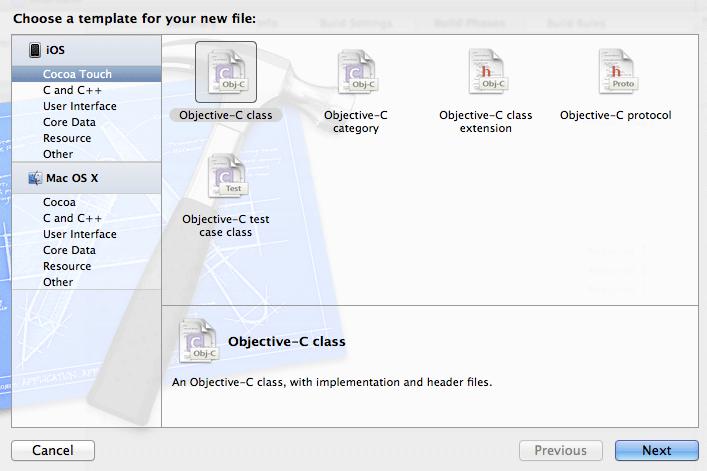
On the second pane of the assistant, choose
NSObject
as a superclass and name the class
HypnosisView
. Click
Create
on the sheet that drops down. Then, open
HypnosisView.h
in the editor area. Change
HypnosisView
’s superclass from
NSObject
to
UIView
.
UIView
You now have a
UIView
subclass.
(Why didn’t we select
UIView
as the superclass in the assistant? When you’re learning, it is important to start with the simplest template available in
Xcode
. Most classes and projects in this book will do so. Templates are great for speeding up development, but they get in the way when you’re learning. Typing in each line of code instead of relying on the
“
magic
”
of a template will make you more comfortable when you’re writing iOS applications on your own.)
Let’s create an instance of
HypnosisView
, set its
backgroundColor
(a property inherited from
UIView
), and add the
HypnosisView
to the view hierarchy.
Open
HypnosisterAppDelegate.m
. At the top of this file, import the header file for
HypnosisView
.
#import "HypnosisView.h"
@implementation HypnosisterAppDelegate
Locate the method
application:didFinishLaunchingWithOptions:
near the top of
HypnosisterAppDelegate.m
. In this method, create an instance of
HypnosisView
and add it as a subview of the window.
didFinishLaunchingWithOptions:(NSDictionary *)launchOptions
{
self.window = [[UIWindow alloc] initWithFrame:[[UIScreen mainScreen] bounds]];
// Override point for customization after application launch.
CGRect viewFrame = CGRectMake(160, 240, 100, 150);
HypnosisView *view = [[HypnosisView alloc] initWithFrame:viewFrame];
[view setBackgroundColor:[UIColor redColor]];
[[self window] addSubview:view];
self.window.backgroundColor = [UIColor whiteColor];
[self.window makeKeyAndVisible];
return YES;
}
Build run the application. Notice the red rectangle towards the bottom right corner of the screen: this is the instance of
HypnosisView
, which is drawn on top of the
UIWindow
(the white background). This
HypnosisView
instance is a subview of the
UIWindow
. When you add a view as a subview of another view, the inverse relationship is automatically established: the
HypnosisView
’s
superview
is the
UIWindow
. (To avoid a retain cycle, the
superview
property is declared as
__unsafe_unretained
.)
Also, notice that the console says something about applications expecting to have a root view controller. You can ignore this. It doesn’t hurt anything, and it will make sense after the next chapter.
This is your first time programmatically creating an instance of a view and adding it as a subview of another view, but you have been doing the same thing all along in XIB files. In your XIB files, when you dragged a view from the library onto the canvas, you created the view instance. When you dragged that view on top of another view, you established a subview/superview relationship between those two views. A view created programmatically and a view created by loading a XIB file are no different once the application is executing.
When creating a view programmatically, you use
alloc
and an initializer message like you would for any other object. The designated initializer of
UIView
, and thus
HypnosisView
, is
initWithFrame:
. This method takes a
CGRect
structure as an argument. This
CGRect
is the view’s
frame
.
Every view instance has a
frame
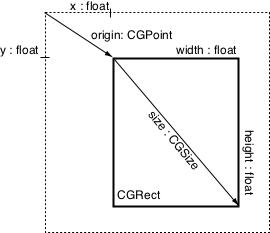
rectangle. A view’s frame specifies the view’s size and position relative to its superview. A frame is represented by a
CGRect
structure and contains the members
origin
and
size
(
Figure 6.6
). These members are also structures. The
origin
is of type
CGPoint
and contains two
float
members:
x
and
y
. The
size
is of type
CGSize
and has two
float
members:
width
and
height
. (A structure is not an Objective-C object, so you can’t send it messages, and you don’t declare it as a pointer.)
Figure 6.6 CGRect
Thus, a view is always a rectangle. Because the
HypnosisView
’s
origin
is
(160, 240)
, its top left corner is 160 points to the right and 240 points down from the top-left corner of the window (its superview). This places the top-left corner of the
HypnosisView
in the middle of the screen. Also, the
HypnosisView
stretches 100 points to the right and 150 points down due to its
size
.
Create another instance of
HypnosisView
in
HypnosisterAppDelegate.m
and add it to the window in a different position and with a different size and background color.
CGRect anotherFrame = CGRectMake(20, 30, 50, 50);
HypnosisView *anotherView = [[HypnosisView alloc] initWithFrame:anotherFrame];
[anotherView setBackgroundColor:[UIColor blueColor]];
[[self window] addSubview:anotherView];
self.window.backgroundColor = [UIColor whiteColor];
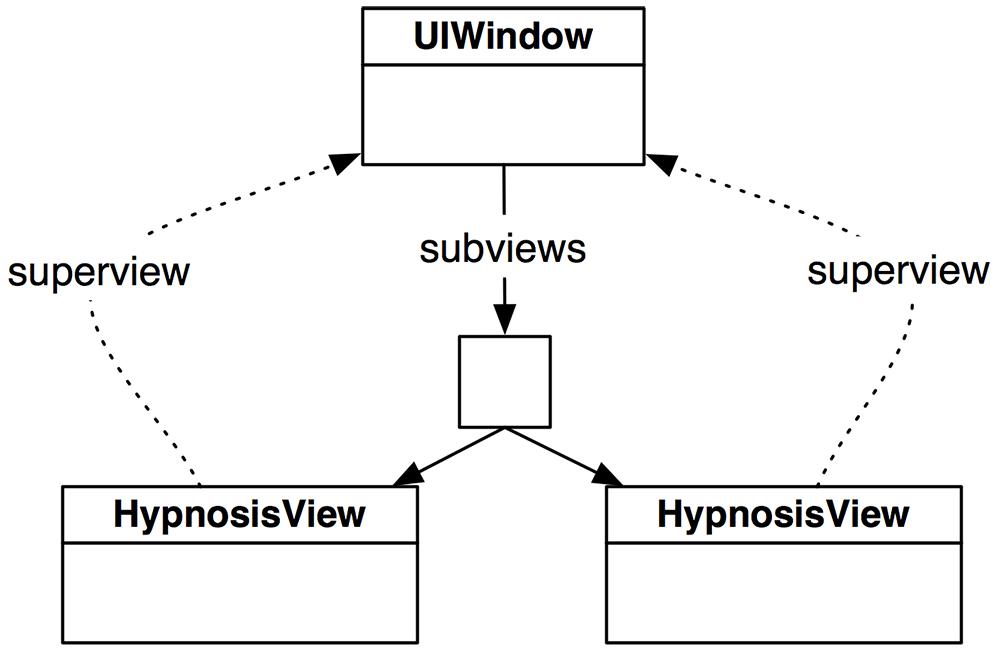
Build and run again. Notice that there are now two rectangles; these are the two instances of
HypnosisView
.
Figure 6.7
shows the view hierarchy.
Figure 6.7 View hierarchy with both HypnosisViews as subviews of the window
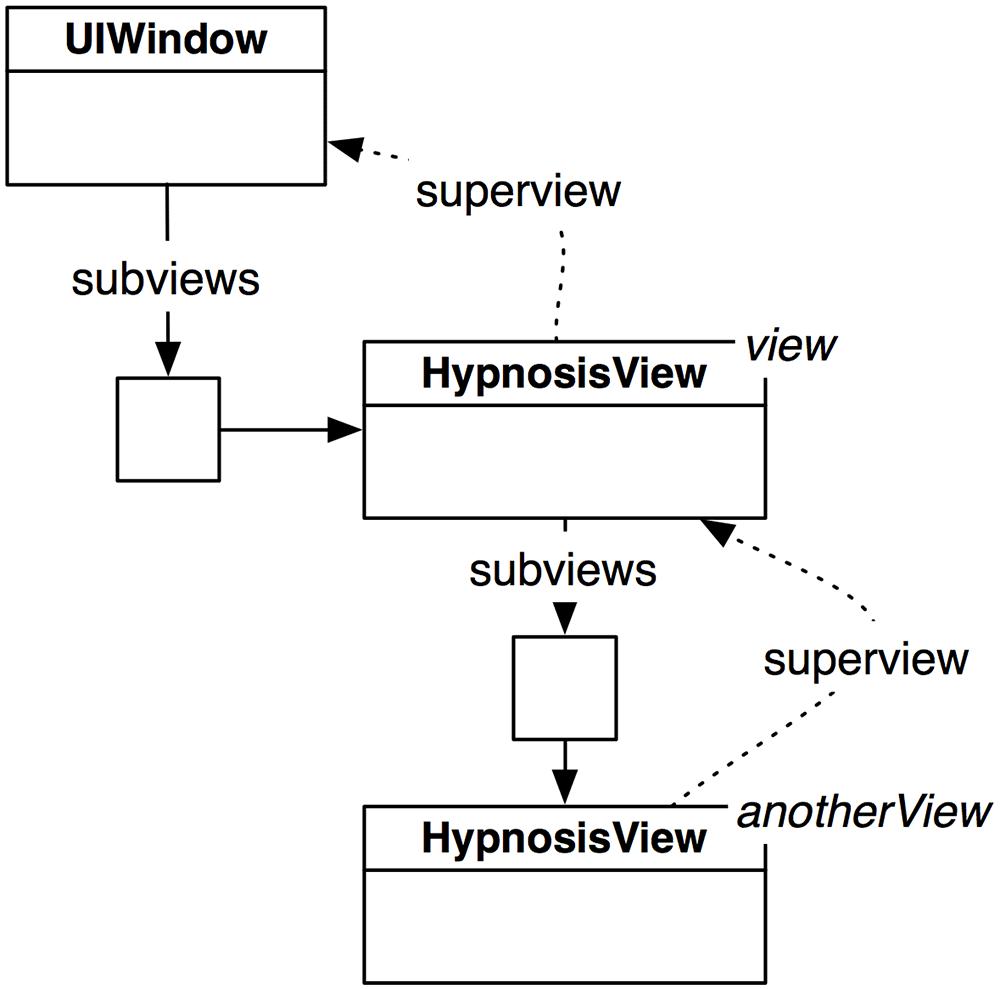
A view hierarchy can be deeper than two levels. In
HypnosisterAppDelegate.m
, insert
anotherView
as a subview of the first
view
instead of as a subview of the window.
[anotherView setBackgroundColor:[UIColor blueColor]];
Build and run the application. Notice that even though
anotherView
’s
frame
did not change, its position on the screen did. A view’s
frame
is relative to its superview, not the window, so the top-left corner of
anotherView
is now inset
(20, 30)
points from the top-left corner of
view
.
Figure 6.8
shows the new view hierarchy.
Figure 6.8 View hierarchy with one HypnosisView as a subview of the other
So far, you have created a
UIView
subclass, created two instances of it, and inserted them into the view hierarchy.
We gave these two views instances distinguishable
backgroundColor
s so that we can see their position and size on the screen. But views comprise all iOS interfaces, so clearly there must be a way to draw more than just colored rectangles. The drawing that makes a view interesting happens in the
UIView
method
drawRect:
. By default,
drawRect:
does nothing, but
UIView
subclasses override this method to perform custom drawing.
When you override
drawRect:
, you issue drawing instructions that create the image for instances of your
UIView
subclass. These drawing instructions come from the Core Graphics framework, which is automatically added to an application target when you create a new project.
Let’s override
drawRect:
in
HypnosisView
. The first thing we need to do in
drawRect:
is grab a pointer to a
drawing context
. A drawing context maintains the state of drawing (like the current drawing color and thickness of the pen) and performs drawing operations. A drawing operation draws shapes using the current drawing state. At the end of
drawRect:
, the image produced by the context becomes that view’s image.
Before a view is sent the message
drawRect:
, a drawing context is automatically created and set as the
“
current context.
”
In
HypnosisView.m
, enter the following code to grab a pointer to that context in
drawRect:
.
{
CGContextRef ctx = UIGraphicsGetCurrentContext();
}
The type
CGContextRef
is defined as
CGContext *
– a pointer to a
CGContext
.
CGContext
is a structure that represents a drawing context. (The suffix
Ref
makes it easy to distinguish between pointers to C structures and pointers to Objective-C objects.) Here,
ctx
points to the current drawing context.
A view’s image is the same size as it appears on the screen, i.e., the same size as the view’s
frame
. The frame describes the view’s size relative to the view’s superview. However, the view shouldn’t have to know about its superview until it gets to compositing its image to the screen. So, there is a separate
CGRect
property of
UIView
named
bounds
that gives the view its size independent of its superview. In
HypnosisView.m
, get the
bounds
rectangle in
drawRect:
after you get a pointer to the drawing context.
{
CGContextRef ctx = UIGraphicsGetCurrentContext();
CGRect bounds = [self bounds];
}
The drawing operations you perform on the
CGContextRef
must fall within the
bounds
rectangle; otherwise, they will be clipped to that rectangle. Let’s draw a circle in the center of the
bounds
rectangle. Add the following code to
drawRect:
.
{
CGContextRef ctx = UIGraphicsGetCurrentContext();
CGRect bounds = [self bounds];
// Figure out the center of the bounds rectangle
CGPoint center;
center.x = bounds.origin.x + bounds.size.width / 2.0;
center.y = bounds.origin.y + bounds.size.height / 2.0;
// The radius of the circle should be nearly as big as the view
float maxRadius = hypot(bounds.size.width, bounds.size.height) / 4.0;
// The thickness of the line should be 10 points wide
CGContextSetLineWidth(ctx, 10);
// The color of the line should be gray (red/green/blue = 0.6, alpha = 1.0);
CGContextSetRGBStrokeColor(ctx, 0.6, 0.6, 0.6, 1.0);
// Add a shape to the context - this does not draw the shape
CGContextAddArc(ctx, center.x, center.y, maxRadius, 0.0, M_PI * 2.0, YES);
// Perform a drawing instruction; draw current shape with current state
CGContextStrokePath(ctx);
}
Build and run the application. The same blue and red squares are there, but now each square has a gray circle within it. These gray circles are the result of the
drawRect:
method for instances of
HypnosisView
.
Notice that a view’s
backgroundColor
is always drawn regardless of what
drawRect:
does. Typically, you set the
backgroundColor
of a view to clear so that only
drawRect:
’s results show. In
HypnosisterAppDelegate.m
, remove the code that sets the background color of each of these views.
CGRect anotherFrame = CGRectMake(20, 30, 50, 50);
HypnosisView *anotherView = [[HypnosisView alloc] initWithFrame:anotherFrame];
Then, in
HypnosisView.m
, override
initWithFrame:
to set the background color of every
HypnosisView
to clear.
{
self = [super initWithFrame:frame];
if (self) {
// All HypnosisViews start with a clear background color
[self setBackgroundColor:[UIColor clearColor]];
}
return self;
}
Build and run the application.
Figure 6.9
shows the clear backgrounds and the resulting circles that look a little like an olive.
Figure 6.9 Current results
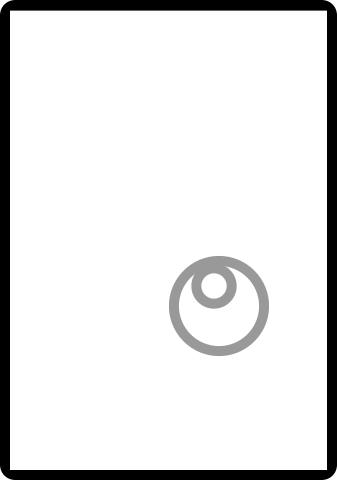
Remember that you are looking at two view instances that are stacked on top of each other. The circles are different sizes because the frame of each view (and, thus, the bounds and the image that represents the view) are different sizes.
While the
bounds
origin
is typically
(0, 0)
and the
size
is typically equal to the
frame
’s
size
, this is sometimes not the case. Thus, when drawing, you should never use constant numbers. Instead, use a combination of the
origin
and
size
of the
bounds
to specify the coordinates that you draw to.
