iOS Programming: The Big Nerd Ranch Guide, 3/e (Big Nerd Ranch Guides) (29 page)
Read iOS Programming: The Big Nerd Ranch Guide, 3/e (Big Nerd Ranch Guides) Online
Authors: Aaron Hillegass,Joe Conway
Tags: #COM051370, #Big Nerd Ranch Guides, #iPhone / iPad Programming

When you’re being hypnotized, you probably don’t want to see the time or your remaining battery charge – these things cause anxiety. So, you’re going to hide the status bar before you make the window visible. In
HypnosisterAppDelegate.m
, add a line near the top of
application:didFinishLaunchingWithOptions:
.
didFinishLaunchingWithOptions:(NSDictionary *)launchOptions
{
self.window = [[UIWindow alloc] initWithFrame:[[UIScreen mainScreen] bounds]];
[[UIApplication sharedApplication] setStatusBarHidden:YES
withAnimation:UIStatusBarAnimationFade];
Build and run the application again. Notice the status bar fading out after the application launches. You can also hide the status bar before your application appears on the screen by adding a new key-value pair to the application’s info property list. To do this, select the project from the project navigator. Then select the
Hypnosister
target and the
Info
pane in the editor area (
Figure 6.13
). This pane is an editor for the
Info.plist
file that is a part of every iOS application. (You could select the
Hypnosister-Info.plist
file from the project navigator, but this interface shows the key-value pairs more clearly.)
Figure 6.13 Info property list with hidden status bar
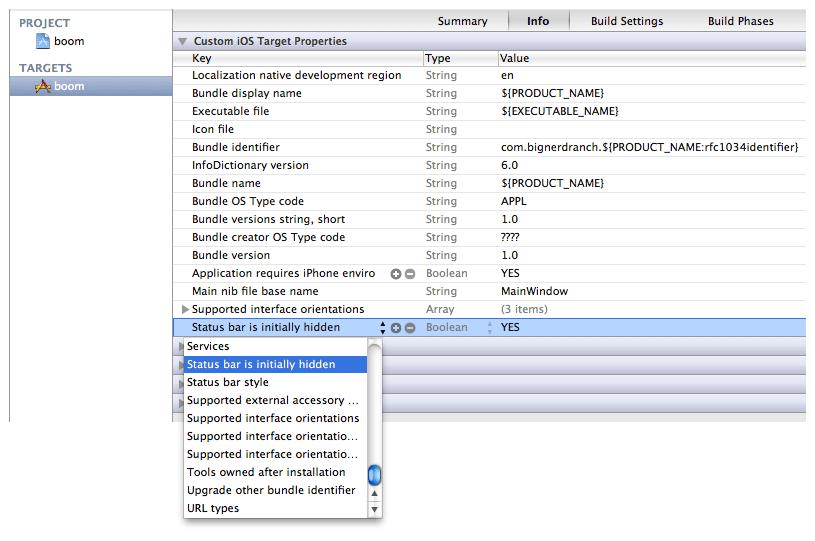
Select the last row and click the
+
icon next to the key name to add another key-value pair. A new row will appear, and a pop-up menu will open in the
Key
column. Choose
Status bar is initially hidden
from this list and hit return. In the
Value
column, change the value to
YES
. Now the status bar will be hidden as soon as you launch the application.
Make the circles appear in assorted colors. (Remember to make a copy of your project to work on challenges.)
Make it so every
HypnosisView
instance has a green crosshair in the middle. This crosshair should not have a shadow, but it should be drawn on top of the text. (Hint: you will need to use the functions
CGContextMoveToPoint
,
CGContextAddLineToPoint
,
CGContextSaveGState
,
CGContextRestoreGState
.)
Make another
UIView
subclass. This subclass should draw the Big Nerd Ranch logo. (For the logo, use the file that you used for the application icon of the
Quiz
application.)
The logo should be clipped to a circle that contains just the hat. The logo should have a black outline with a shadow underneath it. Also, the circle should have a slightly blue gradient coming from the top of the circle to the center of it. This view instance should be a subview of the
HypnosisView
. (Hint: you will need to use
UIImage
,
CGColorSpaceRef
,
CGGradientRef
,
CGContextClip
and a few other functions and types you have seen in previous challenges and this chapter.)
Figure 6.14 Finished gold challenge
View Controllers
In the
Quiz
application, you wrote all of your code in a
QuizViewController
class. An instance of this class was the controller for the
Quiz
application: It had pointers to the labels on the screen, and the buttons sent messages to it when they were tapped. It also had pointers to model objects that made up the data of the application.
The
Quiz
application had only one screen, so it was sufficient to have only one controller object for that application. However, most applications have more than one screen. Having one controller and many screens is messy because the controller has too many objects to manage. When designing iOS applications, it is best to have a controller for every screen.
A
UIViewController
instance specializes in controlling a single screen within an application. Every
UIViewController
has a
view
property that points to an instance of
UIView
or one of its subclasses, and this view is its screen. Typically, this
view
is a fullscreen view. More often than not, the
view
also has subviews. Thus, a view controller controls a view hierarchy. Because the
view
is the root of this hierarchy, when the
view
of a view controller is added as a subview of the window, the entire view hierarchy is added.
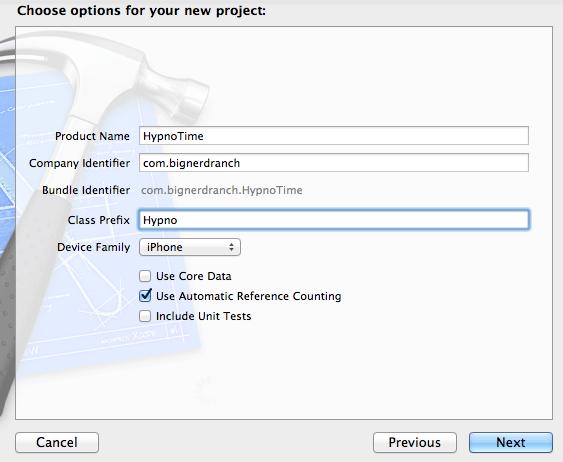
Create a new iOS project from the
Empty Application
template. Name this project
HypnoTime
and configure the project as shown in
Figure 7.1
.
Figure 7.1 Creating a new project
Unlike
Quiz
and
Whereami
, this application will have two subclasses of
UIViewController
– one called
HypnosisViewController
and another called
TimeViewController
. Each view controller will control a view, and users will be able to swap between the views depending on whether they want to be hypnotized or just want to see what time it is. The swapping will be handled by another class,
UITabBarController
. We’ll get to tab bar controllers in the second part of this chapter after we create the two view controllers.
You never create instances of
UIViewController
directly; instead, you create subclasses of
UIViewController
to instantiate. From the
File
menu, select
New File...
from the
New
menu item.
From the
iOS
section, select
Cocoa Touch
and then choose
Objective-C class
. Hit
Next
.
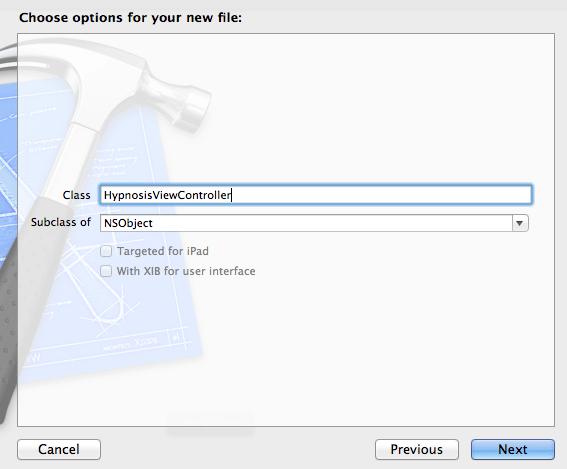
On the next pane, name this class
HypnosisViewController
, choose
NSObject
as the superclass, and hit
Next
(
Figure 7.2
). Save the files when prompted to do so.
Figure 7.2 Creating HypnosisViewController
Open
HypnosisViewController.h
and change the superclass to
UIViewController
.
@end
A view controller is responsible for creating its view hierarchy.
HypnosisViewController
’s view hierarchy will be made up of only one view, an instance of
HypnosisView
– the
UIView
subclass you created in
Chapter 6
. Locate
HypnosisView.h
and
HypnosisView.m
in
Finder
and drag them into
HypnoTime
’s project navigator.
In the sheet that appears, check the box to
Copy items into destination group’s folder
and click
Finish
(
Figure 7.3
). This will create a copy of the two files, add those files to
HypnoTime
’s directory on the filesystem, and then add them to the
HypnoTime
project.
Figure 7.3 Adding HypnosisView to HypnoTime

A
UIViewController
subclass creates its view hierarchy by overriding the method
loadView
. This method creates a view instance and sets it as the
view
of the view controller. In
HypnosisViewController.m
, override
loadView
, making sure to import the header file for
HypnosisView
at the top of this file.
#import "HypnosisView.h"
@implementation HypnosisViewController
- (void)loadView
{
// Create a view
CGRect frame = [[UIScreen mainScreen] bounds];
HypnosisView *v = [[HypnosisView alloc] initWithFrame:frame];
// Set it as *the* view of this view controller
[self setView:v];
}
@end
In
HypnoAppDelegate.m
, create an instance of
HypnosisViewController
and set it as the
rootViewController
of the
UIWindow
. Make sure to import
HypnosisViewController.h
at the top of this file.
#import "HypnosisViewController.h"
@implementation HypnoAppDelegate
@synthesize window = _window;
- (BOOL)application:(UIApplication *)application
didFinishLaunchingWithOptions:(NSDictionary *)launchOptions
{
self.window = [[UIWindow alloc] initWithFrame:[[UIScreen mainScreen] bounds]];
// Override point for customization after application launch.
HypnosisViewController *hvc = [[HypnosisViewController alloc] init];
[[self window] setRootViewController:hvc];
self.window.backgroundColor = [UIColor whiteColor];
[self.window makeKeyAndVisible];
return YES;
}
Build and run the application. You will see an instance of
HypnosisView
grace the screen; this is
HypnosisViewController
’s
view
.
Figure 7.4 Application diagram
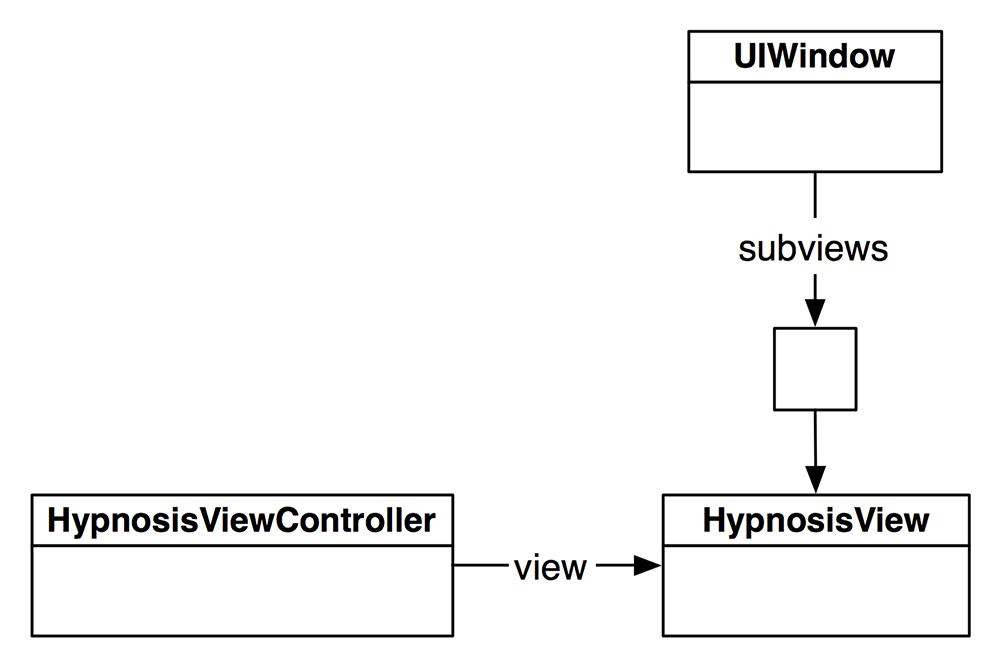
Setting a view controller as the
rootViewController
of a window adds that view controller’s
view
as a subview of the window (
Figure 7.4
). It also automatically resizes the
view
to be the same size as the window. Given what you learned in
Chapter 6
, you could write
setRootViewController:
yourself:
{
// Get the view of the root view controller
UIView *rootView = [vc view];
// Make a frame that fits the window's bounds
CGRect viewFrame = [self bounds];
[rootView setFrame:viewFrame];
// Insert this view as window's subview
[self addSubview:rootView];
}
(This method does are a few more things, but this is what we are interested in right now).
Now let’s turn to
HypnoTime
’s second
UIViewController
subclass. Create a new
NSObject
subclass and name it
TimeViewController
.
In
TimeViewController.h
, change the superclass to
UIViewController
.
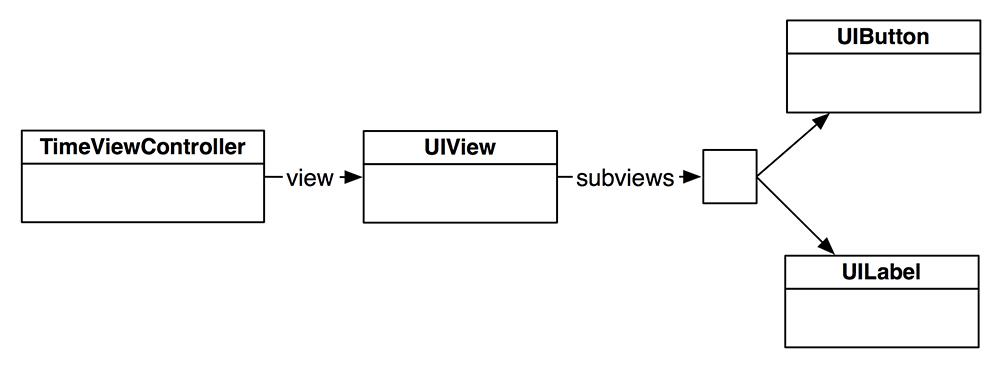
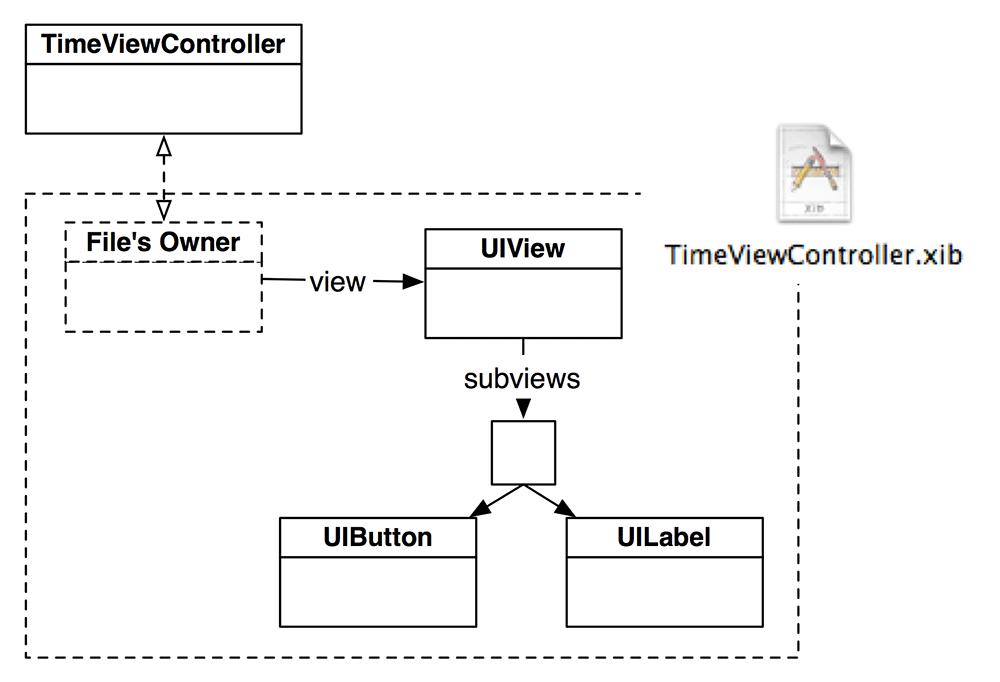
A
TimeViewController
’s screen will show a
UILabel
and a
UIButton
that updates that label to the current time. Thus, the
TimeViewController
’s
view
will be a blank, full-screen
UIView
that has two subviews – the button and label (
Figure 7.5
).
Figure 7.5 TimeViewController’s view hierarchy
When creating
HypnosisViewController
’s view hierarchy, you did so programmatically: in
loadView
, you instantiated
HypnosisView
and set it as the
view
. This view did not have any subviews.
TimeViewController
’s
view
will have two subviews. When a view controller’s
view
has subviews, it is best to create and load its view hierarchy in a XIB file instead of overriding
loadView
. Creating a view programmatically or from a XIB doesn’t make any difference once the application is running; a XIB file is just easier when you need to lay out multiple view objects.
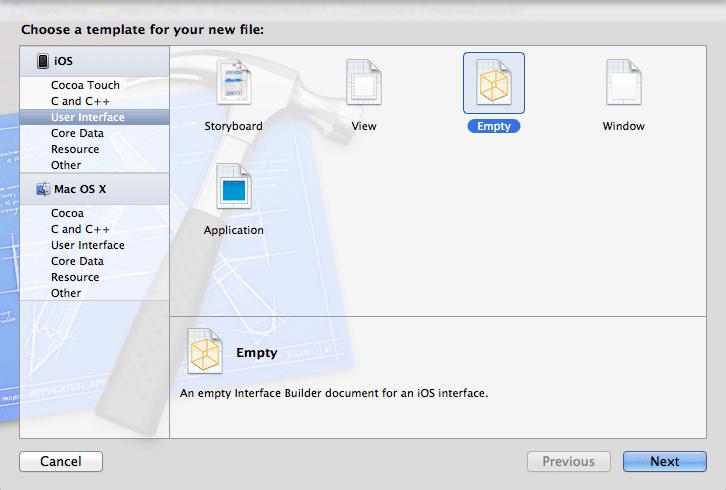
Create a new XIB file by selecting
File
+
New
+
New File...
. From the
iOS
section, select
User Interface
and then choose the
Empty XIB
template (
Figure 7.6
). On the next pane, select
iPhone
from the pop-up menu.
Figure 7.6 Creating an empty XIB
Name this file
TimeViewController.xib
and save it. Then select it in the project navigator to show it the editor area. (It is important to name files as we tell you. Sometimes, people like to name files differently as they are working through this book. This is not a good idea; many of the names are intentional because of assumptions built into the iOS SDK. We’ll talk more about these assumptions later, and you can experiment then.)
In previous chapters, you have been editing XIB files and seeing interfaces in your application without much explanation of how they got there. Now it’s time to learn how XIB files work.
XIB files contains objects: dragging an object onto the canvas saves that object into the XIB file. When the XIB file is loaded, those objects are loaded back into memory.
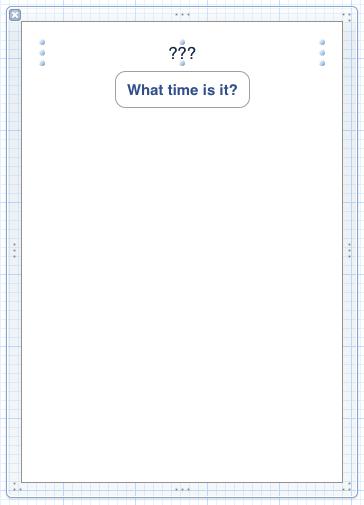
In
TimeViewController.xib
, drag a
UIView
onto the canvas and then drag a
UIButton
and a
UILabel
onto the view. Give the button a title that reads
What time is it?
. Give the label text that reads
???
and center it (
Figure 7.7
).
Figure 7.7 TimeViewController’s XIB file
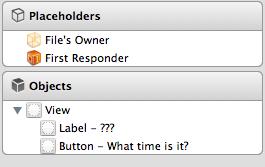
Notice that these objects appear under the
Objects
section in the outline view (
Figure 7.8
). Objects that appear in this section are the objects that are saved in this XIB file. We have a special term for this type of saving called archiving. Thus, the objects in this section are known as
archived objects
.
Figure 7.8 Objects in TimeViewController.xib
There is another type of object in a XIB file:
placeholder objects
. There are two objects in this XIB file in the
Placeholder
section:
File's Owner
and
First Responder
. You can safely ignore the
First Responder
, but the
File's Owner
is very important.
To understand the
File's Owner
, you must first understand the need for it. When a view controller loads its view, it sets its
view
property so that it knows what its view is and can put it on the screen. For the
HypnosisViewController
, we did this programmatically, so it was done in
loadView
and all set at compile time.
Not so with
TimeViewController
. When an instance of
TimeViewController
needs to load its
view
, it will load the XIB file. When this happens, all of the archived objects in the XIB will be created, and
TimeViewController
can’t know which of those objects is its
view
.
Here’s where the
File's Owner
comes in: the
File's Owner
is a hole in the XIB file. You make connections between objects in the XIB and
File's Owner
when configuring the interface. When the XIB file is loaded, the
TimeViewController
drops itself in the
File's Owner
hole, and all the connections between the
File's Owner
and the archived objects will be made to the
TimeViewController
.
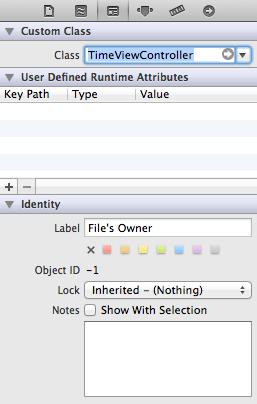
To be able to set the connections that a
TimeViewController
needs, we have to tell
Xcode
that
TimeViewController
is the class of the object that will drop itself into the hole. Select the
File's Owner
object on the outline view and click the icon in the inspector area to show the identity inspector. Change the
Class
to
TimeViewController
(
Figure 7.9
).
Figure 7.9 Identity inspector for File's Owner
Control-click on the
File's Owner
object to bring up the panel of available connections. Now that we’ve specified the class as a
UIViewController
subclass, you are offered the
view
outlet. Connect this outlet to the
UIView
object in the XIB file. Now when the
TimeViewController
loads the XIB file, it will have the appropriate connections and will be able to load its
view
.
Figure 7.10 File's Owner
Thus, an outlet connection in a XIB file is equivalent to sending the object with the outlet a setter message based on the name of the outlet. For example, setting the
view
outlet of an object will send the message
setView:
to that object when the XIB file is loaded. The argument to this method is the object on other end of the connection.
Let’s test this out. Open
HypnoAppDelegate.m
, create an instance of
TimeViewController
, and set it as the
rootViewController
of the window. Make sure to import
TimeViewController.h
.
#import "HypnosisViewController.h"
#import "TimeViewController.h"
@implementation HypnoAppDelegate
@synthesize window = _window;
- (BOOL)application:(UIApplication *)application
didFinishLaunchingWithOptions:(NSDictionary *)launchOptions
{
self.window = [[UIWindow alloc] initWithFrame:[[UIScreen mainScreen] bounds]];
// Override point for customization after application launch.
// Now that we aren't using hvc, this line will generate a warning - ignore it
HypnosisViewController *hvc = [[HypnosisViewController alloc] init];
TimeViewController *tvc = [[TimeViewController alloc] init];
[[self window] setRootViewController:tvc];
self.window.backgroundColor = [UIColor whiteColor];
[self.window makeKeyAndVisible];
return YES;
}
Build and run the application. As you might expect, you see the
TimeViewController
’s
view
that you created in
TimeViewController.xib
. Now we need to connect up the subviews.
Since
TimeViewController
is controlling this view hierarchy, it is responsible for updating the label when the button is tapped. Thus,
TimeViewController
must be the target of the
UIButton
and have a pointer to the
UILabel
. In
TimeViewController.h
, declare an outlet and a method.
{
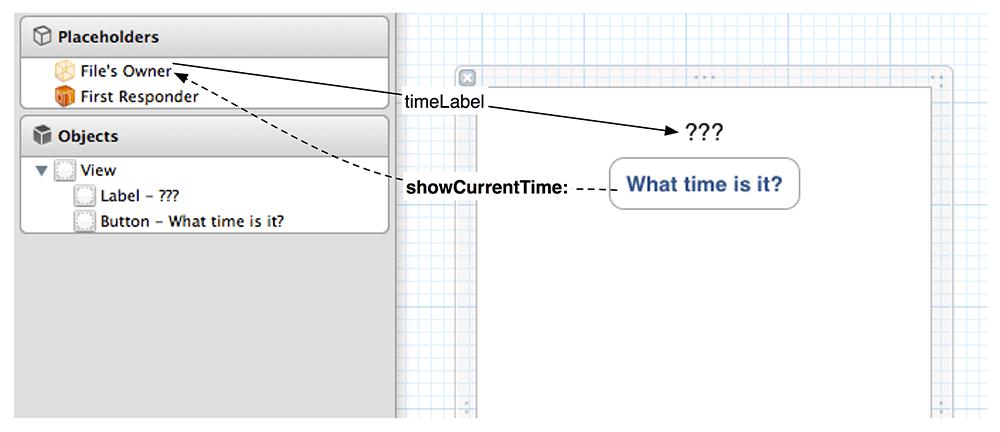
IBOutlet UILabel *timeLabel;
}
- (IBAction)showCurrentTime:(id)sender;
@end
Open
TimeViewController.xib
and connect the
timeLabel
outlet of
File's Owner
(which we now know is the
TimeViewController
) to the
UILabel
. Then connect the
UIButton
to the
File's Owner
and select
showCurrentTime:
. These connections are shown in
Figure 7.11
.
Figure 7.11 TimeViewController XIB connections