iOS Programming: The Big Nerd Ranch Guide, 3/e (Big Nerd Ranch Guides) (25 page)
Read iOS Programming: The Big Nerd Ranch Guide, 3/e (Big Nerd Ranch Guides) Online
Authors: Aaron Hillegass,Joe Conway
Tags: #COM051370, #Big Nerd Ranch Guides, #iPhone / iPad Programming

To finish your
Whereami
application, you just need to add two final methods:
findLocation
, which is sent in
textFieldShouldReturn:
, and
foundLocation:
, which will be sent in
locationManager:didUpdateToLocation:fromLocation:
. In
WhereamiViewController.h
, declare these two methods.
{
CLLocationManager *locationManager;
IBOutlet MKMapView *worldView;
IBOutlet UIActivityIndicatorView *activityIndicator;
IBOutlet UITextField *locationTitleField;
}
- (void)findLocation;
- (void)foundLocation:(CLLocation *)loc;
@end
The
findLocation
method will tell the
locationManager
to start looking for the current location. It will also update the user interface so that the user can’t re-enter text into the text field and will start the activity indicator spinning. The
foundLocation:
method will create an instance of
BNRMapPoint
and add it to the
worldView
. It will also handle the map’s zoom and reset the states of the UI elements and the
locationManager
.
In
WhereamiViewController.m
, import
BNRMapPoint.h
and implement the two methods.
#import "BNRMapPoint.h"
@implementation WhereamiViewController
- (void)findLocation
{
[locationManager startUpdatingLocation];
[activityIndicator startAnimating];
[locationTitleField setHidden:YES];
}
- (void)foundLocation:(CLLocation *)loc
{
CLLocationCoordinate2D coord = [loc coordinate];
// Create an instance of BNRMapPoint with the current data
BNRMapPoint *mp = [[BNRMapPoint alloc] initWithCoordinate:coord
title:[locationTitleField text]];
// Add it to the map view
[worldView addAnnotation:mp];
// Zoom the region to this location
MKCoordinateRegion region = MKCoordinateRegionMakeWithDistance(coord, 250, 250);
[worldView setRegion:region animated:YES];
// Reset the UI
[locationTitleField setText:@""];
[activityIndicator stopAnimating];
[locationTitleField setHidden:NO];
[locationManager stopUpdatingLocation];
}
Note that when importing files, you put quotation marks around header files you create and angled brackets around header files from frameworks. Angled brackets tell the compiler,
“
Only look in the system libraries for this file.
”
Quotation marks say,
“
Look in the directory for this project first, and if you don’t find something, then look in the system libraries.
”
Finally, send the message
foundLocation:
when a new location is found by the
CLLocationManager
. Update the delegate method
locationManager:didUpdateToLocation:fromLocation:
in
WhereamiViewController.m
:
didUpdateToLocation:(CLLocation *)newLocation
fromLocation:(CLLocation *)oldLocation
{
NSLog(@"%@", newLocation);
// How many seconds ago was this new location created?
NSTimeInterval t = [[newLocation timestamp] timeIntervalSinceNow];
// CLLocationManagers will return the last found location of the
// device first, you don't want that data in this case.
// If this location was made more than 3 minutes ago, ignore it.
if (t < -180) {
// This is cached data, you don't want it, keep looking
return;
}
[self foundLocation:newLocation];
}
Build and run the application. Simulate the location, and then enter a title into the text field. An annotation will appear on the map at your current location. Tap the pin to show the title.
Have the map display satellite imagery instead of a street map. (Hint:
MKMapView
has a
mapType
property.)
Add a
UISegmentedControl
to the interface. It should have three items – one for each
mapType
of
MKMapView
. Changing the segmented control should change the map type.
Using the
NSDate
and
NSDateFormatter
classes, have your tagged annotations show the dates they were tagged.
Subclassing UIView and UIScrollView
In previous chapters, you’ve created several views: a
UIButton
, a
UILabel
, etc. But what exactly is a view?
- A view is an instance of
UIView
or one of its subclasses.
- A view knows how to draw itself on the application’s window, an instance of
UIWindow
.
- A view exists within a hierarchy of views. The root of this hierarchy is the application’s window.
- A view handles events, like touches.
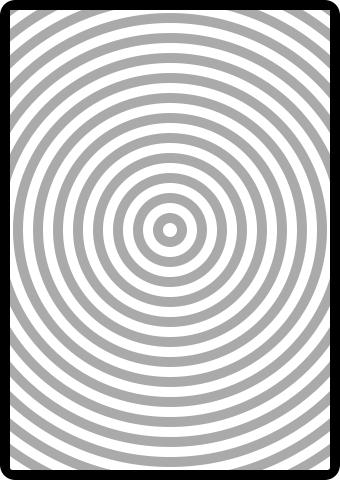
In this chapter, you are going to create your own
UIView
subclass that fills the screen with concentric circles, as shown in
Figure 6.1
. You will also learn how to draw text and enable scrolling and zooming.
Figure 6.1 View that draws concentric circles

In
Xcode
, select
File
→
New
→
New Project...
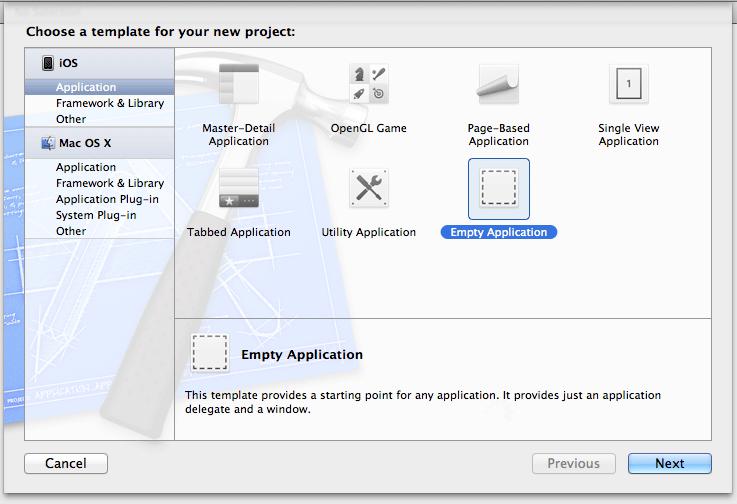
. From the
iOS
section, select
Application
and choose the
Empty Application
template for this project (
Figure 6.2
).
Figure 6.2 Empty Application template

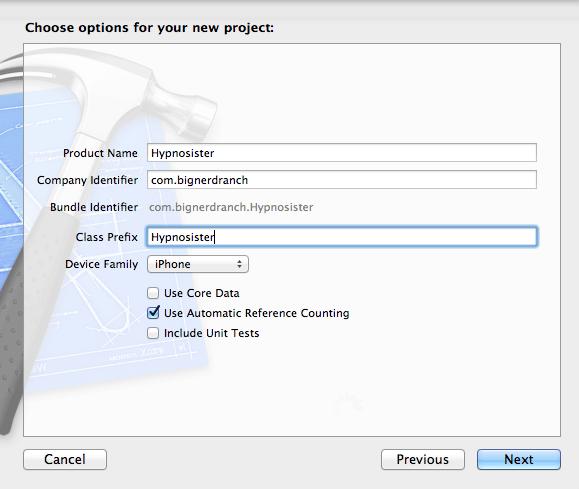
After clicking
Next
, enter
Hypnosister
for the product name and class prefix. Make the device family
iPhone
and make sure the
Use Automatic Reference Counting
box is checked (
Figure 6.3
).
Figure 6.3 Configuring Hypnosister

Views make up the user interface of an application. Each view maintains an image that represents it. For example, a
UIButton
’s image is a rounded rectangle with a title in the center. A
UILabel
’s image is just text. When something about a view changes, like a
UILabel
’s
text
property or a
UIButton
’s
title
, the view’s image is redrawn so that these changes become visible on screen.
Another subclass of
UIView
is
UIWindow
. Every application has exactly one instance of
UIWindow
that serves as the container for all the views in the application. The window is created when the application launches. Open
HypnosisterAppDelegate.m
and find the
application:didFinishLaunchingWithOptions:
method.
didFinishLaunchingWithOptions:(NSDictionary *)launchOptions
{
self.window = [[UIWindow alloc] initWithFrame:[[UIScreen mainScreen] bounds]];
// Override point for customization after application launch.
self.window.backgroundColor = [UIColor whiteColor];
[self.window makeKeyAndVisible];
return YES;
}
In
application:didFinishLaunchingWithOptions:
, the template added code that creates a
UIWindow
object and sends it the message
makeKeyAndVisible
. This puts the window on the screen, and once a window is on the screen, you can add other views to it.
(Note that every iOS application template adds this code. It is not specific to the
Empty Application
template. You can see the same code in your
QuizAppDelegate.m
and
WhereamiAppDelegate.m
files, which were created by the
Single View Application
template.)
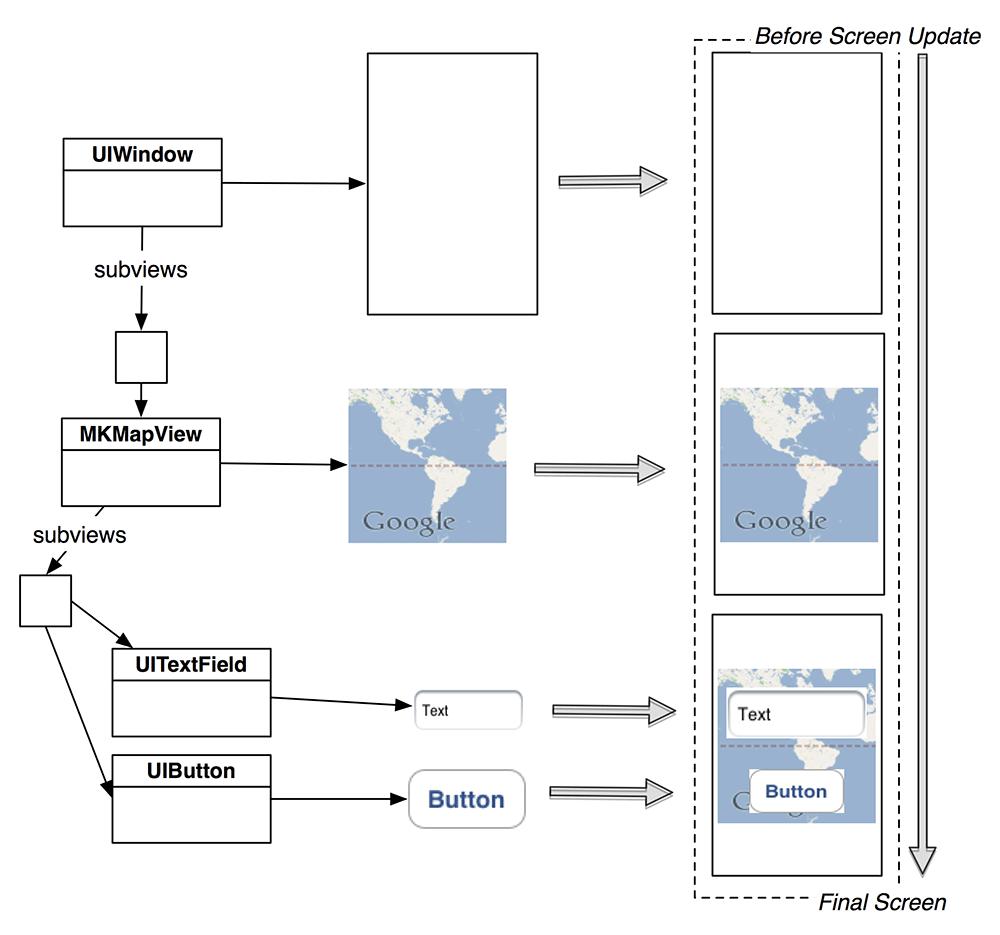
When a view is added to a window, it is said to be a
subview
of the window. Views that are subviews of the window can also have subviews, and the result is a hierarchy of view objects. A view will appear on the screen if and only if its been added to this hierarchy – either directly as a subview of the window or as a subview of another view that has been added to the window. Thus, the window is the root of the view hierarchy.
When the screen is redrawn (which happens after an event is processed), the window’s image is drawn to the screen. Then, all of the subviews of the window draw their images to the screen, then the subviews of the subviews draw their images, and so on (
Figure 6.4
).
Figure 6.4 Drawing a view hierarchy to the screen

Creating a user interface boils down to this: create each view’s image and add each view to the view hierarchy. Classes like
UIButton
,
MKMapView
and
UITextField
already know what their images look like. Sometimes, however, you want to create views that draw something not supplied by Apple. In that case, you need to create a custom view object and write the code to create its image.
