Read iOS Programming: The Big Nerd Ranch Guide, 3/e (Big Nerd Ranch Guides) Online
Authors: Aaron Hillegass,Joe Conway
Tags: #COM051370, #Big Nerd Ranch Guides, #iPhone / iPad Programming
iOS Programming: The Big Nerd Ranch Guide, 3/e (Big Nerd Ranch Guides) (73 page)

Every target includes
build settings
that describe how it should be built. Every project also has build settings that serve as defaults for all the targets within the project. Let’s take a look at the project build settings for
TouchTracker
. Select the project from the project navigator and then select the
TouchTracker
project in the editor area.
Click the
Build Settings
tab at the top of the editor area. These are the project-level build settings – the default values that targets inherit. In the top-right corner of the editor area is a search box that you can use to search for a specific setting. Start typing
iOS Deployment Target
in the box, and the list will adjust to show this setting. (The deployment target specifies the lowest version of the OS that can run the application.)
Next to the search box are two sets of options:
Basic
or
All
and
Combined
and
Levels
. The first pair determines which settings are shown. To see the difference between the second pair, let’s look at the target’s build settings.
In the left table of the editor area, select the
TouchTracker
target. Then select the
Build Settings
tab. These are the build settings for this specific target. Find the
iOS Deployment Target
setting again and click on
Levels
.
Figure 21.25 Build Settings - Levels
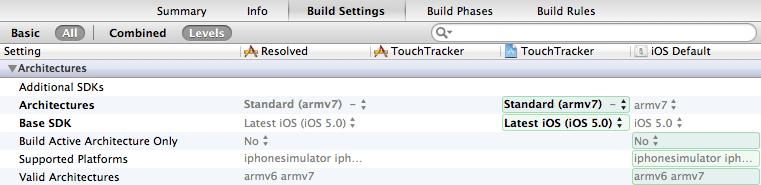
When viewing the build settings with this option, you can see each setting’s value at the three different levels: OS, project, and target. (
Figure 21.25
). The far right column shows the
iOS Default
settings; these serve as the project’s defaults, which it can override. The next column to the left shows the project’s settings, and the one after that shows the currently selected target’s settings. The
Resolved
column shows which setting will actually be used; it is always be equal to the left-most specified value. You can click in each column to set the value for that level. When you’re done looking around, change the setting back to
Combined
.
Each target and project has multiple
build configurations
. A build configuration is a set of build settings. When you create a project, there are two build configurations: debug and release. The build settings for the debug configuration make it easier to debug your application, while the release settings turn on optimizations to speed up execution.
Let’s take a look at the build settings and configurations for
TouchTracker
. Select the project from the project navigator and the
TouchTracker
project in the editor area. Then, select
Info
from the tabs on top of the editor area (
Figure 21.26
).
Figure 21.26 Build configurations list
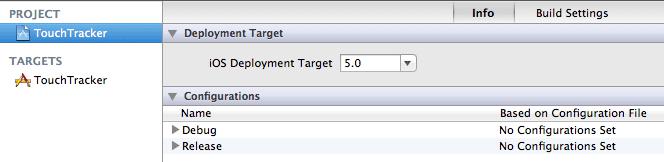
The
Configurations
section shows you the available build configurations in the project and targets. You can add and remove build configurations with the buttons at the bottom of this section.
When performing a scheme action, the scheme will use one of these configurations when building its targets. You can specify the build configuration that the scheme uses in the scheme editor in the option for
Build Configuration
in the
Info
pane.
Enough talk – time to do something useful. Let’s change the value of the target build setting
Preprocessor Macros
. Preprocessor macros allow you to compile code conditionally. They are either defined or not defined at the start of a build. If you wrap a block of code in a preprocessor directive, it will only be compiled if that macro has been defined. The
Preprocessor Macros
setting lists preprocessor macros that are defined when a certain build configuration is used by a scheme to build a target.
Select the
TouchTracker
target, and in its
Build Settings
pane, search for the
Preprocessor Macros
build setting. Double-click on the value column for the
Debug
configuration under
Preprocessor Macros
. In the table that appears, add a new item:
VIEW_DEBUG
, as shown in
Figure 21.27
.
Figure 21.27 Changing a build setting
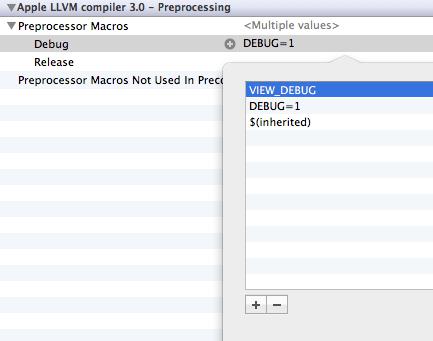
Adding this value to this setting says,
“
When you are building the
TouchTracker
target with the debug configuration, a preprocessor macro
VIEW_DEBUG
is defined.
”
Let’s add some debugging code to
TouchTracker
that will only be compiled when the target is built with the debug configuration.
UIView
has a private method
recursiveDescription
that prints out the entire view hierarchy of an application. However, you cannot call this method in an application that you deploy to the App Store, so you will only allow it to be called if
VIEW_DEBUG
is defined.
In
AppDelegate.m
, add the following code to
application:didFinishLaunchingWithOptions:
.
#ifdef VIEW_DEBUG
NSLog(@"%@", [[self window] performSelector:@selector(recursiveDescription)]);
#endif
return YES;
}
This code will send the message
recursiveDescription
to the window. (Notice the use of
performSelector:
.
recursiveDescription
is a private method, so we have to dispatch it in this way.)
recursiveDescription
will print a view’s description, then all of its subviews, and its subviews’ subviews and so on. You can leave this code in for all builds. Because the preprocessor macro will not be defined for a release build, the code will not be compiled when you build for the App Store.
Now let’s test out this code. Hold down the Option key and run the application. When the scheme editor drops down, make sure that the debug configuration is selected. Check out the console and you will see the view hierarchy of your application, starting at the window. (Don’t worry about the warning that this line of code generates.)
Core Animation Layer
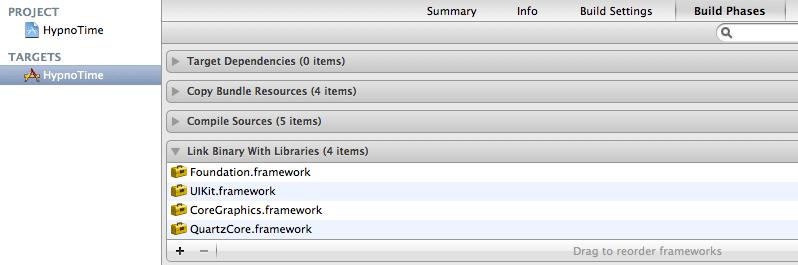
Animation is a hallmark of the iOS interface. When used properly, it gives the user visual cues about the application’s workflow. The classes and functions needed to animate an application’s interface are in the Core Animation API. To use any part of Core Animation, you need to add the QuartzCore framework to your project.
Open your
HypnoTime
project and select the project from the project navigator. Then, select the
HypnoTime
target and the
Build Phases
pane. Add
QuartzCore.framework
to
Link Binary With Libraries
, as shown in
Figure 22.1
.
Figure 22.1 QuartzCore.framework
There are two classes that make Core Animation work:
CALayer
and
CAAnimation
.
At its core, an instance of
CALayer
is a buffer containing a bitmap. When you draw a layer (or a stack of layers), the rendering is hardware-accelerated. This makes drawing a layer to the screen incredibly fast. Like views, layers are arranged hierarchically – each layer can have sublayers.
A
CAAnimation
object causes a change over time. Typically, it changes one property (like
opacity
) of a layer.
In this chapter, we will focus on
CALayer
, and in the next chapter, we’ll focus on
CAAnimation
.
In
Chapter 6
, you learned that every view has an image and that it is a view’s image that gets drawn to the screen. This image is an instance of
CALayer
.
When you instantiate a view, it creates a layer, and when the screen is redrawn, the layers of each view in the window’s hierarchy are drawn (including the window’s layer). We call layers created by views
implicit layers
. Because every view has a layer, there is a matching layer hierarchy that mimics the view hierarchy (
Figure 22.2
).
After the views draw on their layers, the layers are copied to the screen. When we talk about copying a bunch of layers to the screen in a particular order and respecting each pixel’s opacity, we use the word
composite
. Thus, the full description is
“
Each view renders to its layer, and then all the layers are composited to the screen.
”
Figure 22.2 View and corresponding layer hierarchy
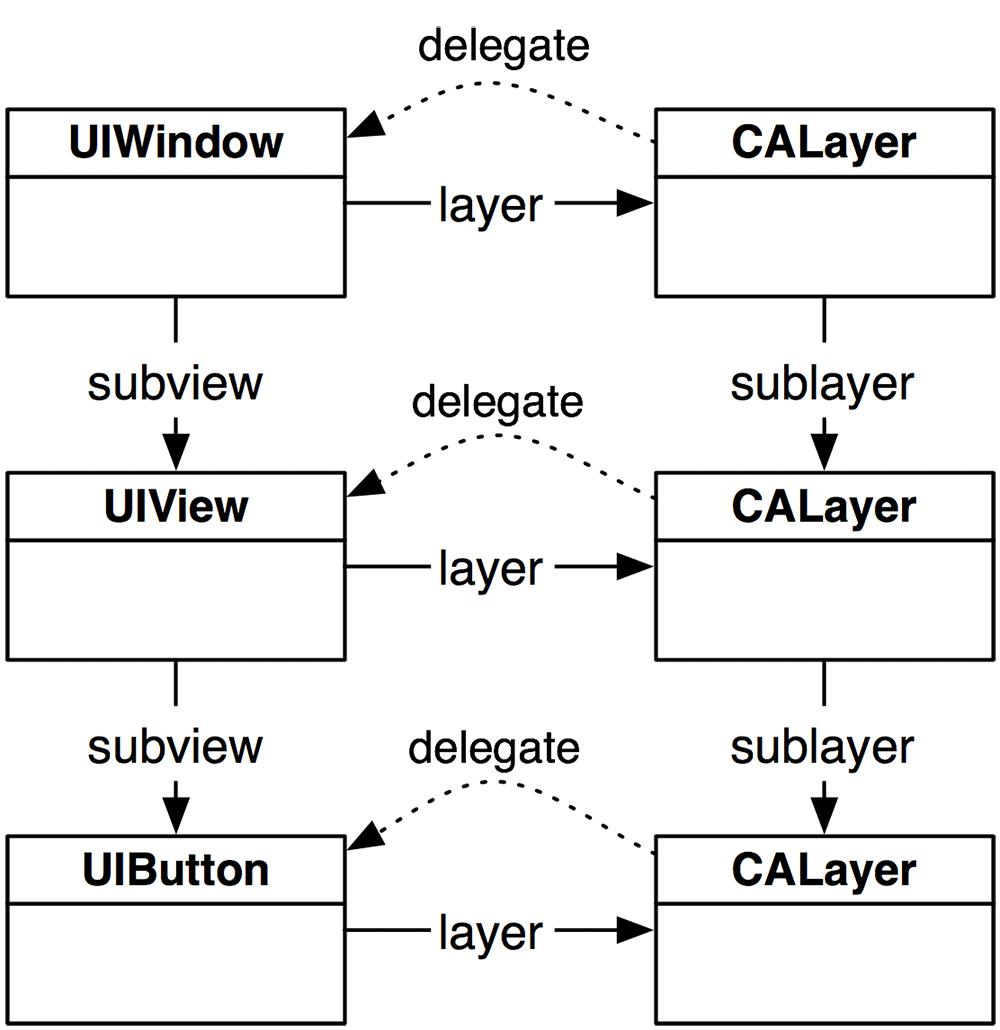
Notice in
Figure 22.2
that each view has a
layer
and each view is its layer’s delegate. We’ll come back to the delegate relationship later in the chapter.
So what’s the reason behind having views
and
layers? Remember that
UIView
is a subclass of
UIResponder
. A view is really an abstraction of a visible object that can be interacted with on the screen, wrapped into a tidy class. A layer, on the other hand, is all about the drawing.
