iOS Programming: The Big Nerd Ranch Guide, 3/e (Big Nerd Ranch Guides) (74 page)
Read iOS Programming: The Big Nerd Ranch Guide, 3/e (Big Nerd Ranch Guides) Online
Authors: Aaron Hillegass,Joe Conway
Tags: #COM051370, #Big Nerd Ranch Guides, #iPhone / iPad Programming

Not all layers are implicit layers. You can create a layer by sending
alloc
to the class
CALayer
. Layers created this way are called
explicit layers
. In this section, you’re going to create a layer and then make it a sublayer of the implicit layer of your
HypnosisView
(
Figure 22.3
).
Figure 22.3 Object diagram

In
HypnosisView.h
, import the QuartzCore framework and add an instance variable to hold on to the layer object you are about to create:
#import
{
CALayer *boxLayer;
}
@property (nonatomic, strong) UIColor *circleColor;
@end
The designated initializer for a
CALayer
is simply
init
. After you instantiate a layer, you set its size, position (relative to its superlayer), and contents. In
HypnosisView.m
, change the
initWithFrame:
method to create a new layer and add it as a sublayer to
HypnosisView
’s layer.
{
self = [super initWithFrame:r];
if (self) {
[self setBackgroundColor:[UIColor clearColor]];
[self setCircleColor:[UIColor lightGrayColor]];
// Create the new layer object
boxLayer = [[CALayer alloc] init];
// Give it a size
[boxLayer setBounds:CGRectMake(0.0, 0.0, 85.0, 85.0)];
// Give it a location
[boxLayer setPosition:CGPointMake(160.0, 100.0)];
// Make half-transparent red the background color for the layer
UIColor *reddish = [UIColor colorWithRed:1.0 green:0.0 blue:0.0 alpha:0.5];
// Get a CGColor object with the same color values
CGColorRef cgReddish = [reddish CGColor];
[boxLayer setBackgroundColor:cgReddish];
// Make it a sublayer of the view's layer
[[self layer] addSublayer:boxLayer];
}
return self;
}
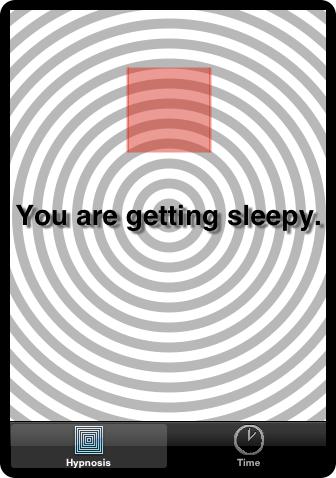
Build and run the application. You will see a semi-transparent red block appear on the view, as shown in
Figure 22.4
.
Figure 22.4 Red layer
Notice that layers interpret their size and position differently than views do. With a
UIView
, we typically define the
frame
of the view to establish its size and position. The origin of the frame rectangle is the upper-left corner of the view, and the size stretches right and down from the origin.
For a
CALayer
, instead of defining a frame, you set the
bounds
and
position
properties of the layer. The default setting for
position
is the
center
of the layer in its superlayer. (The
anchorPoint
property determines where the position lies inside the layer’s bounds, and its default value is
(0.5, 0.5)
, otherwise known as the center.) Therefore, if you change the size of the layer but leave the position constant, the layer will remain centered on the same point.
Even though a layer doesn’t have a
frame
property, you can still get and set its
“
frame
”
by sending it the messages
frame
and
setFrame:
. When a layer is sent the message
frame
, it computes a rectangle from its
position
and
bounds
properties. Similarly, when sending a layer the message
setFrame:
, it does some math and then sets the
bounds
and
position
properties accordingly.
However, it is better to think of layers in terms of their
position
and
bounds
properties. The mental math needed to animate a layer is much simpler if you stick to setting the
bounds
and
position
properties directly.
A layer contains a bitmap called its
contents
, which can be set programmatically or with an image. To set the contents programmatically, you either subclass
CALayer
or assign a delegate to an instance of
CALayer
. The delegate then implements drawing routines. (This is how implicit layers work; the view is its layer’s delegate.)
We will discuss drawing to a layer programmatically at the end of this chapter. For now, you’re going to set the contents of the layer using an image file.
In
HypnosisView.m
, add the following code to the
initWithFrame:
method:
// Create a UIImage
UIImage *layerImage = [UIImage imageNamed:@"Hypno.png"];
// Get the underlying CGImage
CGImageRef image = [layerImage CGImage];
// Put the CGImage on the layer
[boxLayer setContents:(__bridge id)image];
// Inset the image a bit on each side
[boxLayer setContentsRect:CGRectMake(-0.1, -0.1, 1.2, 1.2)];
// Let the image resize (without changing the aspect ratio)
// to fill the contentRect
[boxLayer setContentsGravity:kCAGravityResizeAspect];
[[self layer] addSublayer:boxLayer];
In this code, we create an image and then get the underlying
CGImage
to use with Core Graphics drawing. Then we set the image as the layer’s contents and make adjustments for how the contents appear within the layer.
Notice the use of
CGImageRef
and
CGColorRef
in this method. Why doesn’t Core Animation use
UIImage
and
UIColor
?
The QuartzCore framework (which supplies the classes
CALayer
and
CAAnimation
) and Core Graphics framework (which supplies
CGImageRef
) exist on both iOS and on the Mac. UIKit (where we get
UIImage
and anything else prefixed with
UI
) only exists on iOS. To maintain its portability, QuartzCore must use
CGImageRef
instead of
UIImage
. Fortunately, UIKit objects have methods to easily access their Core Graphics counterparts, like
UIImage
’s
CGImage
method you used in the previous code.
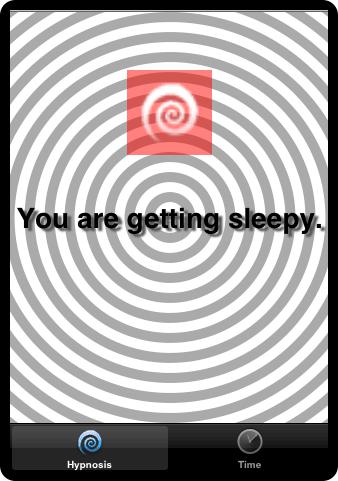
Build and run the application. Now your layer has an image for its contents, as shown in
Figure 22.5
.
Figure 22.5 Layer with image
Because layers exist in a hierarchy, they can have sublayers, and each layer has a pointer back to its parent layer called
superlayer
. When a layer is composited to the screen, it is copied to the screen, and then each sublayer is composited atop it. Therefore, a layer always draws on top of its
superlayer
.
In a view hierarchy, sibling views (views with the same parent) typically do not have overlapping bounds. For instance, imagine a view with two subviews that are buttons. What would be the point of them overlapping and obscuring each other? It would confuse and frustrate the user trying to tap one or the other.
The layer hierarchy, however, is a different story. Siblings are far more likely to overlap because layers are about visual effects and drawing, not user interaction. Which sibling is composited over the other? Each layer has a property called
zPosition
. If two layers are siblings and they overlap, then the layer with the higher
zPosition
is composited on top of the layer with the lower
zPosition
. (A sublayer
always
draws on top of its superlayer, regardless of
zPosition
.)
A layer’s
zPosition
defaults to
0
and can be set to a negative value.
[overLayer setZPosition:5];
[parentLayer addSublayer:underLayer];
[parentLayer addSublayer:overLayer];
// overLayer is composited on top of underLayer!
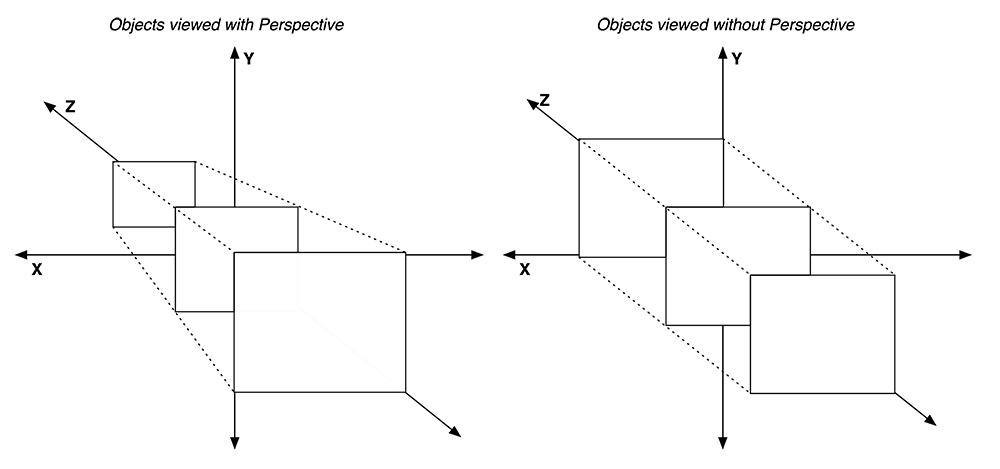
When the Z-axis is discussed, some developers imagine that perspective is applied, and they expect a layer to appear larger as its
zPosition
increases. However, Core Animation layers are presented orthographically; they do not appear as different sizes based on their
zPosition
s.
Figure 22.6 Perspective vs. orthographic