Read iOS Programming: The Big Nerd Ranch Guide, 3/e (Big Nerd Ranch Guides) Online
Authors: Aaron Hillegass,Joe Conway
Tags: #COM051370, #Big Nerd Ranch Guides, #iPhone / iPad Programming
iOS Programming: The Big Nerd Ranch Guide, 3/e (Big Nerd Ranch Guides) (43 page)

The
UINavigationBar
isn’t very interesting right now. A
UINavigationBar
should display a descriptive title for the
UIViewController
that is currently on top of the
UINavigationController
’s stack.
Every
UIViewController
has a
navigationItem
property of type
UINavigationItem
. However, unlike
UINavigationBar
,
UINavigationItem
is not a subclass of
UIView
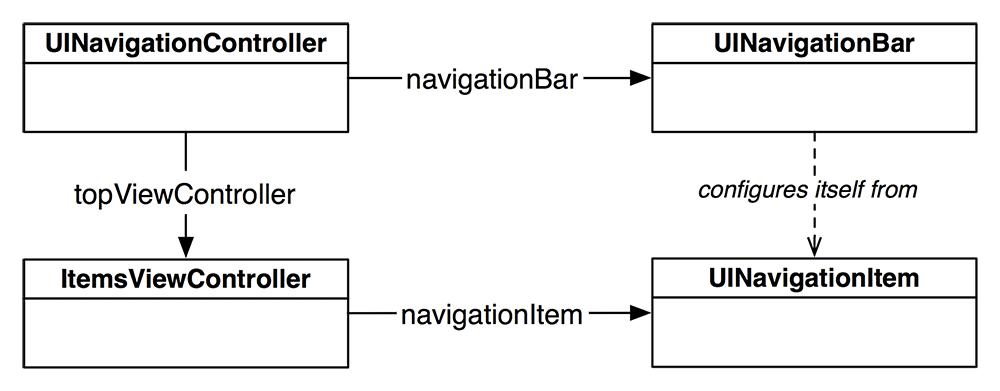
, so it cannot appear on the screen. Instead, the navigation item supplies the navigation bar with the content it needs to draw. When a
UIViewController
comes to the top of a
UINavigationController
’s stack, the
UINavigationBar
uses the
UIViewController
’s
navigationItem
to configure itself, as shown in
Figure 11.13
.
Figure 11.13 UINavigationItem
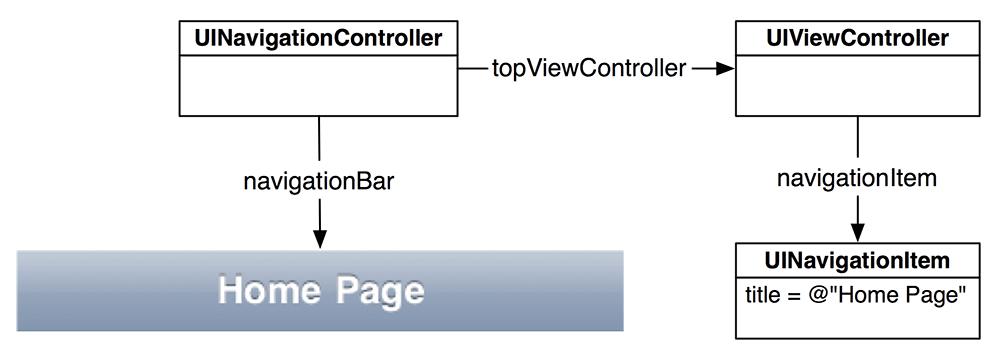
By default, a
UINavigationItem
is empty. At the most basic level, a
UINavigationItem
has a simple
title
string. When a
UIViewController
is moved to the top of the navigation stack and its
navigationItem
has a valid string for its
title
property, the navigation bar will display that string (
Figure 11.14
).
Figure 11.14 UINavigationItem with title
In
ItemsViewController.m
, modify
init
to set the
navigationItem
’s
title
to read
Homepwner
.
{
self = [super initWithStyle:UITableViewStyleGrouped];
if (self) {
UINavigationItem *n = [self navigationItem];
[n setTitle:@"Homepwner"];
}
return self;
}
Build and run the application. Notice the string
Homepwner
on the navigation bar. Create and tap on a row and notice that the navigation bar no longer has a title. We need to give the
DetailViewController
a title, too. It would be nice to have the
DetailViewController
’s navigation item title be the name of the
BNRItem
it is displaying. Obviously, you cannot do this in
init
because you don’t yet know what its
item
will be.
Instead, the
DetailViewController
will set its title when it sets its
item
property. In
DetailViewController.m
, implement
setItem:
, replacing the synthesized setter method for
item
.
{
item = i;
[[self navigationItem] setTitle:[item itemName]];
}
Build and run the application. Create and tap a row, and you’ll see that the title of the navigation bar is the name of the
BNRItem
you selected.
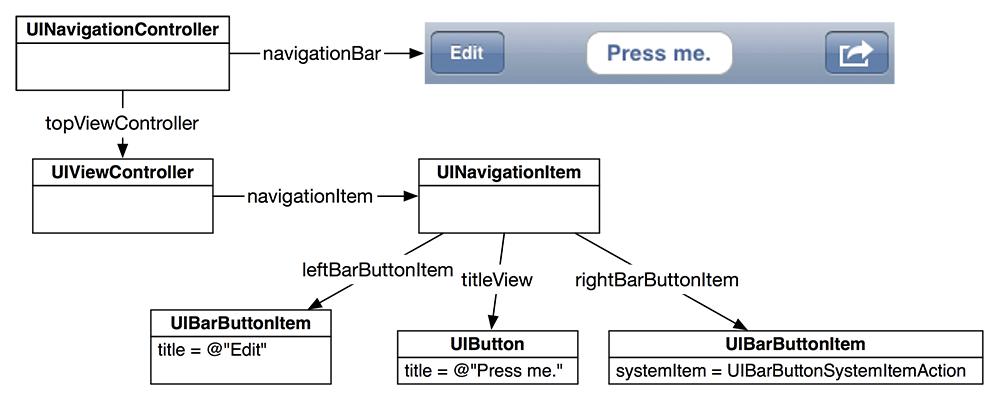
A navigation item can hold more than just a title string, as shown in
Figure 11.15
. There are three customizable areas for each
UINavigationItem
: a
leftBarButtonItem
, a
rightBarButtonItem
, and a
titleView
. The left and right bar button items are pointers to instances of
UIBarButtonItem
, which contains the information for a button that can only be displayed on a
UINavigationBar
or a
UIToolbar
.
Figure 11.15 UINavigationItem with everything
Like
UINavigationItem
,
UIBarButtonItem
is not a subclass of
UIView
but supplies the content that a
UINavigationBar
needs to draw. Consider the
UINavigationItem
and its
UIBarButtonItem
s to be containers for strings, images, and other content. A
UINavigationBar
knows how to look in those containers and draw the content it finds.
The third customizable area of a
UINavigationItem
is its
titleView
. You can either use a basic string as the title or have a subclass of
UIView
sit in the center of the navigation item. You cannot have both. If it suits the context of a specific view controller to have a custom view (like a button, a slider, an image, or even a map), you would set the
titleView
of the navigation item to that custom view.
Figure 11.15
shows an example of a
UINavigationItem
with a custom view as its
titleView
. Typically, however, a title string is sufficient, and that’s what we’ll do in this chapter.
Let’s add a
UIBarButtonItem
to the
UINavigationBar
. We want this button to sit on the right side of the navigation bar when the
ItemsViewController
is on top of the stack. When tapped, it should add a new
BNRItem
to the list.
A bar button item has a target-action pair that works like
UIControl
’s target-action mechanism: when tapped, it sends the action message to the target. When you set a target-action pair in a XIB file, you Control-drag from a button to its target and then select a method from the list of
IBAction
s. To programmatically set up a target-action pair, you pass the target and the action to the button.
In
ItemsViewController.m
, create a
UIBarButtonItem
instance and give it its target and action.
{
self = [super initWithStyle:UITableViewStyleGrouped];
if (self) {
UINavigationItem *n = [self navigationItem];
[n setTitle:@"Homepwner"];
// Create a new bar button item that will send
// addNewItem: to ItemsViewController
UIBarButtonItem *bbi = [[UIBarButtonItem alloc]
initWithBarButtonSystemItem:UIBarButtonSystemItemAdd
target:self
action:@selector(addNewItem:)];
// Set this bar button item as the right item in the navigationItem
[[self navigationItem] setRightBarButtonItem:bbi];
}
return self;
}
The action is passed as a value of type
SEL
. Recall that the
SEL
data type is a pointer to a selector and that a selector is the entire message name including any colons. Note that
@selector()
doesn’t care about the return type, argument types, or names of arguments. Also, remember that
@selector()
doesn’t check to see if the method actually exists. If you give a
SEL
to a button, that button will send the corresponding message regardless of whether the method is implemented by the target.
Build and run the application. Tap the
+
button, and a new row will appear in the table. (Note that this is not the only way to set up a bar button item; check the documentation for other initialization messages you can send an instance of
UIBarButtonItem
.)
Now let’s add another
UIBarButtonItem
to replace the
Edit
button in the table view header. In
ItemsViewController.m
, edit the
init
method.
{
self = [super initWithStyle:UITableViewStyleGrouped];
if (self) {
UINavigationItem *n = [self navigationItem];
[n setTitle:@"Homepwner"];
// Create a new bar button item that will send
// addNewItem: to ItemsViewController
UIBarButtonItem *bbi = [[UIBarButtonItem alloc]
initWithBarButtonSystemItem:UIBarButtonSystemItemAdd
target:self
action:@selector(addNewItem:)];
// Set this bar button item as the right item in the navigationItem
[[self navigationItem] setRightBarButtonItem:bbi];
[[self navigationItem] setLeftBarButtonItem:[self editButtonItem]];
}
return self;
}
Surprisingly, that’s all the code you need to get an edit button on the navigation bar. Build and run, tap the
Edit
button, and watch the
UITableView
enter editing mode! Where does
editButtonItem
come from?
UIViewController
has an
editButtonItem
property, and when sent
editButtonItem
, the view controller creates a
UIBarButtonItem
with the title
Edit
. Even better, this button comes with a target-action pair: it sends the message
setEditing:animated:
to its
UIViewController
when tapped.
