iOS Programming: The Big Nerd Ranch Guide, 3/e (Big Nerd Ranch Guides) (42 page)
Read iOS Programming: The Big Nerd Ranch Guide, 3/e (Big Nerd Ranch Guides) Online
Authors: Aaron Hillegass,Joe Conway
Tags: #COM051370, #Big Nerd Ranch Guides, #iPhone / iPad Programming

It’s important to ensure there are no bad connections in a XIB file. A bad connection typically happens when you change the name of an instance variable but do not update the connection in the XIB file. Or, you completely remove an instance variable but do not remove it from the XIB file. Either way, a bad connection will cause your application to crash when the XIB file is loaded.
When you make a connection, the XIB file is supplying data at runtime to a view controller. The view controller then uses this data in its existing methods to form the connection. For example, the
nameField
connection is set with the following code:
The
setValue:forKey:
method will search the receiver (
self
) for an instance variable named
nameField
. If it can’t find such a variable, an unknown key exception is thrown.
To see the runtime error generated by a bad connection, create a new temporary outlet for
DetailViewController
and connect it. Then, delete the instance variable but do not disconnect that outlet in
DetailViewController.xib
. Build and run, create and tap on a row, and then check the console as your application crashes and burns. The exception will look something like this:
[
this class is not key value coding-compliant for the key nameField.'
Return to the XIB and disconnect the bad outlet.
Now let’s make more connections. For each of the
UITextField
s in the XIB file, connect the
delegate
property to the
File's Owner
. (Remember, Control-drag from the
UITextField
to the
File's Owner
and select
delegate
from the list.)
Next, let’s consider the
DetailViewController
’s
view
. Right now, it has a plain white background. Let’s give it the same background as the
UITableView
. Recall that a view controller’s
view
is not created until the view controller loads it the first time, so the code to perform extra setup on the
view
should be in
viewDidLoad
. Override this method in
DetailViewController.m
.
{
[super viewDidLoad];
[[self view] setBackgroundColor:[UIColor groupTableViewBackgroundColor]];
}
Now that this project has a good number of source files, you will be switching between them fairly regularly. One way to speed up switching between commonly accessed files is to use
Xcode
tabs. If you double-click on a file in the project navigator, the file will open in a new tab. You can also open up a blank tab with the shortcut Command-T. The keyboard shortcuts for cycling through tabs are Command-Shift-} and Command-Shift-{. (You can see the other shortcuts for project organization by selecting the
General
tab from
Xcode
’s preferences.)
Now you have a navigation controller and two view controller subclasses. Time to put the pieces together. The user should be able to tap a row in
ItemsViewController
’s table view and have the
DetailViewController
’s view slide onto the screen and display the properties of the selected
BNRItem
instance.
Of course, you need to create an instance of
DetailViewController
. Where should this object be created? Think back to previous exercises where you instantiated all of your controllers in the method
application:didFinishLaunchingWithOptions:
. For example, in the
Chapter 7
chapter, you created both view controllers and immediately added them to tab bar controller’s
viewControllers
array.
However, when using a
UINavigationController
, you cannot simply store all of the possible view controllers in its stack. The
viewControllers
array of a navigation controller is dynamic – you start with a root view controller and add view controllers depending on user input. Therefore, some object other than the navigation controller needs to create the instance of
DetailViewController
and be responsible for adding it to the stack.
This object must meet two requirements: it needs to know when to push
DetailViewController
onto the stack, and it needs a pointer to the navigation controller to send the navigation controller messages, namely,
pushViewController:animated:
.
ItemsViewController
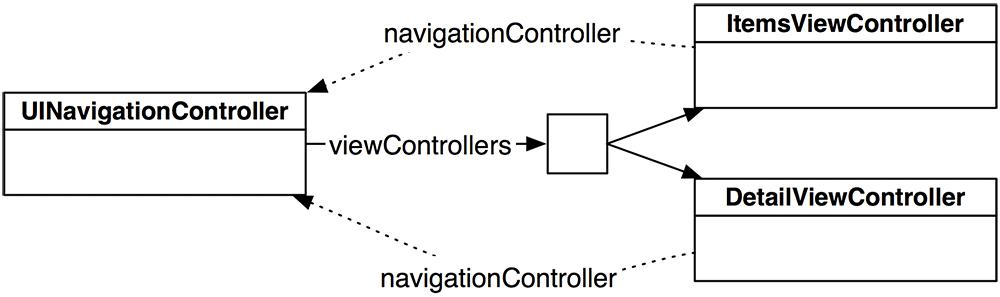
fills both requirements. First, it knows when a row is tapped in a table view because, as the table view’s delegate, it receives the message
tableView:didSelectRowAtIndexPath:
when this event occurs. Second, any view controller in a navigation controller’s stack can get a pointer to that navigation controller by sending itself the message
navigationController
(
Figure 11.12
). As the root view controller,
ItemsViewController
is always in the navigation controller’s stack and thus can always access it.
Figure 11.12 navigationController property
Therefore,
ItemsViewController
will be responsible for creating the instance of
DetailViewController
and adding it to the stack. At the top of
ItemsViewController.h
, import the header file for
DetailViewController
.
@interface ItemsViewController : UITableViewController
When a row is tapped, its delegate is sent
tableView:didSelectRowAtIndexPath:
, which contains the index path of the selected row. In
ItemsViewController.m
, implement this method to create a
DetailViewController
and then push it on top of the navigation controller’s stack.
- (void)tableView:(UITableView *)aTableView
didSelectRowAtIndexPath:(NSIndexPath *)indexPath
{
DetailViewController *detailViewController = [[DetailViewController alloc] init];
// Push it onto the top of the navigation controller's stack
[[self navigationController] pushViewController:detailViewController
animated:YES];
}
Build and run the application. Create a new item and select that row from the
UITableView
. Not only are you taken to
DetailViewController
’s
view
, but you also get a free animation and a button in the
UINavigationBar
titled
Back
. Tap this button to get back to
ItemsViewController
.
Since the
UINavigationController
’s stack is an array, it will take ownership of any view controller added to it. Thus, the
DetailViewController
is owned only by the
UINavigationController
after
tableView:didSelectRowAtIndexPath:
finishes. When the stack is popped, the
DetailViewController
is destroyed. The next time a row is tapped, a new instance of
DetailViewController
is created.
Having a view controller push the next view controller is a common pattern. The root view controller typically creates the next view controller, and the next view controller creates the one after that, and so on. Some applications may have view controllers that can push different view controllers depending on user input. For example, the
Photos
pushes a video view controller or an image view controller onto the navigation stack depending on what type of media was selected.
(The iPad-only class
UISplitViewController
calls for a different pattern. The iPad’s larger screen size allows two view controllers in a drill-down interface to appear on screen simultaneously instead of being pushed onto the same stack. You’ll learn more about
UISplitViewController
in
Chapter 26
.)
Of course, the
UITextField
s on the screen are currently empty. To fill these fields, you need a way to pass the selected
BNRItem
from the
ItemsViewController
to the
DetailViewController
.
To pull this off, you will give
DetailViewController
a property to hold a
BNRItem
. When a row is tapped,
ItemsViewController
will give the corresponding
BNRItem
to the instance of
DetailViewController
that is being pushed onto the stack. The
DetailViewController
will populate its text fields with the properties of that
BNRItem
. Editing the text in the
UITextField
s on
DetailViewController
’s
view
will change the properties of that
BNRItem
.
In
DetailViewController.h
, add this property. Also, at the top of this file, forward declare
BNRItem
.
@class BNRItem;
@interface DetailViewController : UIViewController
{
__weak IBOutlet UITextField *nameField;
__weak IBOutlet UITextField *serialNumberField;
__weak IBOutlet UITextField *valueField;
__weak IBOutlet UILabel *dateLabel;
}
@property (nonatomic, strong) BNRItem *item;
@end
In
DetailViewController.m
, synthesize the accessors for
item
and import
BNRItem
’s header file.
@implementation DetailViewController
@synthesize item;
When the
DetailViewController
’s
view
appears on the screen, it needs to setup its subviews to show the properties of the
item
. In
DetailViewController.m
, override
viewWillAppear:
to transfer the
item
’s properties to the various
UITextField
s.
{
[super viewWillAppear:animated];
[nameField setText:[item itemName]];
[serialNumberField setText:[item serialNumber]];
[valueField setText:[NSString stringWithFormat:@"%d", [item valueInDollars]]];
// Create a NSDateFormatter that will turn a date into a simple date string
NSDateFormatter *dateFormatter = [[NSDateFormatter alloc] init];
[dateFormatter setDateStyle:NSDateFormatterMediumStyle];
[dateFormatter setTimeStyle:NSDateFormatterNoStyle];
// Use filtered NSDate object to set dateLabel contents
[dateLabel setText:[dateFormatter stringFromDate:[item dateCreated]]];
}
In
ItemsViewController.m
, add the following code to
tableView:didSelectRowAtIndexPath:
so that
DetailViewController
has its
item
before
viewWillAppear:
gets called.
didSelectRowAtIndexPath:(NSIndexPath *)indexPath
{
DetailViewController *detailViewController = [[DetailViewController alloc] init];
NSArray *items = [[BNRItemStore sharedStore] allItems];
BNRItem *selectedItem = [items objectAtIndex:[indexPath row]];
// Give detail view controller a pointer to the item object in row
[detailViewController setItem:selectedItem];
[[self navigationController] pushViewController:detailViewController
animated:YES];
}
Many programmers new to iOS struggle with how data is passed between
UIViewController
s. Having all of the data in the root view controller and passing subsets of that data to the next
UIViewController
(like you just did) is a clean and efficient way of performing this task.
Build and run your application. Create a new item and select that row in the
UITableView
. The view that appears will contain the information for the selected
BNRItem
. While you can edit this data, the
UITableView
won’t reflect those changes when you return to it. To fix this problem, you need to implement code to update the properties of the
BNRItem
being edited. In the next section, we’ll see when to do this.
Whenever a
UINavigationController
is about to swap views, it sends out two messages:
viewWillDisappear:
and
viewWillAppear:
. The
UIViewController
that is about to be popped off the stack is sent the message
viewWillDisappear:
. The
UIViewController
that will then be on top of the stack is sent
viewWillAppear:
.
When a
DetailViewController
is popped off the stack, you will set the properties of its
item
to the contents of the
UITextField
s. When implementing these methods for views appearing and disappearing, it is important to call the superclass’s implementation – it has some work to do as well. In
DetailViewController.m
, implement
viewWillDisappear:
.
{
[super viewWillDisappear:animated];
// Clear first responder
[[self view] endEditing:YES];
// "Save" changes to item
[item setItemName:[nameField text]];
[item setSerialNumber:[serialNumberField text]];
[item setValueInDollars:[[valueField text] intValue]];
}
Notice the use of
endEditing:
. When the message
endEditing:
is sent to a view, if it or any of its subviews is currently the first responder, it will resign its first responder status, and the keyboard will be dismissed. (The argument passed determines whether the first responder should be forced into retirement. Some first responders might refuse to resign, and passing
YES
ignores that refusal.)
Now the values of the
BNRItem
will be updated when the user taps the
Back
button on the
UINavigationBar
. When
ItemsViewController
appears back on the screen, it is sent the message
viewWillAppear:
. Take this opportunity to reload the
UITableView
so the user can immediately see the changes. In
ItemsViewController.m
, override
viewWillAppear:
.
{
[super viewWillAppear:animated];
[[self tableView] reloadData];
}
Build and run your application now. Now you can move back and forth between the
UIViewController
s you created and change the data with ease.